Create a connection
Learn how to connect to your user's account with connections.
This guide explains how to create a new connection and generate access tokens to make authenticated calls to the Data API.
It walks through the process of:
- generating an auth link to take the user through the auth journey
- handling the user's redirection back to your app after they've authorised with their bank
- making an authenticated API call to access the user's data
Connection authorisation lifecycle
There is no endpoint you can use to check the status of an existing connection, but this diagram shows the lifecycle and statuses that a connection moves through.
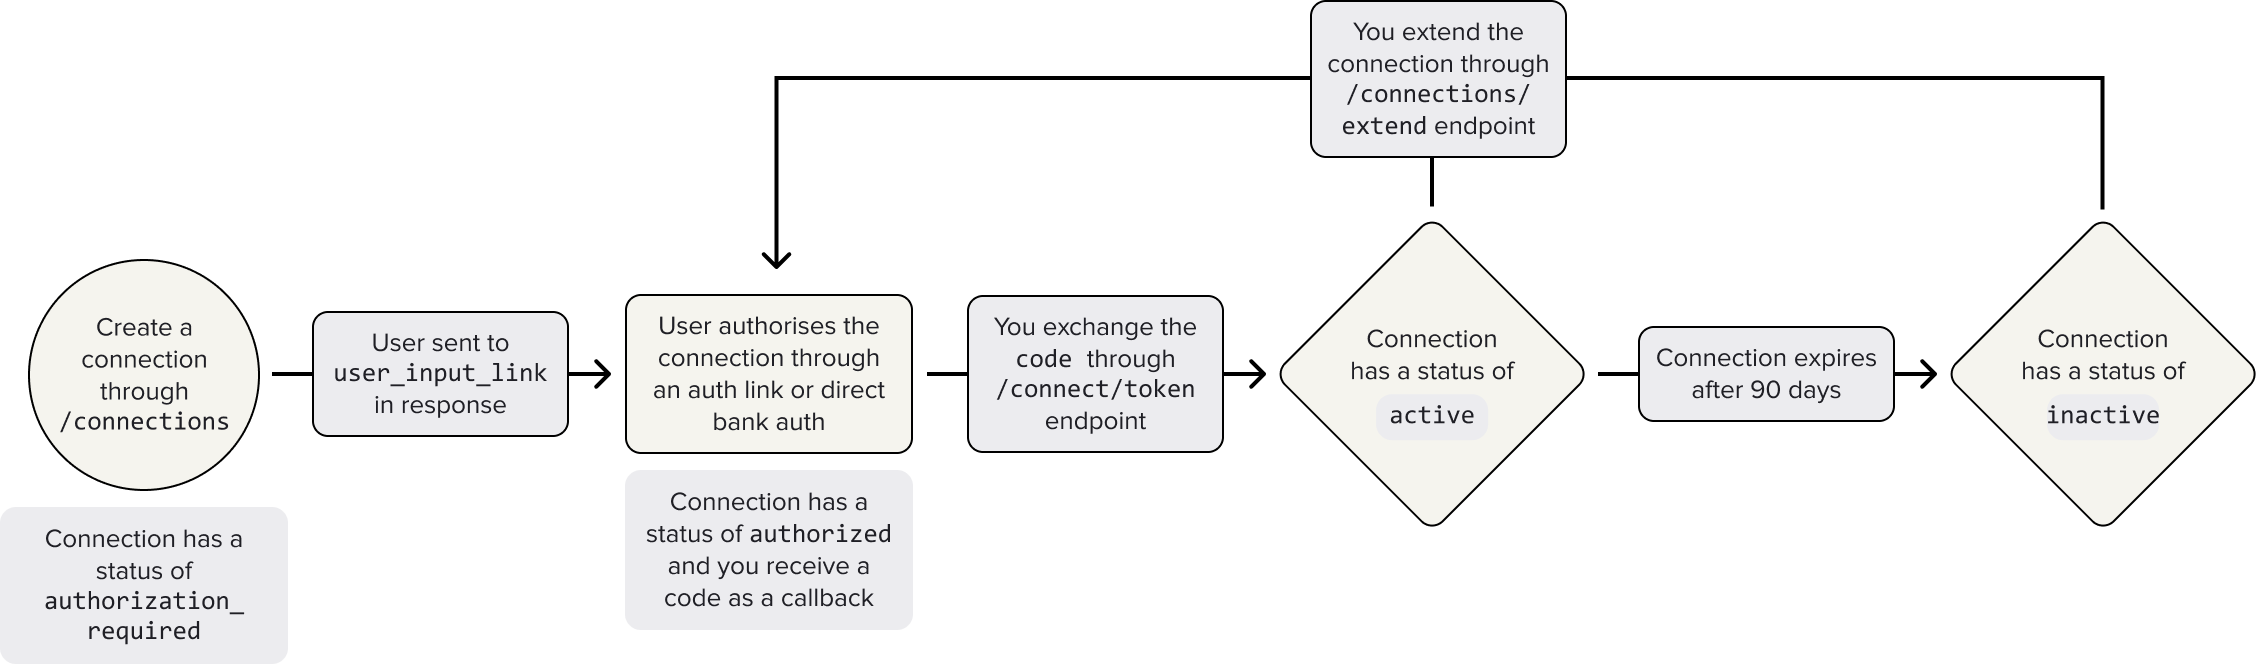
The lifecycle of a connection
A connection can have four statuses: authorization_required, authorized, active, and inactive. This is the flow of a connection through these statuses:
- You receive the user's consent for you to access their financial data.
The connection now has theauthorization_requiredstatus. - The user authorises the connection with their banking provider.
The connection now has theauthorizedstatus and you receive acodeas a callback. - You
exchangethe code for anaccess_token. If the connection has theoffline_accessscope, you can exchange this for arefresh_token.
The connection now has theactivestatus, and remains active until 90 days have passed since the connection was created. - Optionally, you can extend the connection by making a POST request to the
/connections/extendendpoint, if the user gives consent. You can do this during the 90 days it's active, or after it becomes inactive after 90 days. - If don't extend the connection it enters the
inactivestatus after 90 days. This means you can't retrieve data for the user.
However, you can optionally extend the connection with a request to the/connections/extendendpoint if the user reconfirms consent. You can do this while the connection is stillactive, or after it becomesinactive.
Open banking regulations mean that a user's consent to grant access to their financial data can last a maximum of 90 days, after which the connection expires. You can check when a connection will expire with the /data/v1/me endpoint.
Auth link and auth dialog
An auth link is a URL you provide to your user to start the authorisation process. When a user clicks on your auth link, they'll be taken to our auth dialog, where they can give consent to connect their bank account via TrueLayer. Your auth link is specific to your integration.
The auth dialog is the UI that guides users through the process of consenting to share their banking data. It's simple to integrate, works on all modern browsers and devices, and is compliant with government policies including FCA, GDPR, and PSD2 in the UK and CDR in Australia.
You can generate an auth link in the Console's auth link builder.
Once a user successfully authenticates with their bank, they'll be redirected back to the redirect_uri URL you specified in your auth link. This redirect link will contain a code in the URL parameters.
Tip for first-timers
Use the default redirect link (https://console.truelayer.com/redirect-page) to begin with. It will render the code nicely in the browser so you can quickly generate an access token. Implement your own redirect URL once you've generated an access token and have everything working end-to-end.
Exchanging a code for an access token
Once a code is obtained, it can be exchanged for a short-lived access_token.
curl -X POST \
    -d grant_type=authorization_code \
    -d client_id=${client_id} \
    -d client_secret=${client_secret} \
    -d redirect_uri=${redirect_uri} \
    -d code=${code} \
    https://auth.truelayer.com/connect/token
{
  "access_token": "JWT-ACCESS-TOKEN-HERE",
  "expires_in": "JWT-EXPIRY-TIME",
  "token_type": "Bearer",
  "refresh_token": "REFRESH-TOKEN-HERE"
}
invalid_grant
If you try to exchange a code that is not active, you receive an
invalid_granterror.The most common specific reasons that this error occurs are:
- Over 5 minutes have elapsed since the code was generated
- The code has already been successfully exchanged for an
access_tokenTo fix this, you will need to generate a new code.
Make an authenticated call to Data API
You can use this access_token to make an authenticated call to the Data API. The example below lists all the accounts a user has chosen to share with you.
curl -H "Authorization: Bearer ${access_token}" \
  https://api.truelayer.com/data/v1/accounts
Optional: Renew an access token with a refresh token
| Country | offline_access connection lifetime | No offline_access connection lifetime |
|---|---|---|
| United Kingdom Australia | 90† days 365 days | 60 minutes 24 hours |
Your access_token will expire after 1 hour. After that, depending on the scopes you have enabled, you may be able to request a new access_token using a refresh_token.
One-time access vs long-lived access
You'll only be able to renew access tokens that have the
offline_accessscope enabled. This scope instructs TrueLayer to create a long-lived credential with the bank. Without this scope, you'll only have access to data for an hour.
If you've enabled the offline_access scope, there will be a refresh_token in the response alongside the access_token. As long as you use it at least once within the first 30 days after you receive it, you can use the refresh_token to renew the access_token as many times as you want for up to 90 days.
curl -X POST \
    -d grant_type=refresh_token \
    -d client_id=${client_id} \
    -d client_secret=${client_secret} \
    -d refresh_token=${refresh_token} \
    https://auth.truelayer.com/connect/token
{
  "access_token": "JWT-ACCESS-TOKEN-HERE",
  "expires_in": "JWT-EXPIRY-TIME",
  "token_type": "Bearer",
  "refresh_token": "REFRESH-TOKEN-HERE"
}
Updated 25 days ago