✅ Bank on file integration checklist
Every step you need to take to set up a variable recurring payments integration.
This is an overview of the steps required to integrate bank on file. This experience enables you to make recurring through a mandate. Each step also contains links to more detailed documentation.
Use this page to check you’ve achieved everything needed for your integration.
Introduction
This checklist focuses on recurring payments made through a mandate. This type of payment is useful when you user needs to make regular unattended payments to you that don't need authorisation: for example, for subscriptions or automated billing.
VRPs are only available in the UK.
A VRP has two parts:
- A mandate, which is the maximum limits and frequency of allowed payments, authorised by the user.
- The payments made over the mandate, which must fit the constraints defined.
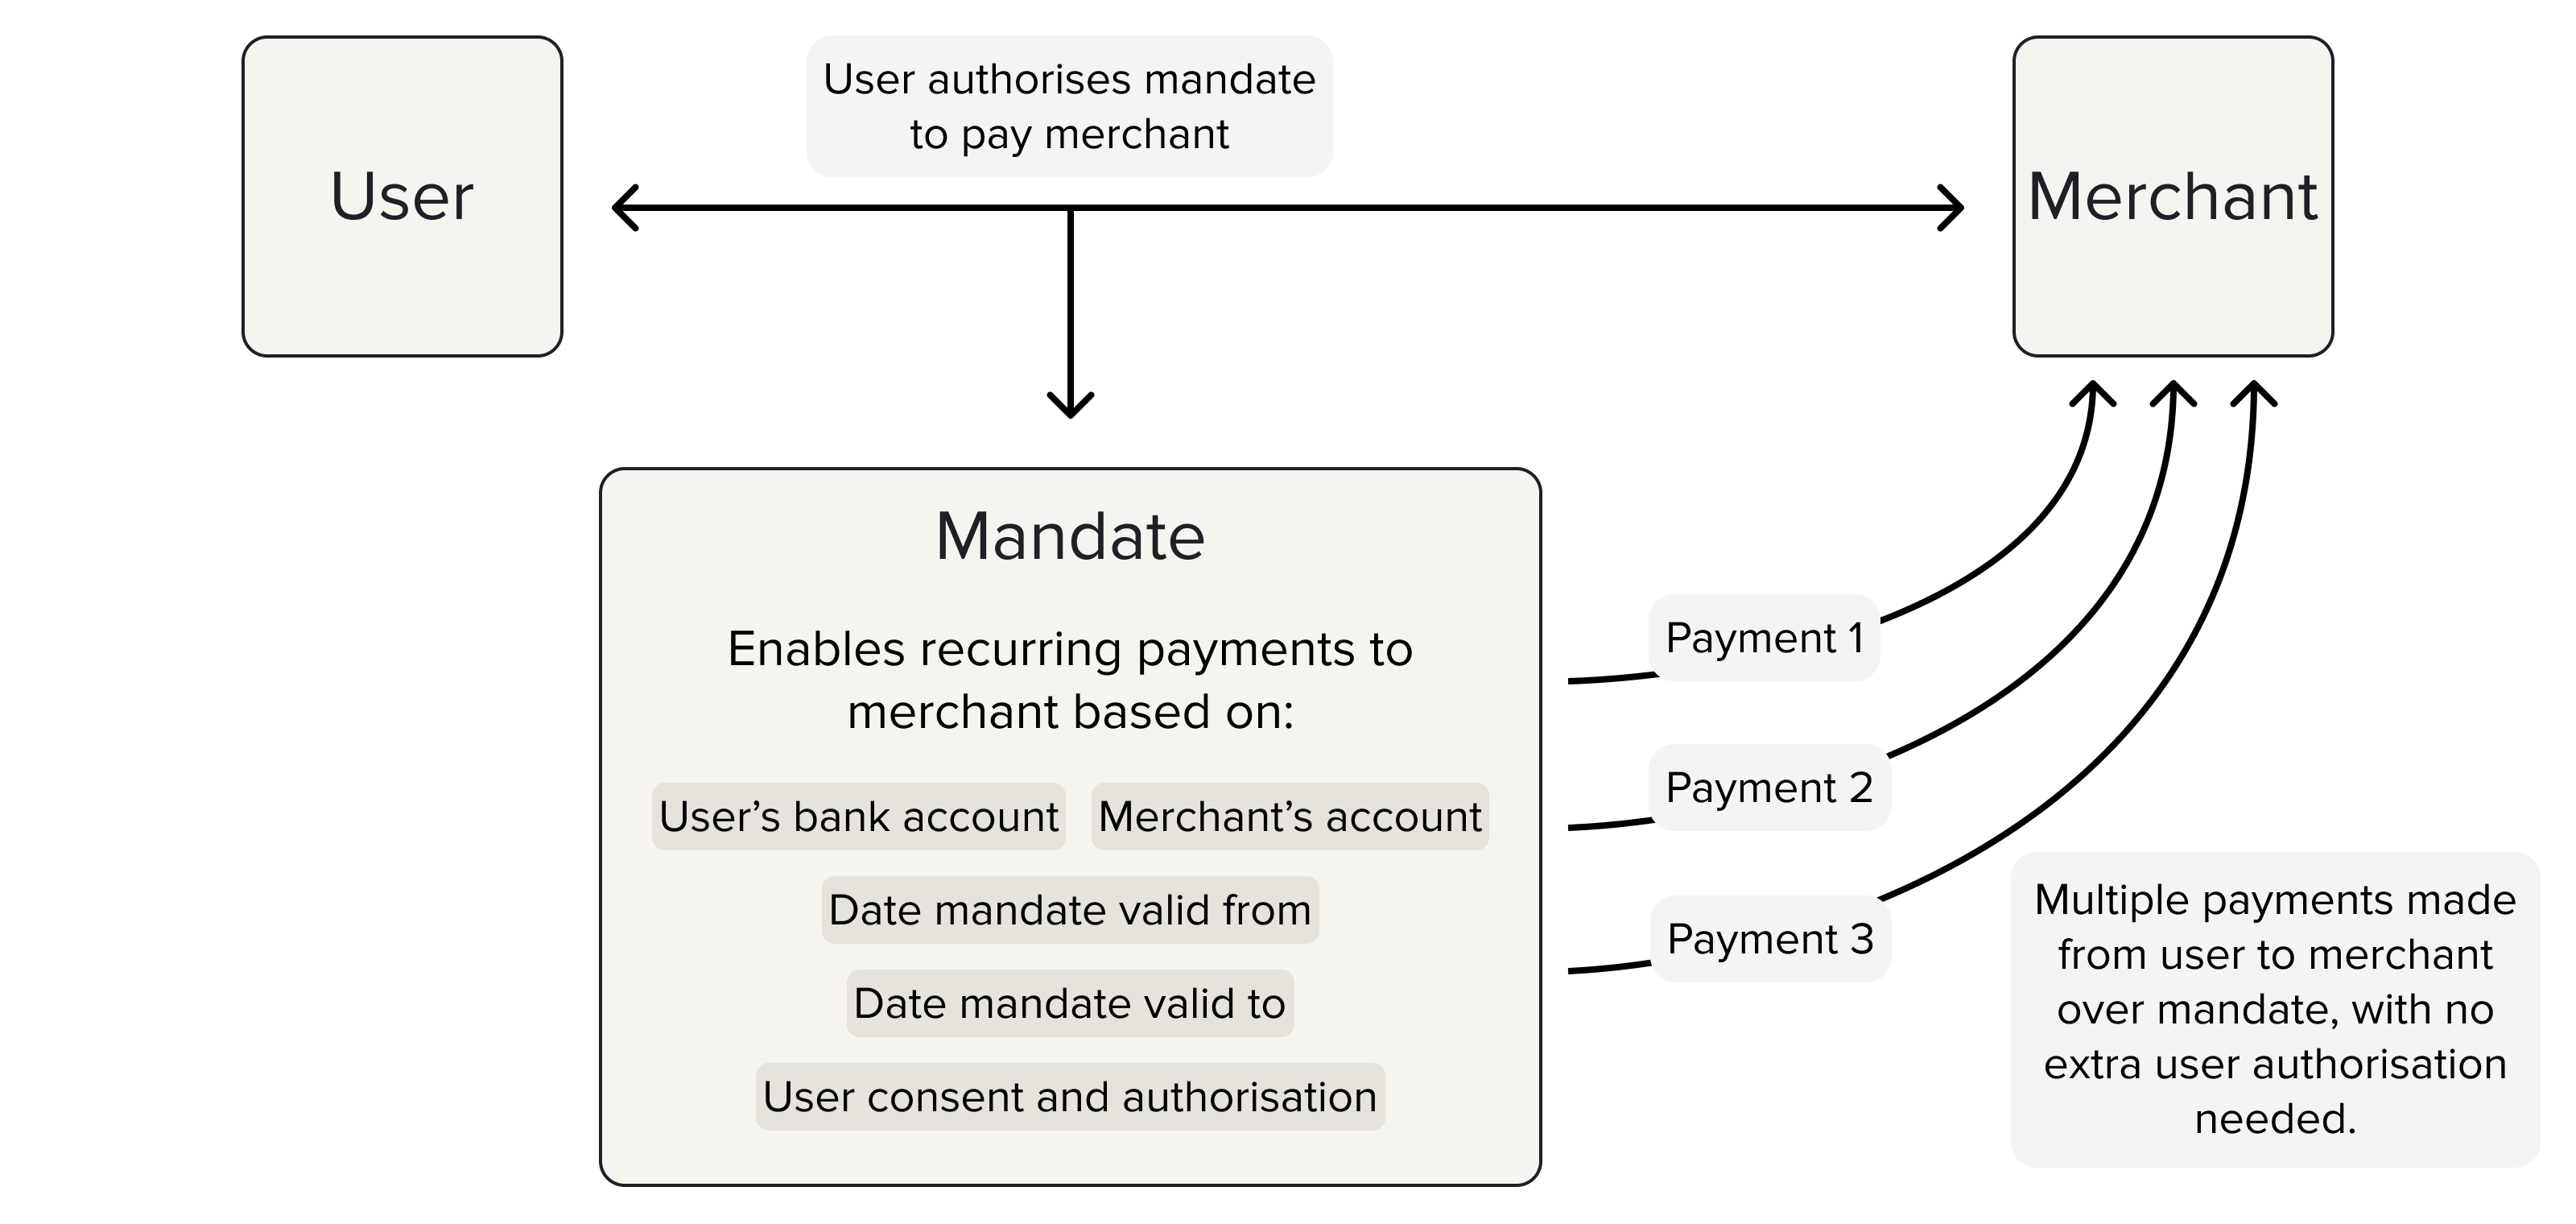
After a user authorises a mandate, you can accept multiple payments from them with no further authorisation needed.

After a user authorises a mandate, you can accept multiple payments from them with no further authorisation needed.
There are three different types of mandate: sweeping, commercial, or direct debit.
The Payments API v3 refers to the agreement between a user and a merchant for VRPs to be taken from their account as a mandate. Other organisations in the Open Banking industry sometimes refer to mandates as a consent. The two terms are interchangeable, but our API refers to this concept as mandates.
Sweeping
Sweeping VRPs are payments between a customer's accounts, as defined by the CMA.
For example, moving money between current accounts, paying off credit card debt, or moving money to savings.
Commercial
Commercial that don't fall within the scope of sweeping as defined by the CMA. This includes applications such as e-commerce payments, subscriptions to a variable service, or investments.
You could use commercial VRPs to set up a one-click checkout where a user provides a mandate to create a series of payments to the same merchant.
Contact us if you're interested in using commercial VRPs. Approvals to go live with commercial VRPs can take about 10 weeks.
Direct debit
Direct debits are not a type of VRP, but are also based on mandates created with the /v3/mandates endpoint.
Direct debits are still in beta, but you can contact us to learn more about integrating them.
Overview of integrating VRPs
In general, you can divide the process of receiving a VRP into the following stages:
- Console signup and webhook configuration
- Create and top up your merchant account
- Request authentication
- Mandate configuration and creation
- Mandate authorisation
- Payment on a mandate configuration and creation
- Review and track the payment
Each of these parts are included in the steps outlined on this page.
1. Console signup and webhook configuration
The first step of any integration is to sign up to Console. Learn more about this process and what you can do in Console in our Console quickstart guide.
When you sign up to Console, you create your client credentials and upload your signing keys to secure your API requests. See our guide to generating keys.
On Console, you can upload keys, configure webhook URIs, view and administrate your payments, and more. Learn more about Settings page in Console.
1.1 Upload your public key
Once you’ve signed up to Console, you need to upload your public key. To do this, open the Settings page and click the + icon to the right under the Signing keys heading.
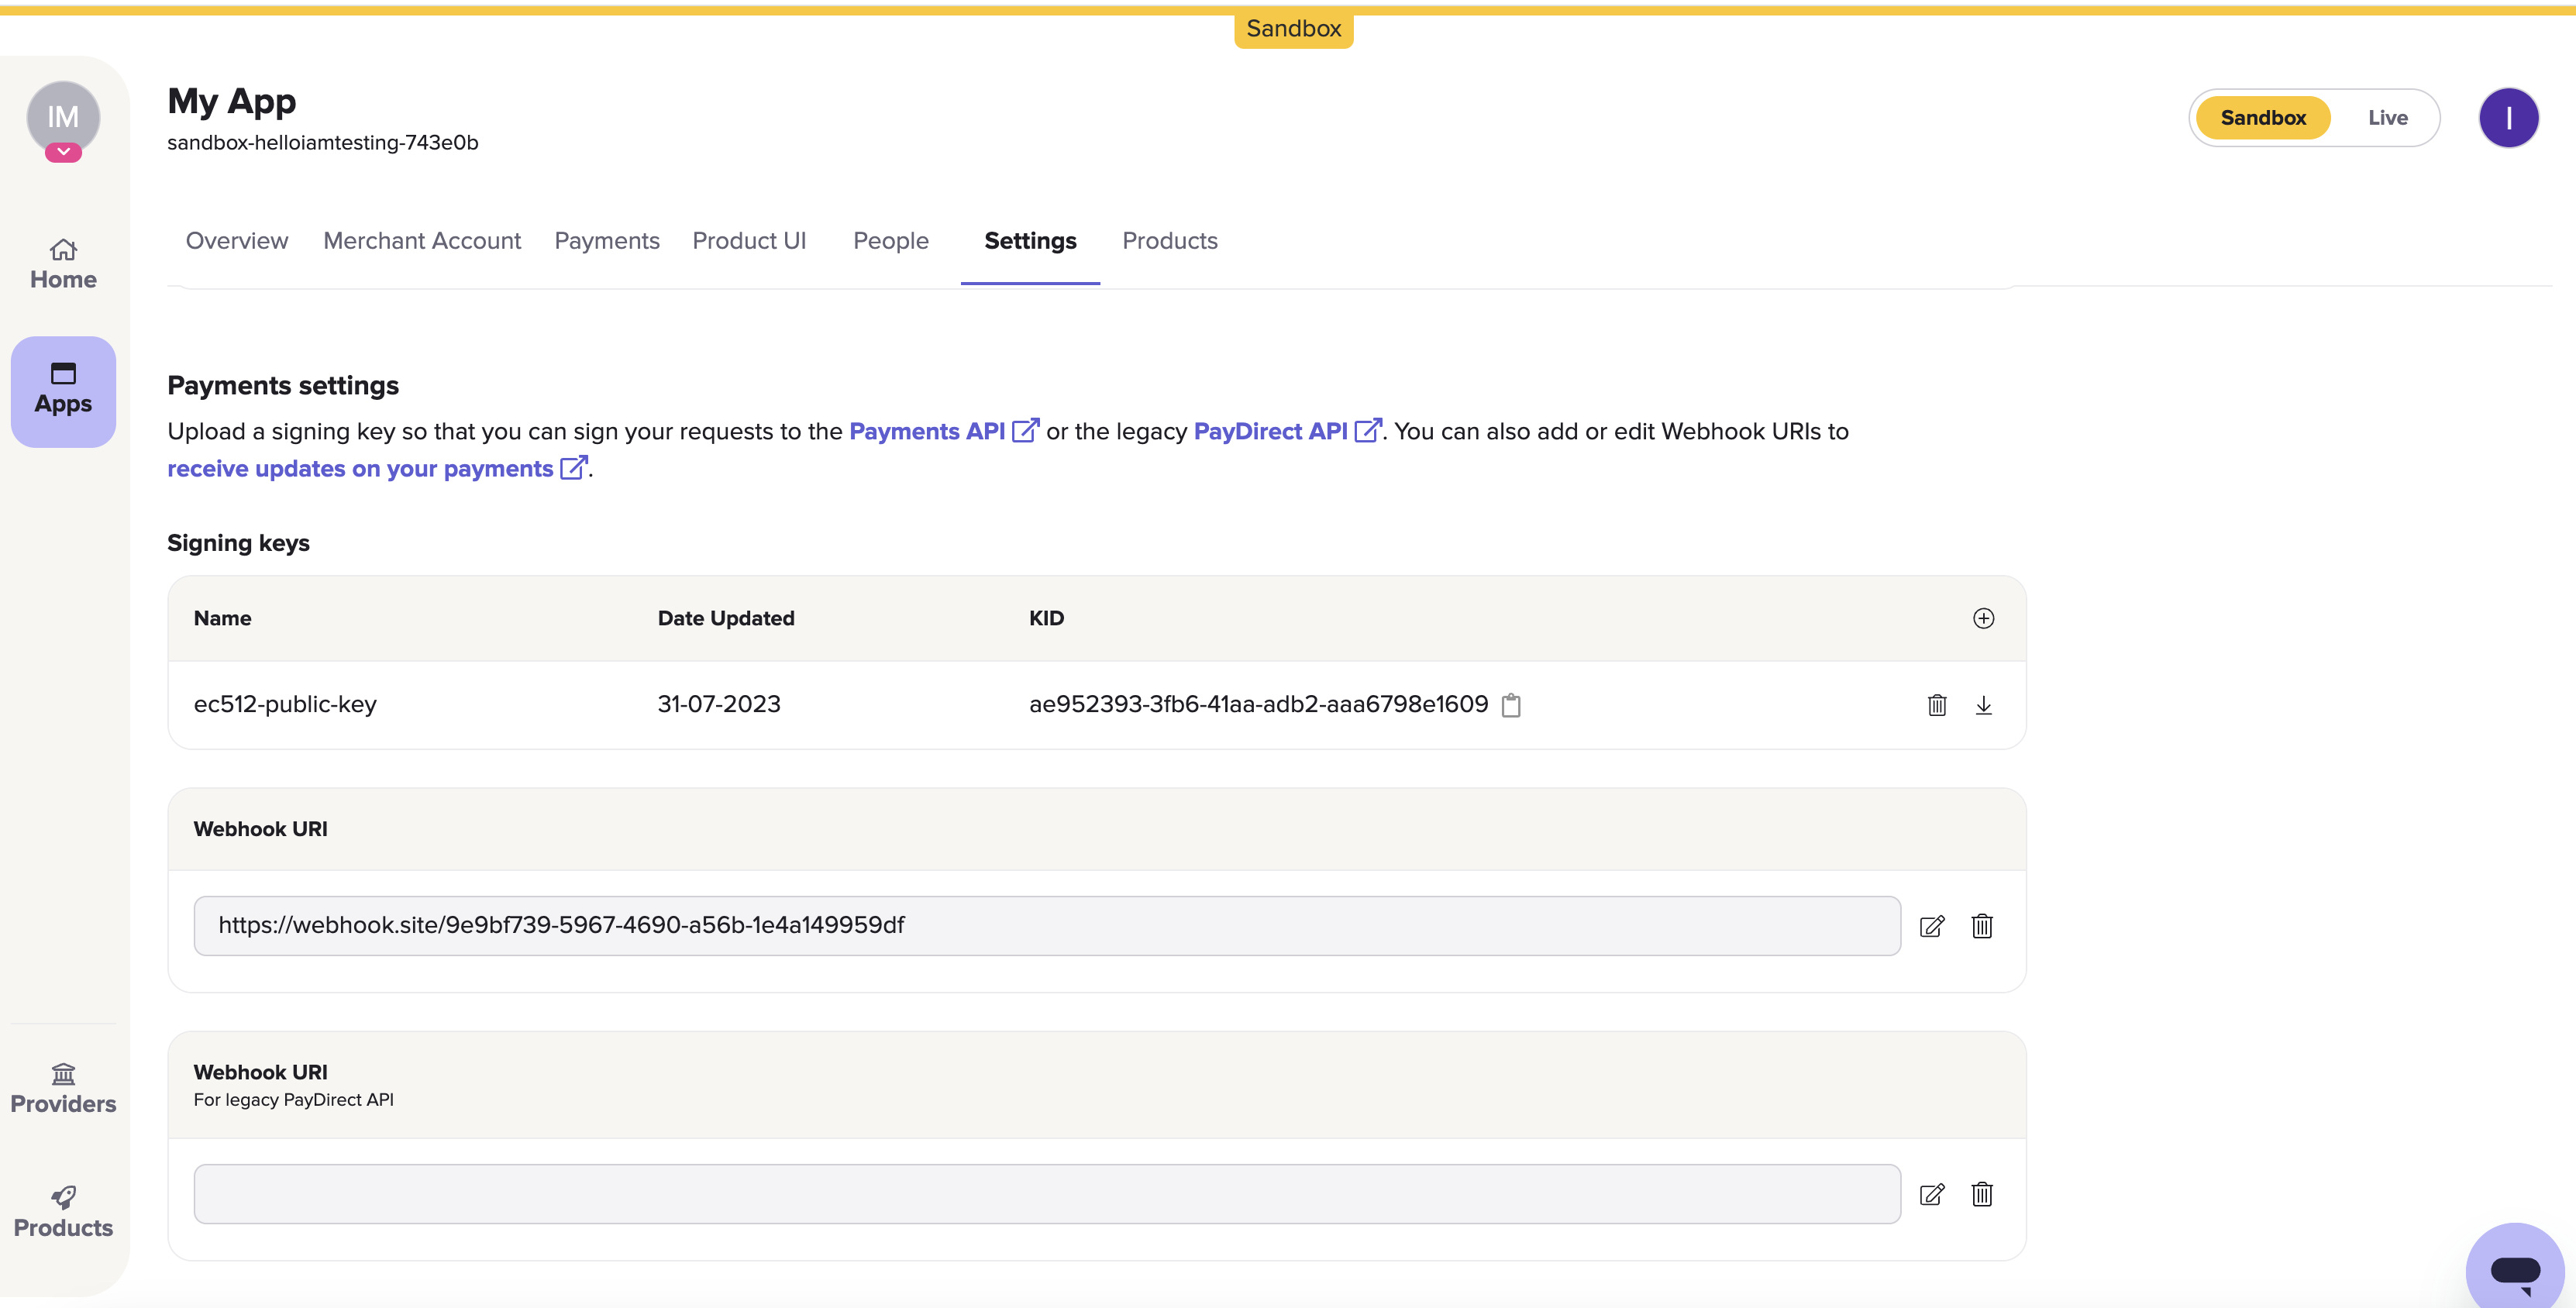
The Payments settings > Signing keys section on the Settings page in Console. Just beneath it is the Webhook URI box.
1.2 Set your webhook URI
On the Settings page, the next box after the Signing keys box is the Webhook URI box. Here, click the edit icon to the right of the box and enter URI where you would like webhooks to be sent.
Webhooks are the recommended way for you to receive updates about anything you do with the TrueLayer API. For example, it can tell you if any VRP mandates, payments, or payouts you make are successful.
Our documentation explains how you can validate your webhook signatures using the public key you uploaded in the last step. You can also test webhooks locally when building your integration.
Learn more about about the possible payment and mandate webhooks you can receive.
2. Create and top up your merchant account
A merchant account is an account that TrueLayer manages on your behalf. This enables a variety of functionalities such as closed-loop payments, name- or age-verification for payments, credit notifications and more. Additionally, you can't make a payout to a user unless you have a merchant account with enough money in it.
When you set up a merchant account, you specify a preferred business account to connect to your merchant account. This business account is what you use to manually top up your merchant account, and can be used to withdraw funds securely too.
Top up your merchant account by making a transfer in from a linked business account or accepting pay-ins from customers.
In sandbox? Skip this stepIf you're testing in the sandbox environment, you can skip straight to section 3.
However, before you go live, you need to complete the following steps.
2.1 Link your business account
When you first create your app in Console, you decide on a client_id. Your client_id is linked to your merchant account. To top up and withdraw funds from your merchant account, you need to link your business account details to your client_id.
To link your business account, contact us with your client_id and the IBAN of your account. If you are allowlisting a UK account, you can supply a sort code and account number (SCAN) instead of an IBAN.
2.2 Top up your merchant account manually
Send funds to your merchant account through a bank transfer.
To find out your merchant account bank details, you can either:
- Navigate to the Merchant Account page in Console, and click the Details tab.
Ensure that you select the correct currency. - Use one of the merchant account endpoints, such as
v3/merchant-accounts, or/v3/merchant-accounts/{id}.
2.3. (Optional) Set up low balance notifications
Optionally, you can set up webhooks that notify you when the balance in your merchant account is low. To do this, contact us and specify a threshold you don't want your merchant account to fall below. This is useful to ensure your account always has enough funds to fulfil customers' payout requests.
Once enabled, you receive the balance_notification webhook for your merchant account. Learn more about this feature and how to set it up.
2.4 Set up withdrawals from your merchant account
Withdraw funds to the business account that you linked earlier.
There are three methods that you can use to do this:
The steps below explain how you can set up these withdrawal methods.
2.4.a Configure sweeping in Console
To set up sweeping in Console:
- Navigate to the Merchant Account page in Console and select your merchant account.
- Select the Merchant Account Sweeping tab.
- Enter an Amount. This is the minimum amount that must be in your merchant account before you are able to sweep money from it.
- Select an Interval of Daily, Weekly, or Fortnightly. This is how often money is moved from your merchant account, provided that you have the minimum amount in it at the time.
Learn how to set up sweeping in Console.
2.4.b Configure sweeping through the API
In order to make any API requests, including to set up sweeping, you must first set up authentication for your requests. This is explained in section 3.
To set up sweeping, make a POST request to the /v3/merchant-accounts/{id}/sweeping endpoint. In your request, ensure that you include:
- Your merchant account
idas a path parameter. - The value above which to sweep funds in a minor denomination for the
max_amount_in_minorparameter. - A value of
daily,weekly, orfortnightlyfor thefrequencyparameter.
To check your existing sweeping settings, or to delete them, make a request to the same endpoint as a GET or DELETE request respectively.
Learn more about setting up sweeping through the API.
2.4.c Make a payout to your business account
You can also withdraw funds from your merchant account by making a payout.
When you create a payout, you must specify a beneficiary. First, you need to specify a beneficiary type. This can be external_account, payment_source, or business_account.
We recommend you use business_account, as you don't need to provide any other information. The payout is sent to the business account you linked in step 2.1.
3. Request authentication
Before you can create mandates or payments, you must be able to authenticate your Payments API requests by including appropriate headers. This ensures that your payments are secure and can be sent or retried without issues.
3.1 Sign your requests
Request signing requires a key pair (one public, one private). Any payment requests made to your merchant account are verified against your public key hosted in Console. Generate a private key using this guide.
As only you have the private key that matches your public key, only you can create payments through your integration.
TrueLayer offers and maintains a variety of libraries to help you sign your requests. These are available here on Github.
3.2 Include an idempotency key
Put generally, idempotency with an API is the ability to repeat the same request multiple times without the API considering each request to be a new request.
It’s important that you generate and include an idempotency key with your payments requests to minimise the risk of a payment being created multiple times by accident. You this by including a UUID in the Idempotency-Key header for your requests. Learn more about how to use this header.
3.3 Generate an access_token
access_tokenEach payment you create requires a valid access_token. You can use the same access_token for multiple payments. Each access_token is valid for 60 minutes after generation.
To generate an access token, use the /connect/token endpoint. Provide your client_id and client_secret, as well as the scopes for the payment.
The scopes determine what types of action the access_token can be used for. For a bank on file integration, you must include the payments scope, and recurring_payments:sweeping only if you are configuring a sweeping mandate. (Sweeping typically refers to use cases where users move money between their own accounts.)
Learn more about how to configure and generate a payment access token.
4. Mandate configuration and creation
Before you can create a VRP on a mandate, you need to create the mandate and define its constraints.
To create a mandate, send a POST request to the /v3/mandates endpoint with the details of the mandate.
The exact details you need to include depend on your integration. In this example, we’ll assume that the mandate is:
- For a sweeping use case.
- To make payments to an external account.
- Valid between 30 July 2024 to 30 July 2025.
- For a maximum individual payment value of £50.
- For a total payment value of £100 per day and £1,000 per month.
The interactive window and expandable code block below contain the JSON body for this example.
Expand to access the request above as plain text
POST /v3/mandates HTTP/1.1
Content-Type: application/json
Idempotency-Key: {UUID}
Tl-Signature: {SIGNATURE}
Authorization: Bearer {ACCESS TOKEN}
Host: api.truelayer-sandbox.com

{
    "mandate": {
        "type": "sweeping",
        "provider_selection": {
            "type": "user_selected",
            "filter": {
                "release_channel": "general_availability"
            }
        },
        "beneficiary": {
            "type": "merchant_account",
            "merchant_account_id": "200552da-13da-43c5-a9ba-04ee1502ac57",
            "account_holder_name": "Company "
        }
    },
    "currency": "GBP",
    "user": {
        "id": "8769623a-156e-4918-a67a-0998f05560fd",
        "name": "Test",
        "email": "[email protected]",
        "phone": "+441234567890"
    },
    "constraints": {
        "valid_from": "2024-07-22T15:49:47.831Z",
        "valid_to": "2025-01-01T00:00:00.000Z",
        "maximum_individual_amount": 5000,
        "periodic_limits": {
            "day": {
                "maximum_amount": 10000,
                "period_alignment": "calendar"
            },
            "month": {
                "maximum_amount": 1000000,
                "period_alignment": "calendar"
            }
        }
    }
}
curl --request POST \
--url https://api.truelayer-sandbox.com/v3/mandates \
--header 'Content-Type: application/json' \
--header 'Idempotency-Key: <UUID>' \
--header 'Tl-Signature: <SIGNATURE>' \
--header 'Authorization: Bearer <ACCESS_TOKEN>' \
--data '{
"mandate": {
"type": "commercial",
"use_case": "utilities",
"provider_selection": {
"type": "user_selected",
"filter": {
"countries": ["GB"],
"release_channel": "general_availability"
}
},
"beneficiary": {
"type": "merchant_account",
"merchant_account_id": "<YOUR_MERCHANT_ACCOUNT_ID>",
"account_holder_name": "Energy Company Ltd"
}
},
"currency": "GBP",
"user": {
"id": "<USER_ID>",
"name": "John Smith",
"email": "[email protected]",
"phone": "+441234567890"
},
"constraints": {
"valid_from": "2026-03-31T00:00:00.000Z",
"valid_to": "2027-03-31T00:00:00.000Z",
"maximum_individual_amount": 50000,
"periodic_limits": {
"month": {
"maximum_amount": 150000,
"period_alignment": "calendar"
}
}
}
}'4.1. Mandate type
This parameter determines what type of mandate your request creates. There are three options:
sweeping: Creates a mandate for the sweeping use case. The user must authorise the mandate with their bank so future payments can be taken without authorisation.commercial: Creates a mandate for the commercial use case. Like with sweeping, the user must authorise the mandate with their bank so future payments can be taken without authorisation.- For
commercialmandates, you must also include ause_caseinside themandateobject. Possibleuse_casevalues are:utilitiesgovernment_paymentsfinancial_servicescharity
- For
direct_debit: Creates a direct debit mandate you can collect payments over direct debit. You need to provide the remitting user's payment details in the mandate creation request.
This feature is in beta, contact us for more information.
In the example mandate creation request, the mandate has a type of sweeping. This means the access_token used must also have the recurring_payments:sweeping scope.
4.2. Provider selection
Your user needs to select the bank they want to make payments on the mandate from. In the provider_selection.type parameter, you can choose from two different types of provider selection: user_selected or preselected.
The example mandate creation request uses the user_selected provider selection method.
4.2.1 user_selected provider selection
user_selected provider selectionIn a user_selected mandate creation request, your user selects the banking provider they want to make payments from a list. This list is determined by the values you specify in the provider_selection.filter parameter. You should use user_selected if this mandate is the first time the user has paid you. If they've already paid you, you could suggest that they create a mandate using their saved payment details by using the preselected method.
4.2.2 preselected provider selection
preselected provider selectionIn a preselected mandate creation request, you provide the provider_id of the banking provider the user wants to make payments from. As you user doesn't have to find their provider in a list, the user flow is quicker and easier, with less screens.
In a preselected request, you don't provide a filter like in a user_selected one. However, there is a remitter parameter you can specify. You should provide the remitter parameter if you can, as it removes the need for your user to select their account if they have multiple with the provider.
We recommend you use the preselected method for any return mandate creation requests, and you can also offer it if the user has previously made a payment to you and your have their preferred provider and remitter details on record.
4.3. Beneficiary bank details
This parameter determines who the payments over the mandate are sent to. In the beneficiary.type parameter, you can choose from two different types of beneficiary: merchant_account or external_account.
The example mandate creation request uses a merchant_account as the beneficiary.
4.3.1 merchant_account beneficiary
merchant_account beneficiaryIf you use merchant_account as the value for the beneficiary.type parameter, the mandate pays your merchant account. This means you provide values for the two following child parameters in beneficiary object:
merchant_account_id: This required parameter should be your merchant accountid. You can get thisidthrough the <a href="https://docs.truelayer.com/reference/list-operating-accounts target="_blank"/v3/merchant-accountsendpoint, or from the Details tab in the merchant account dashboard in Console.account_holder_name: For a payment to a merchant account, this is an optional parameter. This should be the name of the account the user is paying, and displays on their bank statement. If you omit this, the name you specified when you created your merchant account is used.
4.3.2 external_account beneficiary
external_account beneficiaryIf you use external_account as the value for the beneficiary.type parameter, the mandate pays a set of bank details. As mandates are only available these will be to SCANdetails, which means you provide values for two following child parameters in the beneficiary object:
account_holder_name: For a payment to an external account, this is a required parameter. This should be the name of the account the user is paying, and displays on their bank statement.account_identifier: For this parameter, you should usesort_code_account_numberas the value foraccount_identifier.type. You should then provide the sort code and account number you want the user to pay in theaccount_identifier.sort_codeandaccount_identifier.account_numberparameters respectively.
4.4. Mandate currency
In the currency parameter, you can specify the currency payments over the mandate will be made in.
As mandates are currently only available in the UK, you must use the gbp currency for all mandates.
4.5. User information
In the user parameter, you can provide information about the remitter who will make payments over the mandate. This is required for most integrations, unless you are PIS-regulated.
For a mandate, you must specify the user's name and at least one of their email address or phone number. We also recommend that you include their date of birth and address. Including as much information as possible reduces the possibility that we contact you for more information through an RFI.
Learn more about user information in requests with the Payments API v3.
4.6. Mandate constraints
The constraints parameter determines how long a mandate is valid for, and the amount of money that users can pay over it. It contains 4 child fields you must complete:
valid_from: A timestamp of when the mandate is valid from.valid_toA timestamp of when the mandate expires.maximum_individual_amount: The maximum value of an individual payment made on the mandate. This should be in pence, not pounds.periodic_limits: The maximum amount that can be paid in a given period over the mandate, such as a day, week, or month.
To learn more about the exact behaviour of theperiodic_limitsfield, see our mandate creation documentation.
4.7. (Optional) Metadata
You can choose to define metadata for each payment. To do this, provide key-value pairs as part of the metadata parameter. An example where this can be useful if you need a unique ID to manage your mandates
4.8. Mandate creation request and headers
Before you send your mandate creation request, you must ensure your request contains these three headers:
- Your
access_token, generated in step 3.3, included as a bearer header. - An
Idempotency-Keyheader, which should be a UUID. - A
Tl-Signatureheader, which your signing library generates.
If your request includes these headers, you can create a mandate.
4.9. Mandate creation response
When you make a successful mandate creation request, you receive a response that contains the mandate id, a user id, a resource_token, and the payment status:
{
    "id": "e98927aa-6d67-43ee-973a-4666bfa68cc7",
    "user": {
        "id": "bb003a78-f037-47db-827e-44c6bff911e3"
    },
    "resource_token": "eyJhbGciOiJSUzUxMiIsImtpZCI6IkRCejExcEFuUGNXVndqaFBNWERuckNyQ0ZrT1p0Y2FqYWtjU21GNmJiVk0iLCJ0eXAiOiJKV1QifQ.eyJhdWQiOiJodHRwczovL2FwaS50cnVlbGF5ZXItc2FuZGJveC5jb20iLCJpc3MiOiJodHRwczovL2FwaS50cnVlbGF5ZXItc2FuZGJveC5jb20vcGF5bWVudHMtZ2F0ZXdheSIsImV4cCI6MTcyMTc1NDM2MiwiaWF0IjoxNzIxNzUzNDYyLCJuYmYiOjE3MjE3NTM0NjIsInNjb3BlIjoibWFuZGF0ZSIsImNsaWVudF9pZCI6InNhbmRib3gtdG9tdGVzdC1hNGQ0MzIiLCJqdGkiOiJlOTg5MjdhYS02ZDY3LTQzZWUtOTczYS00NjY2YmZhNjhjYzcifQ.qIN_n1_FA86sL2YicUMpt3tiBRHOuCcl7DVRbWaGZqc7BG0eSGYZ1PRl_xJo5w-YokdXGL5DPtCc3l7L20HYsH6SVj68imPZ2Q3mURmj263k1fetiMzK6X_dHFOh1LtwS1vpfkGr7ievUBGXjfcFOsGvJ59csTpm1mRSQxwAqv8_kC54GLEFEsmzhHudYjVF3A3hQMxw8V-_57zEEdMrEnalkYtd9-Hz_9GB5zFo1_gk_Q5pPjF5C2nfeVD8q5r0b7zSGqxbyWECjKC7rnBpdpBayXAebwSplw9KN9ROkN0ZPkpF1MAHF5T0emAF3NlsGbm-f8MSNfzXAob_Lff1ZQ",
    "status": "authorization_required"
}
5. Mandate authorisation
Once you’ve created your mandate, your user needs to authorise the mandate with their bank. This means that payments (that meet the constraints you defined) can be taken from their account without further authorisation.
We recommend you use one of TrueLayer's authorisation user interfaces to handle mandate authorisation. These user interfaces are either embedded or hosted. Learn more about our user interfaces, and which one might be best for your integration .
5.1. TrueLayer UIs
TrueLayer’s embedded UIs include the iOS SDK, Android SDK and React Native SDK for mobile. The Web SDK doesn't support mandates yet.
TrueLayer’s hosted UI is the hosted page (HPP). The hosted page requires less integration as you redirect your user to a website or webview where they complete authorisation.
The payment authorisation flow that your user experiences changes based on how you configured the payment to be authorised.
Expand to access an overview of how to integrate the hosted page
1. Generate a hosted page link
When you create a payment, you get a payment id and resource_token in the response. You can use these with a redirect URI you’ve set in Console to create a hosted page link.
A hosted page link has the following format, with the values in the braces replaced with the relevant strings. Include -sandbox from the base URL to make a payment in the sandbox environment.
https://payment.truelayer.com/mandates#mandate_id={payment_id}&resource_token={resource_token}&return_uri={return_uri}2. Send your user to the hosted page
When you direct your user to the hosted page link, they’re taken to a UI where they can select a bank and a payment scheme, and consent for the payment to be made.
3. After your user returns from the hosted page
Whether the user successfully makes the payment or not, they are taken to the redirect URI that you provided when you generated the hosted page link.
You should design the redirect URI to provide your user with useful information. For example, whether their payment was successful or failed.
5.2. Test mandate creation and authorisation
Use the mock provider mock-payments-gb-redirect to test mandates in sandbox.
Example mandate creation requests
Below are two example mandates created in the sandbox environment. One is for a user_selected mandate, where the bank selection displays. The other is for a preselected mandate with the remitter object filled in, so the user doesn't have to select a bank or account.
The constraints in both of these examples mean that:
- the mandates are valid between the 1st January 2024 until 1st January 2025
- the maximum value of an individual payment is 50 pence
- the maximum value that can be paid in a given day is 1 GBP
- the maximum value that can be paid in a given month is 10 GBP
{
  "mandate":  {
    "type":  "sweeping",
    "provider_filter":  {
      "countries":  [
        "GB"
      ],
    },
    "provider_selection":  {
      "type":  "user_selected"
    },
    "beneficiary":  {
      "type":  "merchant_account",
      "merchant_account_id":  "200552da-13da-43c5-a9ba-04ee1502ac57",
        "account_holder_name":  "Docs  Test  Merchant  Account"
    }
  },
  "currency":  "GBP",
  "user":  {
    "id":  "7e8711ee-7741-472c-acca-7e99166ffe63",
    "name":  "Docs  Test  User",
    "email":  "[email protected]",
    "phone":  "+441234567890"
  },
  "constraints":  {
    "valid_from":  "2024-02-16T15:53:58.649Z",
    "valid_to":  "2025-01-01T00:00:00.000Z",
    "maximum_individual_amount":  50,
    "periodic_limits":  {
      "day":  {
        "maximum_amount":  100,
        "period_alignment":  "calendar"
      },
      "month":  {
        "maximum_amount":  1000,
        "period_alignment":  "calendar"
      }
    }
  }
}
{
"mandate": {
"type": "sweeping",
"provider_filter": {
"countries": [
"GB"
],
},
"provider_selection": {
"type": "preselected",
"provider_id": "mock-payments-gb-redirect",
"remitter": {
"account_identifier": {
"type": "sort_code_account_number",
"account_number": "12345601",
"sort_code": "500000"
},
"account_holder_name": "Docs Test User"
}
},
"beneficiary": {
"type": "merchant_account",
"merchant_account_id": "200552da-13da-43c5-a9ba-04ee1502ac57",
"account_holder_name": "Docs Test Merchant Account"
}
},
"currency": "GBP",
"user": {
"id": "c0b2aa52-edf0-462c-82f4-fb951a14afa7",
"name": "qwerty",
"email": "[email protected]",
"phone": "+441234567890"
},
"constraints": {
"valid_from": "2024-02-16T16:02:42.323Z",
"valid_to": "2025-01-01T00:00:00.000Z",
"maximum_individual_amount": 50,
"periodic_limits": {
"day": {
"maximum_amount": 100,
"period_alignment": "calendar"
},
"month": {
"maximum_amount": 1000,
"period_alignment": "calendar"
}
}
}
}5.3. Mandate webhooks
Once you've successfully authorised the mandate, you receive the mandate_authorized webhook at the webhook you specified in step 1.2. This is an example of the webhook:
{
  "type": "mandate_authorized",
  "event_version": 1,
  "event_id": "c55a5a99-9108-4f06-be30-e4a45682a129",
  "mandate_id": "e8d7d86d-e580-486c-b2f9-58ecacc92433",
  "authorized_at": "2024-07-24T14:32:02.811Z"
}
6. Payment on a mandate configuration and creation
Now that you've created and authorised a mandate, you can create a payment on it.
Creating a payment on a mandate is very similar to creating a single payment, and the creation requests share several parameters. However, you use the mandate type for the payment_method, instead of the bank_transfer type. This is simpler as you only need to provide the mandate id in your request instead of provider selection and beneficiary details.
To create a payment on a mandate, you send a POST request to the /v3/payments endpoint with the details of the payment.
The exact details you need to include depend on your integration, but primarily, you just need to include the mandate id. In this example, we’ll continue from the example mandate creation in step 4, creating a payment for 50 GBP on the mandate.
The interactive window and expandable code block below contain the JSON body for this example.
Expand to access the request above as plain text
POST /v3/payments HTTP/1.1
Content-Type: application/json
Idempotency-Key: {UUID}
Tl-Signature: {SIGNATURE}
Authorization: Bearer {ACCESS TOKEN}
Host: api.truelayer-sandbox.com

{
		"payment_method": {
				"type": "mandate",
		"mandate_id": "e98927aa-6d67-43ee-973a-4666bfa68cc7"
		},
		"amount_in_minor": 5000,
		"reference": "TestCo-627389402",
		"currency": "GBP"
}To test payments with simplified request signing, we recommend you use our payments Insomnia collection and plugin.
6.1. Payment amount and currency
You specify the payment amount and currency in the amount_in_minor and currency parameters when you create a payment.
The amount_in_minor value must be in the smallest denomination of a currency. This is pence for GBP.
In the example on this page, there's a maximum_individual_amount constraint with a value of 5,000. This means that the largest value of a payment on this mandate is 50 GBP.
The currency parameter must be GBP, as VRPs are currently only supported in the UK.
6.2. The payment_method parameter
payment_method parameterThe payment_method parameter determines whether the payment is made as a single payment or on a mandate, and contains related information.
6.2.1. type parameter
type parameterWhen you create a payment on a mandate, you must use a value of mandate for the type parameter, and provide the mandate id and optionally some other information. The fields and information you provide are explained in the headings below.
The alternative value for the type parameter is bank_transfer, which you use for single payments.
6.2.2. mandate_id parameter
mandate_id parameterThis is the mandate id you received in the response when you created the mandate. The id is also contained in the bodies of each of the mandate-related webhooks you receive.
6.2.3. reference parameter
reference parameterYou only need to provide the payment_method.reference parameter if the mandate's beneficiary is an external_account. In this case, you can use the reference to reconcile the payment on the mandate with the payment sent from a banking provider. To do so, ensure that the reference on the payment matches the end_to_end_reference generated by the banking provider.
If you don't specify a reference, the API automatically generates one for you. Learn more about reconciling payments on mandates to external accounts.
6.2.4. (Optional) retry parameter
retry parameterThis optional parameter is for a feature where payments on a mandate are retried automatically. You need to contact us to enable this feature.
If you have it enabled, you can specify one of two retry logics, and how long to retry payments for.
Learn more about retrying payments on a mandate.
6.3 (Optional) Metadata
You can opt to provide metadata with each payment on a mandate. To do this, provide key-value pairs as part of the metadata parameter. For example, this can be useful if you need a unique ID to reconcile your payments.
6.4 (Optional) Add risk assessment to your payment
TrueLayer sends a payment_creditable webhook that tells you when you can consider a payment complete and credit a user. By default, you receive this webhook when a payment settles. However, you can configure it so you receive it at various other timings, such as a set period after settlement, or a set period after payment creation.
If you set up multiple configurations for the payment_creditable webhook, you can enable them on a per payment basis in the risk_assessment.segment parameter.
Learn more about payment risk and credit notifications.
6.5 Payment creation request and headers
Before you send your payment creation request, you must ensure your request contains these three headers (they're the same as the headers you used when you created the mandate):
- Your
access_token, generated in step 3.3, included as a bearer header. - An
Idempotency-Keyheader, which should be a UUID. - A
Tl-Signatureheader, which your signing library generates.
6.7 Payment on a mandate creation response
When you successfully create a payment on a mandate, you receive a response that contains the payment id, a user id, a resource_token, and the payment status:
{
	"id": "6e02e04c-d8d5-4176-9e00-6e2a6984a2a9",
	"user": {
		"id": "bb003a78-f037-47db-827e-44c6bff911e3"
	},
	"resource_token": "eyJhbGciOiJSUzUxMiIsImtpZCI6IkRCejExcEFuUGNXVndqaFBNWERuckNyQ0ZrT1p0Y2FqYWtjU21GNmJiVk0iLCJ0eXAiOiJKV1QifQ.eyJhdWQiOiJodHRwczovL2FwaS50cnVlbGF5ZXItc2FuZGJveC5jb20iLCJpc3MiOiJodHRwczovL2FwaS50cnVlbGF5ZXItc2FuZGJveC5jb20vcGF5bWVudHMtZ2F0ZXdheSIsImV4cCI6MTcyMTc1NDU1NCwiaWF0IjoxNzIxNzUzNjU0LCJuYmYiOjE3MjE3NTM2NTQsInNjb3BlIjoicGF5bWVudCIsImNsaWVudF9pZCI6InNhbmRib3gtdG9tdGVzdC1hNGQ0MzIiLCJqdGkiOiI2ZTAyZTA0Yy1kOGQ1LTQxNzYtOWUwMC02ZTJhNjk4NGEyYTkifQ.f_4srP72dlEo--nYFmRKgtJXHwiCt3yKXVXlo5cTX-fe4w11xU55gf2q08aQvwNmJ9rUBDLMqE8NuT9be_50Y64tYqrSBVKFMMh9L1BUwMf0_HGTuB9gv_Upa9J9G0zClwg5u84VklKFwg80UcQeC5_gHgKbSXGTQ3r1fK1BNURIEiM3mzrpl4nnFY4oDjzGLaUiTFedGrpTXdhGL7T4sOAFCKbNL_qeYLBjPL6rAVP4s-d_ARRFq5p4huogwk6txFuQyCNQgjpg679TJcVjD0jkn7zvxb-_wceu0ZjxInQl_3LjFGvGsGwy7GxTIYlpXxyU2Fz_m4F-qhrNXxW2uA",
	"status": "authorized"
}
Because this is a payment on a mandate, the payment immediately has a status of authorized. The payment was already authorised by the user when they authorised the associated mandate.
7. Review and track the payment
Unlike a single payment, a payment on a mandate doesn't require user authorisation. This means that after creation, the payment immediately enters the authorized status. It should then rapidly transition through the executed status to the settled status as payments in the UK are made in seconds over the faster payments system.
You can check the status of a payment in these ways:
- Use the payments view in Console.
- Monitor webhook notifications for your payments.
- Use the
/v3/payments/{id}endpoint to check the status of the payment.
The method requiring the least integration is to check in Console. However, we strongly recommend that you configure webhooks at the beginning of your integration, as these will be essential in your final integration.
7.1 Check payments to your merchant account in Console
After you sign into Console, open your app and open the Payments page. This displays the payments view.
In the payments view, you can see and filter your incoming and outgoing payments.
When you check the payments view, you can find the payment you made earlier. The best way to do this is to check for the payment id. However, you can also check the payments view for information such as the reference, status, value, and time and date of the payment.
7.2 Set up webhooks
When a payment moves from one status to another, TrueLayer sends you a webhook to the Webhook URI you set in step 1.2. Use these to track the progress of every payment you create. How you handle webhooks depends on your integration, but the following information can help.
Each webhook you receive has two headers:
X-TL-Webhook-Timestamp: The time you received the webhook at, in ISO-8601 format.TL-Signature: A JSON web signature with a detached payload you use to verify the webhook.
It is essential that you validate the signature of each received webhook to ensure if was sent from TrueLayer. The logic for this is similar to request signing, and we offer libraries to help you verify these signatures.
The JSON body of each webhook contains a type, which tells you what the webhook is for. They also all contain an event_id and event_version. To learn about the types of webhook notification that you can enable, see the Payments API webhook reference.
For a payment on a mandate in the sandbox environment, you should expect to receive the payment_executed and payment_settled webhooks. In the live environment, you'll receive both of these and also the payment_creditable webhook (unless you've changed your credit notification behaviour).
These are examples of the webhook bodies you receive when you create a payment on a mandate:
{
  "type": "payment_executed",
  "event_version": 1,
  "event_id": "80f2fca8-541d-4387-9843-e2506a9ffcdb",
  "payment_id": "5eeef4b4-e9ce-4428-8ba3-a625c93abc0c",
  "payment_method": {
    "type": "mandate",
    "mandate_id": "e8d7d86d-e580-486c-b2f9-58ecacc92433"
  },
  "executed_at": "2024-07-24T14:32:35.116Z"
}
{
"type": "payment_settled",
"event_version": 1,
"event_id": "4dba027d-2147-424e-9ea8-7d3fd7587e66",
"payment_id": "5eeef4b4-e9ce-4428-8ba3-a625c93abc0c",
"payment_method": {
"type": "mandate",
"mandate_id": "e8d7d86d-e580-486c-b2f9-58ecacc92433"
},
"settled_at": "2024-07-24T14:32:36.217Z",
"payment_source": {
"id": "fe4c748c-1a1a-430e-b3ed-fa6cc15b521b",
"account_identifiers": [
{
"type": "sort_code_account_number",
"sort_code": "040668",
"account_number": "00000871"
},
{
"type": "iban",
"iban": "GB75CLRB04066800000871"
}
],
"account_holder_name": "JOHN SANDBRIDGE"
},
"user_id": "756c91a3-958e-4af8-a4d2-c0d9eb447f15"
}You should have now successfully created a payment on a mandate.