Authorisation flow actions
Configure actions to guide your user through a payment or mandate authorisation flow.
You can start the authorisation flow in two ways:
- You can include the
authorization_flowobject in your payment creation POST request to the/v3/paymentsendpoint.
You can only use this method for payments, not mandates. - After you create a payment or mandate, make a POST request to the
/v3/payments/{id}/authorization-flowor/v3/mandates/{id}/authorization-flowendpoint, using the payment or mandateidas the path parameter.
Whichever of the two above methods you use, the response returns actions. You need to complete these to authorise the payment or mandate.
To set up a direct integration with the Payments API, you need to develop logic and UIs to complete these actions:
| Action | How to complete the action |
|---|---|
provider_selection | Provide the For a To bypass the |
redirect | Redirect the user to a redirect URI. Configure your redirect URI in Console. |
form | Respond to the form action with additional data or a selection based on the structure the form action specifies. The form typically requests that users enter data such as IBAN or branch code. In an embedded flow, the user inputs their bank credentials within a form (rather than being redirected to their bank's site or app). |
wait | Wait for the user to complete strong customer authentication (SCA) with their provider in a different session before returning to the payment flow. We recommend you inform your user that an action is occurring outside of your app or website. This action is only needed in decoupled flows. |
Read below for more detailed information on how to complete each type of action.
How to complete each action
To complete the actions required for authorisation, send the required data in a POST request. For example, you send a provider_id in the POST request for the provider_selection action.
The actions.next.type object in each response after you start the authorisation flow indicates what action is required next. The object also contains the information you need to complete the action.
You can see an example of this in the response from the .../start-payment-authorisation-flow endpoint below:
{
  "authorization_flow": {
    "actions": {
      "next": {
        "type": "provider_selection",
        "providers": [
          {
            "id": "ob-bank-name",
            "display_name": "Bank Name",
            "icon_uri": "https://truelayer-provider-assets.s3.amazonaws.com/global/icon/generic.svg",
            "logo_uri": "https://truelayer-provider-assets.s3.amazonaws.com/global/logos/generic.svg",
            "bg_color": "#000000",
            "country_code": "AT",
            "search_aliases": [
              "string"
            ]
          }
        ]
      }
    }
  },
  "status": "authorizing"
}
This response says that the next required action is provider_selection and returns a list of possible providers (in this case, a single bank with the ID ob-bank-name).
The provider_selection action
provider_selection actionThis is needed when the next action has the type provider_selection. When the actions.next.type object states this action is required, it also contains a list of providers.
The list of providers is based on what you provide for the provider_selection.filter object when you create the payment.
Generally, this is the format of the providers array:
{
        "type": "provider_selection",
        "providers": [
          {
            "id": "ob-bank-name",
            "display_name": "Bank Name",
            "icon_uri": "https://truelayer-provider-assets.s3.amazonaws.com/global/icon/generic.svg",
            "logo_uri": "https://truelayer-provider-assets.s3.amazonaws.com/global/logos/generic.svg",
            "bg_color": "#000000",
            "country_code": "GB"
          },
          {
            "id": "ob-bank-name-2",
            "display_name": "Bank Name 2",
            "icon_uri": "https://truelayer-provider-assets.s3.amazonaws.com/global/icon/generic-2.svg",
            "logo_uri": "https://truelayer-provider-assets.s3.amazonaws.com/global/logos/generic-2.svg",
            "bg_color": "#000000",
            "country_code": "GB"
          }
        ]
      }
Complete the provider_selection action
provider_selection actionIn order to complete the provider_selection action, you must:
- Render the list of providers returned in the
providersarray in a UI that the user can use to select a provider.
You can use the information in theavailabilityobject to render a UI that reflects when a provider is currently unavailable. - Submit the
idof the provider the user selected in a POST request to the.../authorization-flow/actions/provider-selectionendpoint.
The providers object includes the following information for each provider:
idof the provider.- Display name.
- Link to an SVG icon.
- Link to an SVG logo.
This usually contains the icon and the provider's name as text. - Description of whether the provider is available or not.
- Suggested background colour for the provider as a hex colour code.
Image formatWe supply all icons and logos as SVGs for maximum image quality and scalability.
The redirect action
redirect actionThe redirect action does not require that you submit information via POST request. It's typically the last step of authorisation.
This is the format of the redirect action:
{
    "type": "redirect",
    "uri": "http://some-uri"
}
Complete the redirect action
redirect actionThe redirect action means that you need to redirect your user to the uri returned in the object. Register this URI in Console. This URI does not change if your user chooses to pay via mobile or desktop.
The form action
form actionSome providers in the EU need to collect additional data as part of authorisation. Also, users sometimes need to submit their banking credentials within an embedded flow.
When either of these is the case, the Payments API returns form as the next action. Possible types of form action are text, text_with_image and select.
The form action contains the required format of any information the user must provide, and any constraints that apply (such as forbidden special characters).
Usually, a form action for a bank that requires branch information follows the submission of a provider_selection action.
Below is an example of a response you may receive when you complete theprovider_selection action.
{
	"status": "authorizing",
	"authorization_flow": {
		"actions": {
			"next": {
				"type": "form",
				"inputs": [
					{
						"type": "select",
						"id": "branch-name",
						"mandatory": true,
						"display_text": {
							"key": "branch-name.display-text",
							"default": "Branch Name"
						},
						"options": [
							{
								"id": "branch-a",
								"display_text": {
									"key": "branch-name.branch-a",
									"default": "Branch A"
								}
							},
							{
								"id": "branch-b",
								"display_text": {
									"key": "branch-name.branch-b",
									"default": "Branch B"
								}
							}
						]
					}
				]
			}
		}
	}
}
In this example, the form has a type of select. This means you need to create a UI that enables the user to select between the valid options in the response, in this case, branch-a or branch-b.
How to complete the form action
form actionCompleting the form action requires the following steps:
- Render the form as a UI for your user based on the type of the input.
The different types of input are explained in the section below. - Collect the input from the user.
- Submit the input to the
.../authorization-flow/actions/formendpoint as a POST request.
form action formats
form action formatsThis section contains some examples of how your UI could look to complete the three different types of form action.
The type of form that applies to a payment is specified in the actions.next.input.type object.
The three types of form action are:
text: Requires the user to complete one or more text fields.select: Requires the user to select a single value from several.text_with_image: Requires the user to complete a text field that is accompanied by an image.
This image is typically a QR code, which enables the user to retrieve the value to complete the text field from their provider.
When you submit the user's response to a form to the .../authorization-flow/actions/form endpoint, the request body must be a map with the type of input as the key and the user input as value. For example:
{
    "branch-name": "branch-a"
}
The text input type
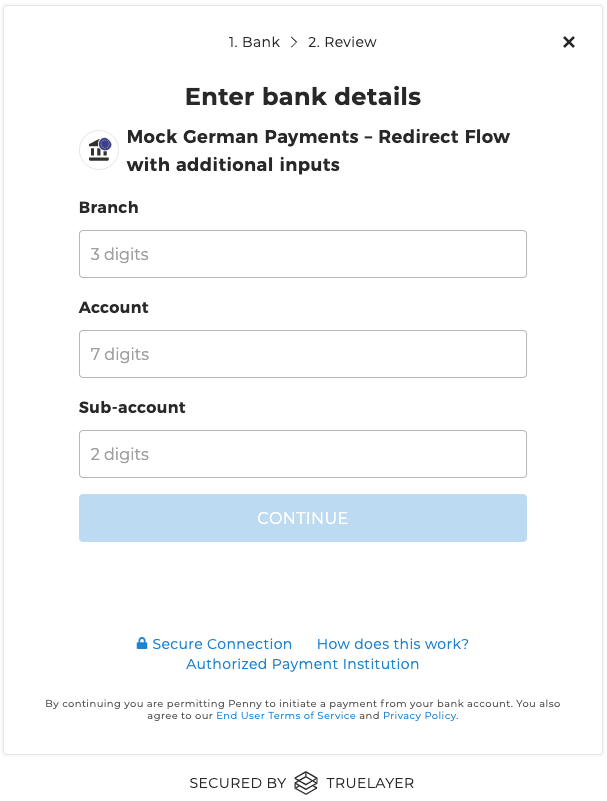
text input typeThe text input type represents a simple written input from the user. On web it can be rendered as an html element of type input.

Text input rendered by TrueLayer hosted payment page for a German mock provider
The select input type
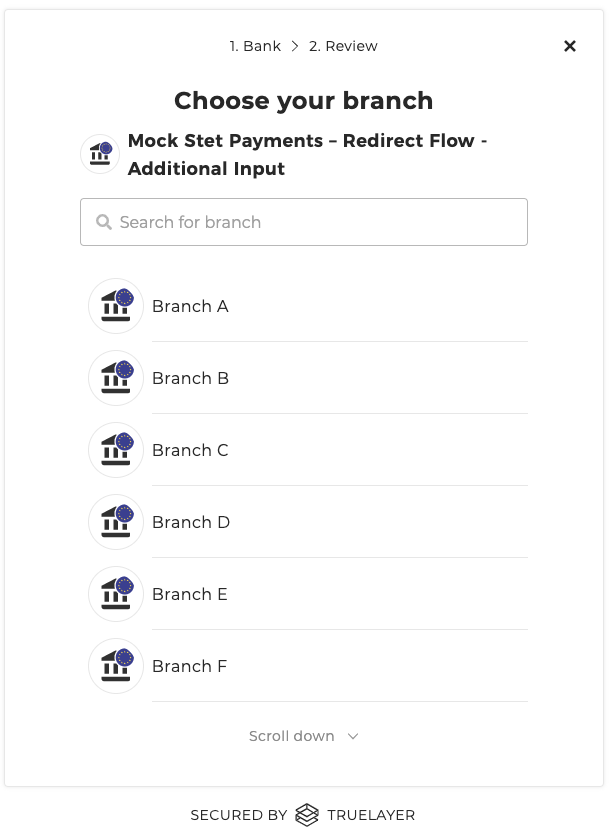
select input typeThe select input type represents a dropdown multiple choice box. On html it can be rendered as an input type also defined as select. This can be required by German and French providers.

Select input rendered by TrueLayer hosted payment page for a French mock provider
The text_with_image input type
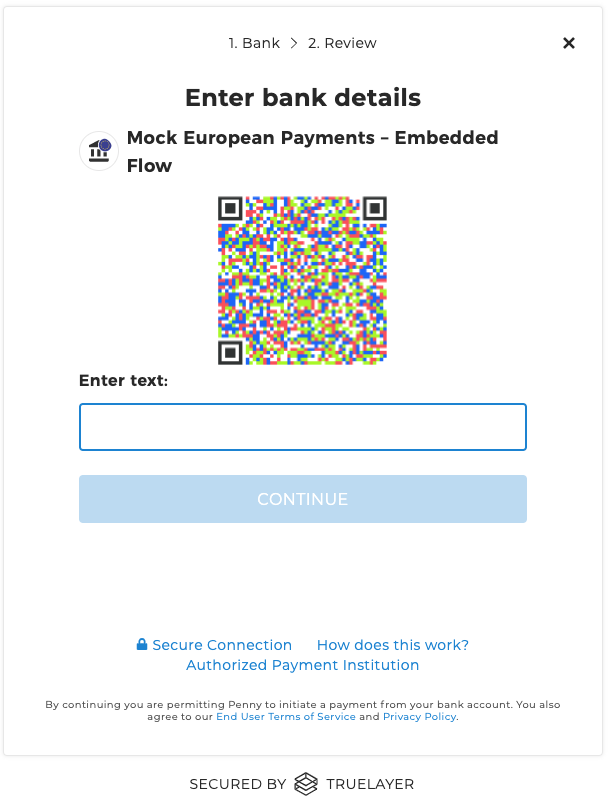
text_with_image input typetext_with_image means you must render an image and display a prompt for the user to enter the expected value based on the image they observe. Mainly required by German providers.

Text with image rendered by TrueLayer hosted payment page for a German mock provider. In Germany user would be required to use an app to scan the QR code and enter found value.
The wait action
wait actionThe wait action only applies to a small proportion of payment authorisation flows. Specifically, it is returned in response to a form action when a decoupled strong customer authentication step is required.
As such, it only applies to integrators who are PISP-licensed and need to accommodate authorisation via a separate banking provider as part of an embedded flow.
This is an example of a response that contains the wait action.
{
	"status": "authorizing",
	"authorization_flow": {
		"actions": {
			"next": {
				"type": "wait"
			}
		}
	}
}
Complete the wait action
wait actionTo complete the wait action, develop a UI that indicates an authorisation step is being completed in a separate app or website.
The object that contains the wait action also contains a display_message object to render text that displays while the user completes authentication with their provider. While the user completes this, you can poll the Payments API to check progress.
When the payment status changes to either executed or failed, display a screen that informs the user of the payment's success or failure.
To ensure a good user experience while the user completes provider authentication in another app or web page, your UI should display a loader while you poll whether authentication has been completed.
Implement actions within an auth flow
For some examples of how to implement auth flows, including provider_selection, redirect and form actions, see the page on example direct API authentication flows.
Updated 21 days ago
