[UK] Signup+ integration checklist
Every step you need to take to receive an age-verified payment, retrieve user details from it, and optimise your signup flow.
You can use Signup+ to authenticate a user by having them make a payment. Their bank account information is used to fetch other details such as date of birth and address, which greatly simplifies the KYC process.
We strongly recommend using pre-settlement verification for new Signup+ payments. This feature filters out and automatically refunds payments from joint and business accounts, which Signup+ does not support.
Introduction
This checklist will take you through setting up an onboarding flow using Signup+ and Payments. To create a Signup+ payment, you first need to create an age-verified payment. Then, you call the Signup+ API to get the info that you need to sign them up to your service automatically. Finally, for customers that don't pass your internal KYC checks, you must enable refunds.
Integrating in Finland?The process for setting up Signup+ in Finland is different to the UK. See our documentation on integrating in Finland for more information.
You can divide this process into these key steps:
- Sign up to Console and create an app
- Create a merchant account
- Configure webhooks
- Authenticate your request
- Initiate a payment with age verification
- Implement payment authorisation
- Review and track your payment
- Create a Signup+ request
- Conduct your KYC checks
- Test refunds
1. Sign up to Console and create an app
Firstly, you need to create an age-verified closed-loop payment with the Payments API.
The first step of any integration is to sign up to Console, create your client credentials and generate signing keys. See our guide to generating keys.
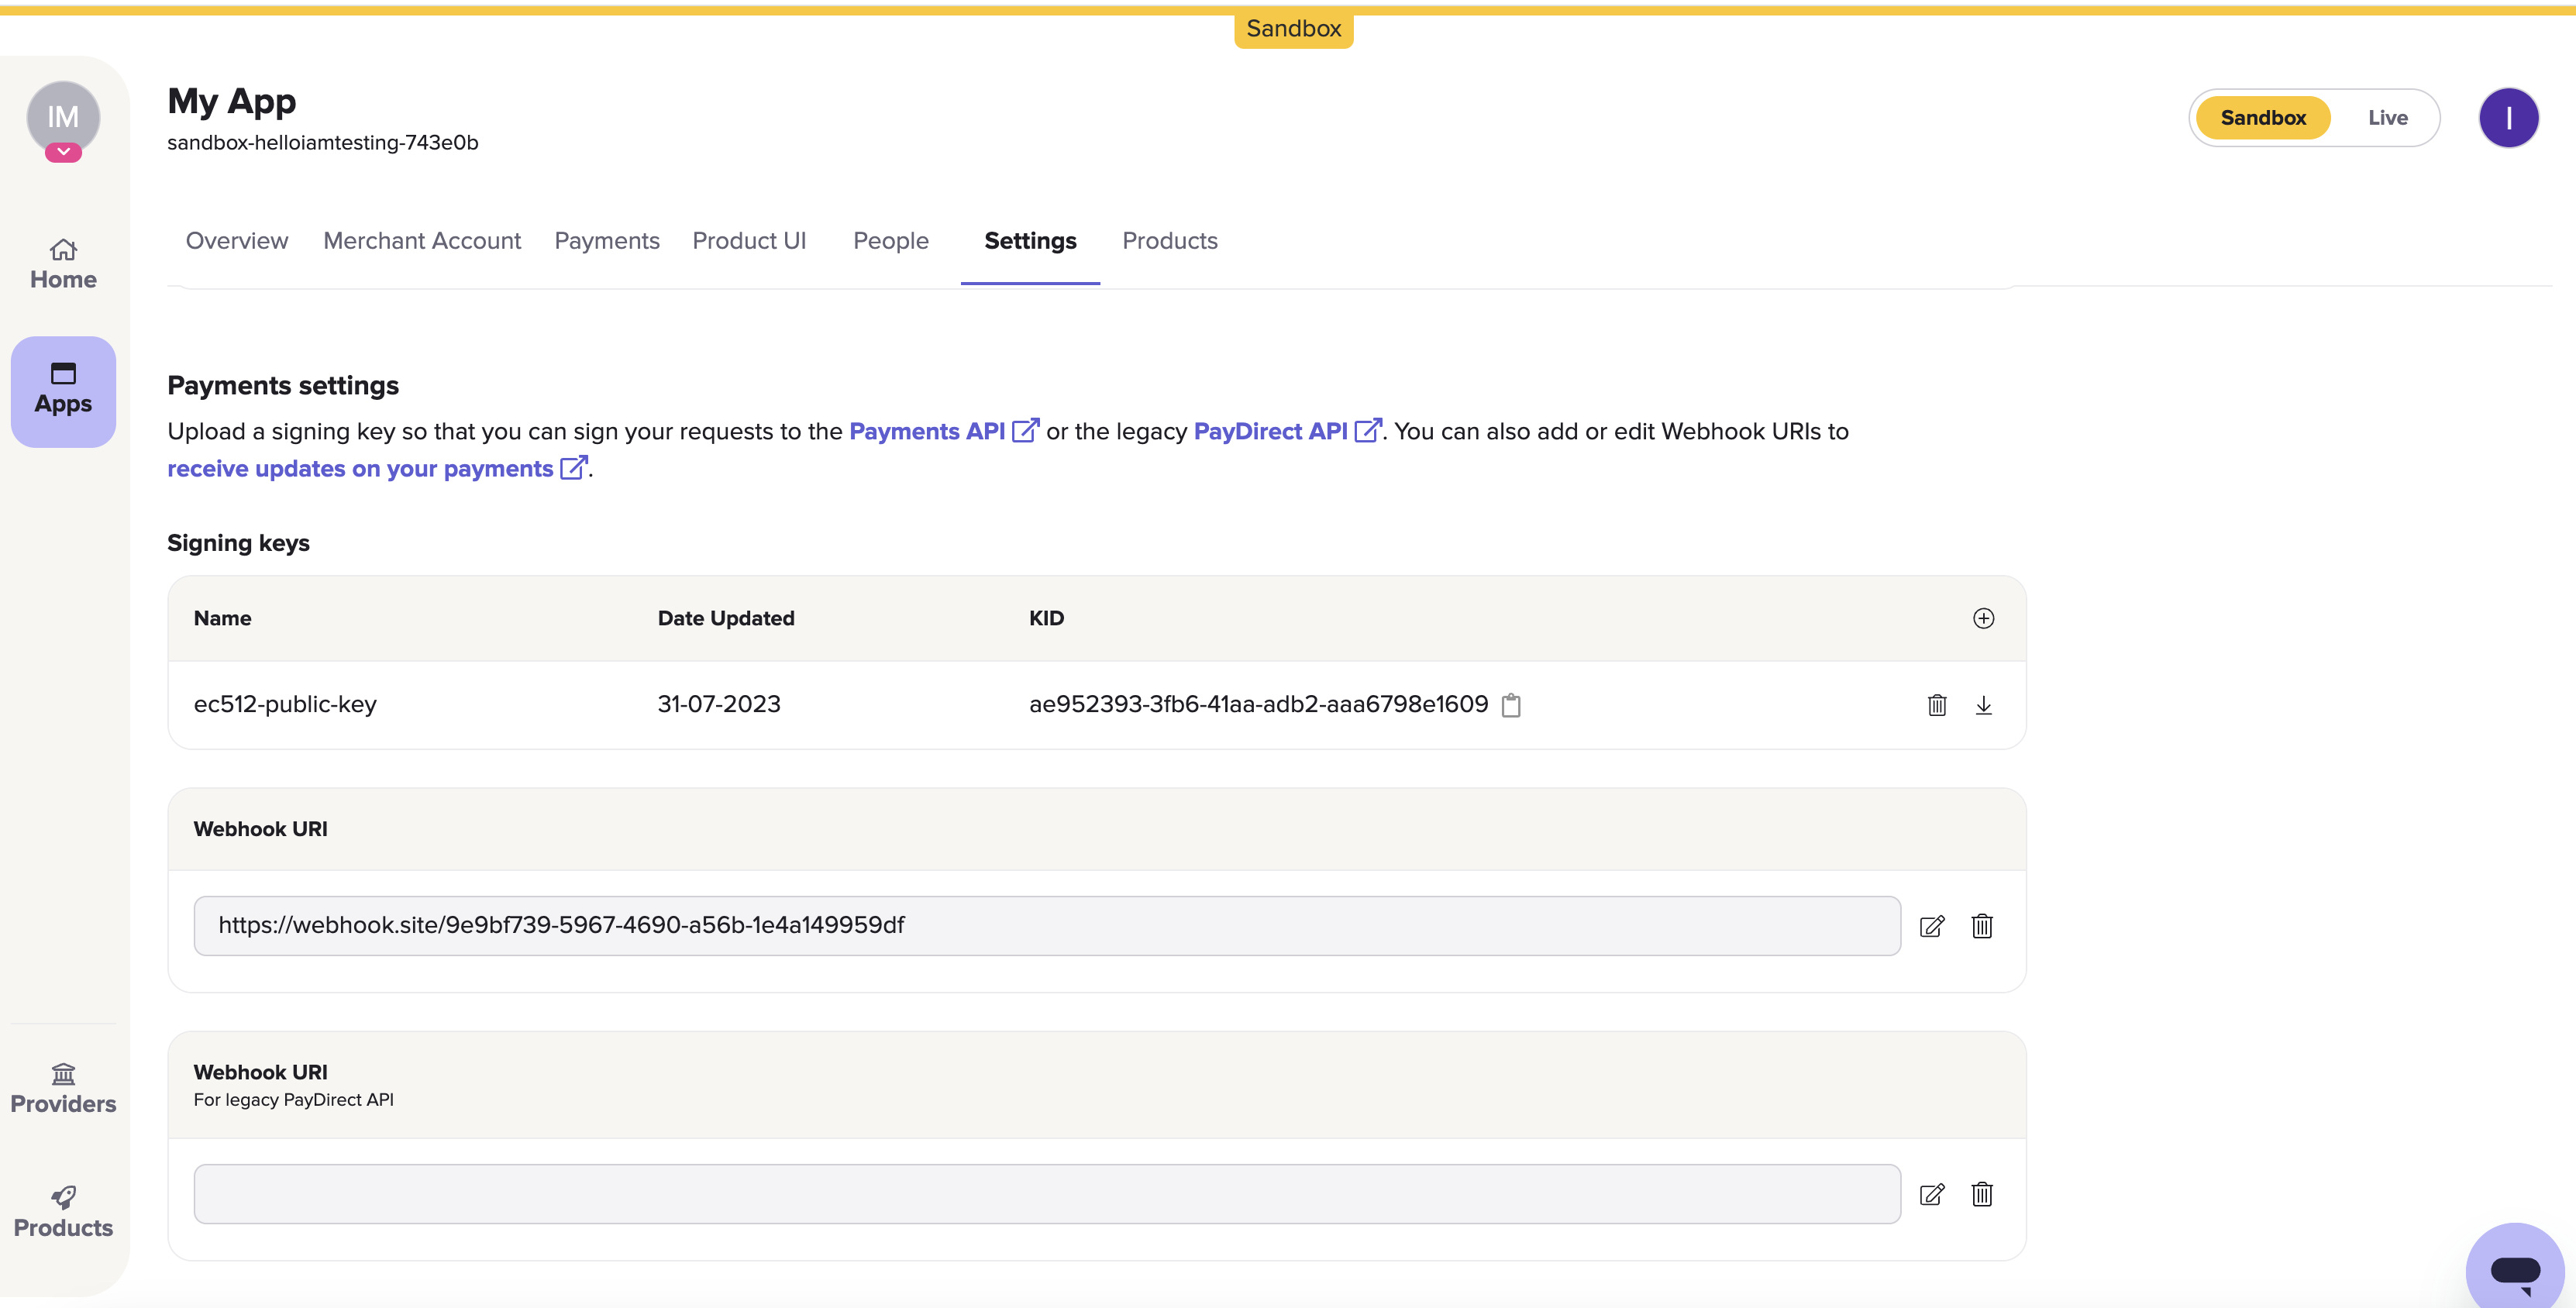
The Payments settings > Signing keys section on the Settings page in Console. Just beneath it is the Webhook URI box.
On Console, you can upload keys, configure webhook URIs, view and administrate your payments, and more. To learn more, see our docs about Console setup and management.
To use Signup+, you must use an app with closed-loop payments enabledIf you're creating an app for the first time, follow the steps below.
Already got an app for processing closed-loop payments? Skip to section 2.1.
1.1 Create an app
Choose a name for your app and a client ID.
If you're creating an app for the first time, you are asked to generate a public key as soon as you create an app.
Otherwise, go to your preferred app > Settings > Payments settings.
1.2 Upload your public key
Once you’ve signed up to Console, you need to upload your public key. Navigate to the Signing keys box and click the + icon.
1.3 Set your webhook URI
Add a webhook URI to the Webhook URI section, on the same page in Console. Webhooks give you updates on the progress of a payment.
Learn more about the possible payment webhooks you can receive, and how to test them locally.
1.4 Enable pre-settlement verification
When you set up pre-settlement verification, we create an intermediary account that temporarily holds any money paid into your account. While this money is held, TrueLayer can perform age or name checks on the remitter. We also filter out joint and business accounts at this stage.
If a user fails an age check, we automatically return any money they paid in. This means that there is no risk that a fraudulent payment, or a payment from an underage customer, may touch a bank account that you own. You don't need to take any action in this case.
However, we strongly recommend that you also perform your own KYC checks internally when you onboard a user. If the user doesn't meet your requirements, you must refund their payment yourself through the [refunds endpoint].
To enable pre-settlement verification, contact us or speak with your integration partner.
2. Create a merchant account
A merchant account is an account that TrueLayer manages on your behalf. This enables a variety of functionalities including closed-loop payments.
When you set up a merchant account, you specify a preferred business account to connect to your merchant account. This business account is what you use to manually top up your merchant account, and can be used to withdraw funds securely too.
Top up your merchant account by making a transfer in from a linked business account or accepting pay-ins from customers.
In sandbox? Skip this stepIf you're testing in the sandbox environment, you can skip straight to section 3.
However, before you go live, you need to complete the following steps.
2.1 Link your business account
Your client_id is linked to your merchant account. To top up and withdraw funds from your merchant account, you need to link your business account details to your client_id.
To link your business account, contact us with your client_id and the IBAN of your account. If you are allowlisting a UK account, you can supply a sort code and account number (SCAN) instead of an IBAN.
Expand to learn about the ways you can withdraw money from your merchant account
There are three methods you can use to withdraw money to your linked business account:
The steps below explain how you can set up these withdrawal methods.
2.1.a Configure sweeping in Console
To set up sweeping in Console:
- Navigate to the Merchant Account page in Console and select your merchant account.
- Open the Merchant Account Sweeping tab.
- Enter an Amount. This is the minimum amount that must be in your merchant account before you are able to sweep money from it.
- Select an Interval of Daily, Weekly, or Fortnightly. This is how often money is moved from your merchant account, provided that you have the minimum amount in it at the time.
Learn how to set up sweeping in Console.
2.1.b Configure sweeping through the API
In order to make any API requests, including to set up sweeping, you must first set up authentication for your requests. This is explained in section 3.
To set up sweeping, make a POST request to the /v3/merchant-accounts/{id}/sweeping endpoint. In your request, ensure that you include:
- Your merchant account
idas a path parameter. - The value above which to sweep funds in a minor denomination for the
max_amount_in_minorparameter. - A value of
daily,weekly, orfortnightlyfor thefrequencyparameter.
To check your existing sweeping settings, or to delete them, make a request to the same endpoint as a GET or DELETE request respectively.
Learn more about setting up sweeping through the API.
2.1.c Make a payout to your business account
You can also withdraw funds from your merchant account by making a payout.
When you create a payout, you must specify a beneficiary. First, you need to specify a beneficiary type. This can be external_account, payment_source, or business_account.
We recommend you use business_account, as you don't need to provide any other information. The payout is sent to the business account you linked in step 2.1.
For more about linking a business account, see our Console docs.
3. Configure webhooks
3.1 Set up webhooks
When a payment moves from one status to another, TrueLayer sends you a webhook to the Webhook URI you set in step 1.2. Use these to track the progress of every payment you create. How you handle webhooks depends on your integration, but the following information can help.
Each webhook you receive has two headers:
X-TL-Webhook-Timestamp: The time you received the webhook at, in ISO-8601 format.TL-Signature: A JSON web signature with a detached payload you can use to verify the webhook.
You need to validate webhooksIt is essential that you validate the signature of each received webhook to ensure if was sent from TrueLayer. The logic for this is similar to request signing, and we offer libraries to help you verify these signatures.
The JSON body of each webhook contains a type, which tells you what the webhook is for. They also all contain an event_id and event_version. To learn about the types of webhook notification that you can enable, see the Payments API webhook reference.
If a payment fails at any point, you receive a webhook to inform you. This contains information about why inside a failure_reason.
4. Authenticate your request
4.1 Sign your requests
Request signing requires a key pair (one public, one private). Any payment requests made to your merchant account are verified against your public key hosted in Console. Generate a pair of keys using this guide.
As only you have the private key that matches your public key, only you can create payments through your integration.
TrueLayer offers and maintains a variety of libraries to help you sign your requests. These are available here on Github.
4.2 Include an idempotency key
Put generally, idempotency with an API is the ability to repeat the same request multiple times without the API considering each request to be a new request.
It’s important that you generate and include an idempotency key with your payments requests to minimise the risk of a payment being created multiple times by accident. You do this by including a key in the Idempotency-Key header for your requests.
Read more about idempotency for payments.
4.3 Generate an access_token
access_tokenEach payment you create requires its own access_token. You can use the same access_token for multiple payments; every access_token, once generated, has a validity of up to 60 minutes.
To generate an access token, use the /connect/token endpoint. Provide your client_id and client_secret, as well as the scopes for the payment. The scopes determine what types of payment the access_token can be used for.
For onboarding with Signup+, include the payments and signupplus scopes. You only need to use the signupplus scope to call the Signup+ endpoint. However, if you make a payment with both scopes, you can use the same token to create the payment and make a Signup+ request.
Learn more about how to configure and generate a payment access token.
5. Create a payment with age verification
There are four extra steps you need to take to ensure that a payment is compatible with Signup+:
- Use the pre-settlement age verification feature when you make the payment
- Filter out providers who don't support Signup+
- Include placeholder values for the user details, since you will only know these after you complete a Signup+ API call
- Add a
related_productsobject to enable Signup+
5.1 Configure a payment
A payment request which is compatible with Signup+ looks like this:
POST /v3/payments HTTP/1.1
Content-Type: application/json
Idempotency-Key: {RANDOM_UUID}
Tl-Signature: {SIGNATURE}
Authorization: Bearer {ACCESS_TOKEN}
Host: api.truelayer-sandbox.com=

{
  "currency": "GBP",
  "payment_method": {
    "type": "bank_transfer",
    "provider_selection": {
      "type": "user_selected",
      "filter": {
        "release_channel": "general_availability",
        "customer_segments": [
          "retail"
        ],
	"excludes": {
          "provider_ids": [
            "ob-revolut",
            "ob-transferwise",
	          "ob-starling",
	          "ob-danske",
	          "ob-boi"
              ]
			      }
          }
    },
    "beneficiary": {
      "type": "merchant_account",
			  "verification": {
        "type": "automated",
        "remitter_date_of_birth":true
      },
      "merchant_account_id": "187db95d-7929-4f93-8c6b-477fd0021f21",
      "account_holder_name": "Test Merchant",
      "reference": "SU plus test"
    }
  },
  "user": {
    "name": "signup",
    "email": "[email protected]",
    "phone": "+447777777777"
		 },
	  "metadata": {
    "example": "examplemetadata"
  },
  "related_products": {
    "signup_plus": {}
  },
  "amount_in_minor": 2100
}
For more information about creating a pay-in, see our guide.
5.1.1 Specify payment amount and currency
Specify the payment amount and currency in the amount_in_minor and currency parameters when you create a payment. For this guide, set the currency to GBP. The amount_in_minor is the amount to pay in the smallest denomination of the currency you're accepting the payment in.
In sandbox, specifying different amounts in the amount_in_minor field will give you different responses when you use the payment id with Signup+. Find a full list of test user responses later in this guide.
5.1.2 Specify the bank account and scheme for the payment
Your user must choose which bank account to pay from, and which scheme to make the payment through.
The payment_method.provider_selection parameter contains some options that change how your user chooses a banking provider.
The first option is whether provider selection is preselected or user_selected. This determines whether you let the user select a provider from a list, or preselect one in your payment creation request. If you choose to let the user select one, the providers are determined by the payment currency and any filters that you apply.
In the example payment creation request, both provider and scheme selection are user_selected, and payment schemes that require a fee are disabled. We recommend only using preselected provider selection for returning users where you know their preferred provider.
If applicable, during the authorisation flow your user sees one page where they can select a banking provider and another where they can select the payment scheme.
We don't support joint accountsSignup+ is only currently compatible with sole bank accounts.
5.1.3 Exclude providers that do not support Signup+
Use the filter object within the provider selection object to ensure that users can only choose from banks which support Signup+.
To do this, you need to:
- Ensure that all banks are in the general availability release channel
In the payment_method.provider_selection.filter object, add a release_channel field and set this to the value general_availability.
- Of the general availability banks, filter out all banks that don't support Signup+
Use the excludes object to filter out specific providers, using their provider ids. For example:
"excludes": {
          "provider_ids": [
            "ob-revolut",
            "ob-transferwise",
	          "ob-starling",
	          "ob-danske",
	          "ob-boi"
              ]
			      }
          }
For a full list of all the providers that don't support Signup+, see our detailed documentation on Signup+ providers.
5.1.4 Specify merchant account beneficiary
When you create a payment, you can choose whether the beneficiary is a merchant account or external account.
For a closed-loop pay-in, you must use a merchant account as the beneficiary. This merchant account must be the same one that receives [closed-loop payments]. To do this, provide the merchant_account_id to be paid in the payment_method.beneficiary.type parameter. You can also add some optional details and metadata.
5.1.5 Provide user information
When you create a payment, you must provide key details about the user. These help you identify who made each payment.
This information is also part of anti-money-laundering measures, so they're mandatory in all of your payment requests unless you're a regulated PISP. For a single payment into a merchant account like this, you must collect the user's name and one of their email address or phone number.
For a first-time payee whose user information you don't know, use these placeholder user details:
"user": {
    "name": "signup",
    "email": "[email protected]",
    "phone": "+447777777777"
For subsequent payments from the same user, you can then supply real information.
5.1.6 (Optional) Provide metadata
You can opt to provide metadata with each payment. To do this, provide key-value pairs as part of the metadata parameter. This can be useful if, for example, you need a unique ID to reconcile your payments.
5.2 Add age verification to your payment
Specify the beneficiary.remitter_date_of_birth flag to create a payment with an automated legal age check.
Note that you cannot verify a user's name as well as their date of birth, as you can only verify based on one criterion for each payment.
5.3 Set Signup+ as a related product
Ensure that the payment has signup_plus specified within the related_product object.
6. Implement payment authorisation
Once you’ve created your payment, your user needs to authorise the payment with their bank. The payment authorisation flow differs depending on how you configured the payment to be authorised.
There are a variety of ways you can integrate an authorisation user interface. We strongly recommend that you use one of TrueLayer’s Web UIs: the hosted payment page (HPP) or Web SDK.
Most of the time, payments settle instantly. Rarely, though, the payment remains in a pending state for up to two minutes.
6.1 Build mandatory and optional UI screens
You must build the following:
- A signup method selection screen
- A screen to filter out existing users and enable them to log in with their credentials
You may also need to build the following:
- A screen where the user can input additional details for signup, such as a username and password, if necessary
- A screen where the user can review the details returned by the Signup+ API (note that this may not be optional for you. Contact us to check if it's mandatory)
Is your user making an iGaming deposit?If your app enables users to gamble, you need to ensure that your customers have the capacity to set deposit limits before they make a payment.
Below is an example of a full authorisation flow.
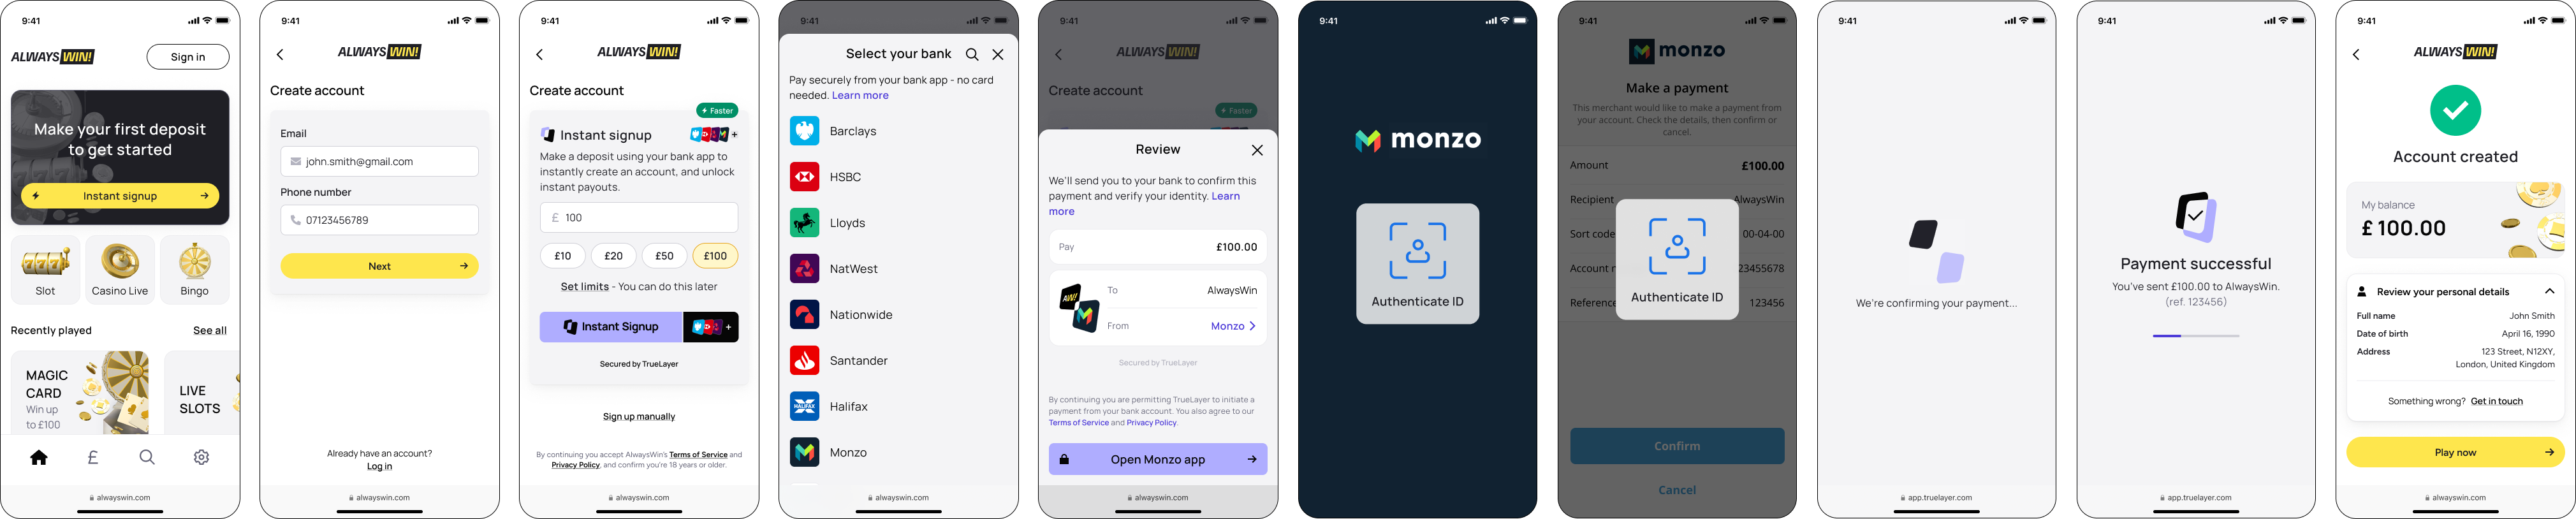
An example Signup+ authorisation flow.
6.2 Handle failed payments
Payments can fail during the authorisation journey for the following reasons:
| Failure reason | What it means | What to do |
|---|---|---|
player_cancelled | The user cancelled the payment on one of TrueLayer's authorisation screens. | Prompt the user to attempt the Signup+ flow again. |
player_cancelled_at_provider | The user cancelled the payment after going to their provider. | Prompt the user to attempt the Signup+ flow again. |
expired | The payment has taken more than fifteen minutes to complete and has expired. | Prompt the user to attempt the Signup+ flow again. |
provider_error | The provider failed while creating the payment. | Prompt the user to sign up manually. |
provider_rejected | The provider rejected the payment for an unspecified reason. | Prompt the user to sign up manually. |
insufficient_funds | The user didn't have enough money in their account to make the payment. | Prompt the user to attempt the Signup+ flow again. |
not_authorized | The player cancelled the payment, or couldn't log in to their bank. | Prompt the user to attempt the Signup+ flow again. |
verification_declined | The user failed the age verification check. | A webhook is automatically sent. No Signup+ API call should be made. Prevent that user from making the transaction. |
For more about possible failure reasons, see our documentation on payment statuses.
7. Review and track your payment
After your user successfully authorises a payment to your merchant account, it has a status of executed. When the status of the payment is settled, the funds are available in your merchant account.
You can check the status of payments in these ways:
- Use the payments view in Console
- Monitor webhook notifications for your payments
- Use a GET Payment request to check the status of the payment.
You must configure webhooks at the beginning of your integration.
7.1 Check payments to your merchant account in Console
After you sign into Console, go to Payments > Payments V3 > Payments. This displays the payments view.
Within the payments view, you can see and filter your incoming and outgoing payments.
When you check the payments view, you can find the payment you made earlier. The best way to do this is to check for the payment id. However, you can also check the payments view for information such as the reference, status, value, and time and date of the payment.
7.2 Check and consume webhooks
When the payment reaches the settled status, you can confirm whether the remitter is over 18 or not.
8. Create a Signup+ request
The Signup+ call is only required to retrieve identity data. If you only want to perform age-based verified pay-ins, without checking identity details (including DOB), rely instead on pre-settlement logic to ensure that your user is over 18.
Make a POST request to the /signup-plus/payments endpoint. Include the payment id as a query parameter, like this:
<https://api.truelayer.com/signup-plus/payments?payment_id={paymentId}>Ensure that you make the request within 15 minutes of the payment entering the settled status.
A successful response contains the user's information, including their bank account details.
{
    "title": "Mr",
    "first_name": "Wallace",
    "last_name": "Wensleydale",
    "date_of_birth": "07/08/1959",
    "address": {
        "address_line1": "62 West Wallaby Street",
        "city": "Wigan",
        "state": "Lancashire",
        "zip": "L18 9HA",
        "country_code": "GB"
    },
    "account_details": {
        "sort_code": "{SORTCODE}",
        "account_number": "{ACCOUNTNUMBER}"
    }
}
A successful response includes:
- first name
- last name
- date of birth
- address line 1
- address line 2
- city
- postcode
- sort code and account number
- country code
- title
- state
If we can't collect any of the above KYC details for a user, the initial payment fails with the reason no_identity_data.
Use these bank-checked details to conduct your own internal KYC checks as you normally would.
9. Conduct your KYC checks
Using the response you get from the Signup+ request, you can do your own KYC checks. If your user fails these checks, refund their initial payment.
At this stage, the request can fail for the following reasons:
| Failure reason | What it means | What to do |
|---|---|---|
no_identity_data | No information about the user could be found | Prompt the user to go through a manual signup flow. |
provider_not_supported | The user has attempted to pay with a bank that doesn't support Signup+ | Prompt the user to go through a manual signup flow. |
internal_server_error | The data provider is down | Prompt the user to go through a manual signup flow. |
invalid_remitter_account | The user has attempted to pay with a joint account | Prompt the user to start the Signup+ flow again with a different account. |
In sandbox, depending on the amount you choose to pay in the initial payment, you will get different responses. Below are examples of values you can use in sandbox to test different responses.
Value of amount_in_minor | Signup+ response | Response type |
|---|---|---|
| 1800 to 1999 | Test user data 1: Leon Gordon | Success |
| 2000 to 2099 | Test user data 2: Anthony Carter | Success |
| 2100 to 2198 | Test user data 3: Isabella Allen | Success |
| 2199 | Test user data 4: Ella Murphy | Success - GAMSTOP test |
| 2200 to 9999 | Range reserved for new test users Defaults to Test User Data 1 | Success |
| 10000 to 25000 | Joint accounts not supported | Error |
| 25001 to 35000 | User data not found | Error |
| Greater than 35000 | Range reserved for other scenarios Defaults to User data not found | Error |
10. Test refunds
You must integrate with refunds to use Signup+. This enables you to refund the initial payment of anyone who doesn't pass your internal KYC checks, or anyone who doesn't complete the signup flow after making a payment.
A refund is a payment or payments made back to a user that previously paid into your merchant account. Refunds cannot exceed the total of the initial payment the user made, and are directly linked to a payment id.
The refunds endpoint is a child of the payments endpoint:
https://api.truelayer-sandbox.com/v3/payments/{id}/refundsTo make a refund, make a POST request to the [/payments/{payment_id}/refunds endpoint] that contains the following parameters:
| Parameter | Description |
|---|---|
{payment_id} | The ID of the original payment that you want to refund. Provide this as a path parameter in the endpoint. |
amount_in_minor | The amount to refund in the smallest possible denomination. If transacting in GBP, for example, this is pence. This is not a required field. If you don't specify this in your refund request, The Payments API assumes you're requesting a refund for full value of the original pay-in. The amount in this field cannot be greater than the value of the original payment. |
reference | The reference that appears on the user's bank statement. This must be 18 characters or less. |
A refund request looks like this:
{
"amount_in_minor": 10000,
"reference": "Refund-12345"
}
In the response, you get a refund id:
{
	"id": "a843eb32-291a-4e63-948f-947ebc7f8ac8"
}
You have now created and authorised a payment with age verification, then called the Signup+ API and tested refunds for payments that don't pass KYC checks.
Updated 19 days ago