Payments integration checklist
Every step you need to take to set up a closed-loop payments integration.
This is an overview of the steps required to integrate closed-loop payments. Each step also contains links to more detailed documentation. Use this page to check you’ve achieved everything needed for your integration.
Introduction
This checklist focuses on closed-loop payments. This type of payment is useful for business applications where you regularly receive payments from customers and also pay back out to them. For example, if they top up an account regularly, but may also want to make withdrawals.
A closed-loop payment consists of two parts:
- A closed-loop pay-in, which is a payment made to your merchant account.
- A closed-loop payout, which is a payout made from your merchant account to an account that paid in.

After a closed-loop pay-in, you can easily make multiple payouts to the same user, and also access other merchant account-related functionality.

After a closed-loop pay-in, you can easily make multiple payouts to the same user, and also access other merchant account-related functionality.
The pay-in and payout make up the ‘loop’ together. However, you can make a payment into a merchant account without needing to make a closed-loop payout as well.
In general, you can divide a closed-loop payment into the following stages:
- Console signup and webhook configuration
- Create and top up your merchant account
- Payment authentication
- Payment creation and configuration
- Payment authorisation
- Review and track the pay-in
- Payout creation and configuration
- Improve the returning user payment flow (optional)
Each of these parts are included in the steps outlined on this page.
1. Console signup and webhook configuration
The first step of any integration is to sign up to Console. Learn more about this process and what you can do in Console in our Console quickstart guide.
When you sign up to Console, you create your client credentials and upload your signing keys to secure your API requests. See our guide to generating keys.
On Console, you can upload keys, configure webhook URIs, view and administrate your payments, and more. Learn more about Settings page in Console.
1.1 Upload your public key
Once you’ve signed up to Console, you need to upload your public key. To do this, open the Settings page and click the + icon to the right under the Signing keys heading.
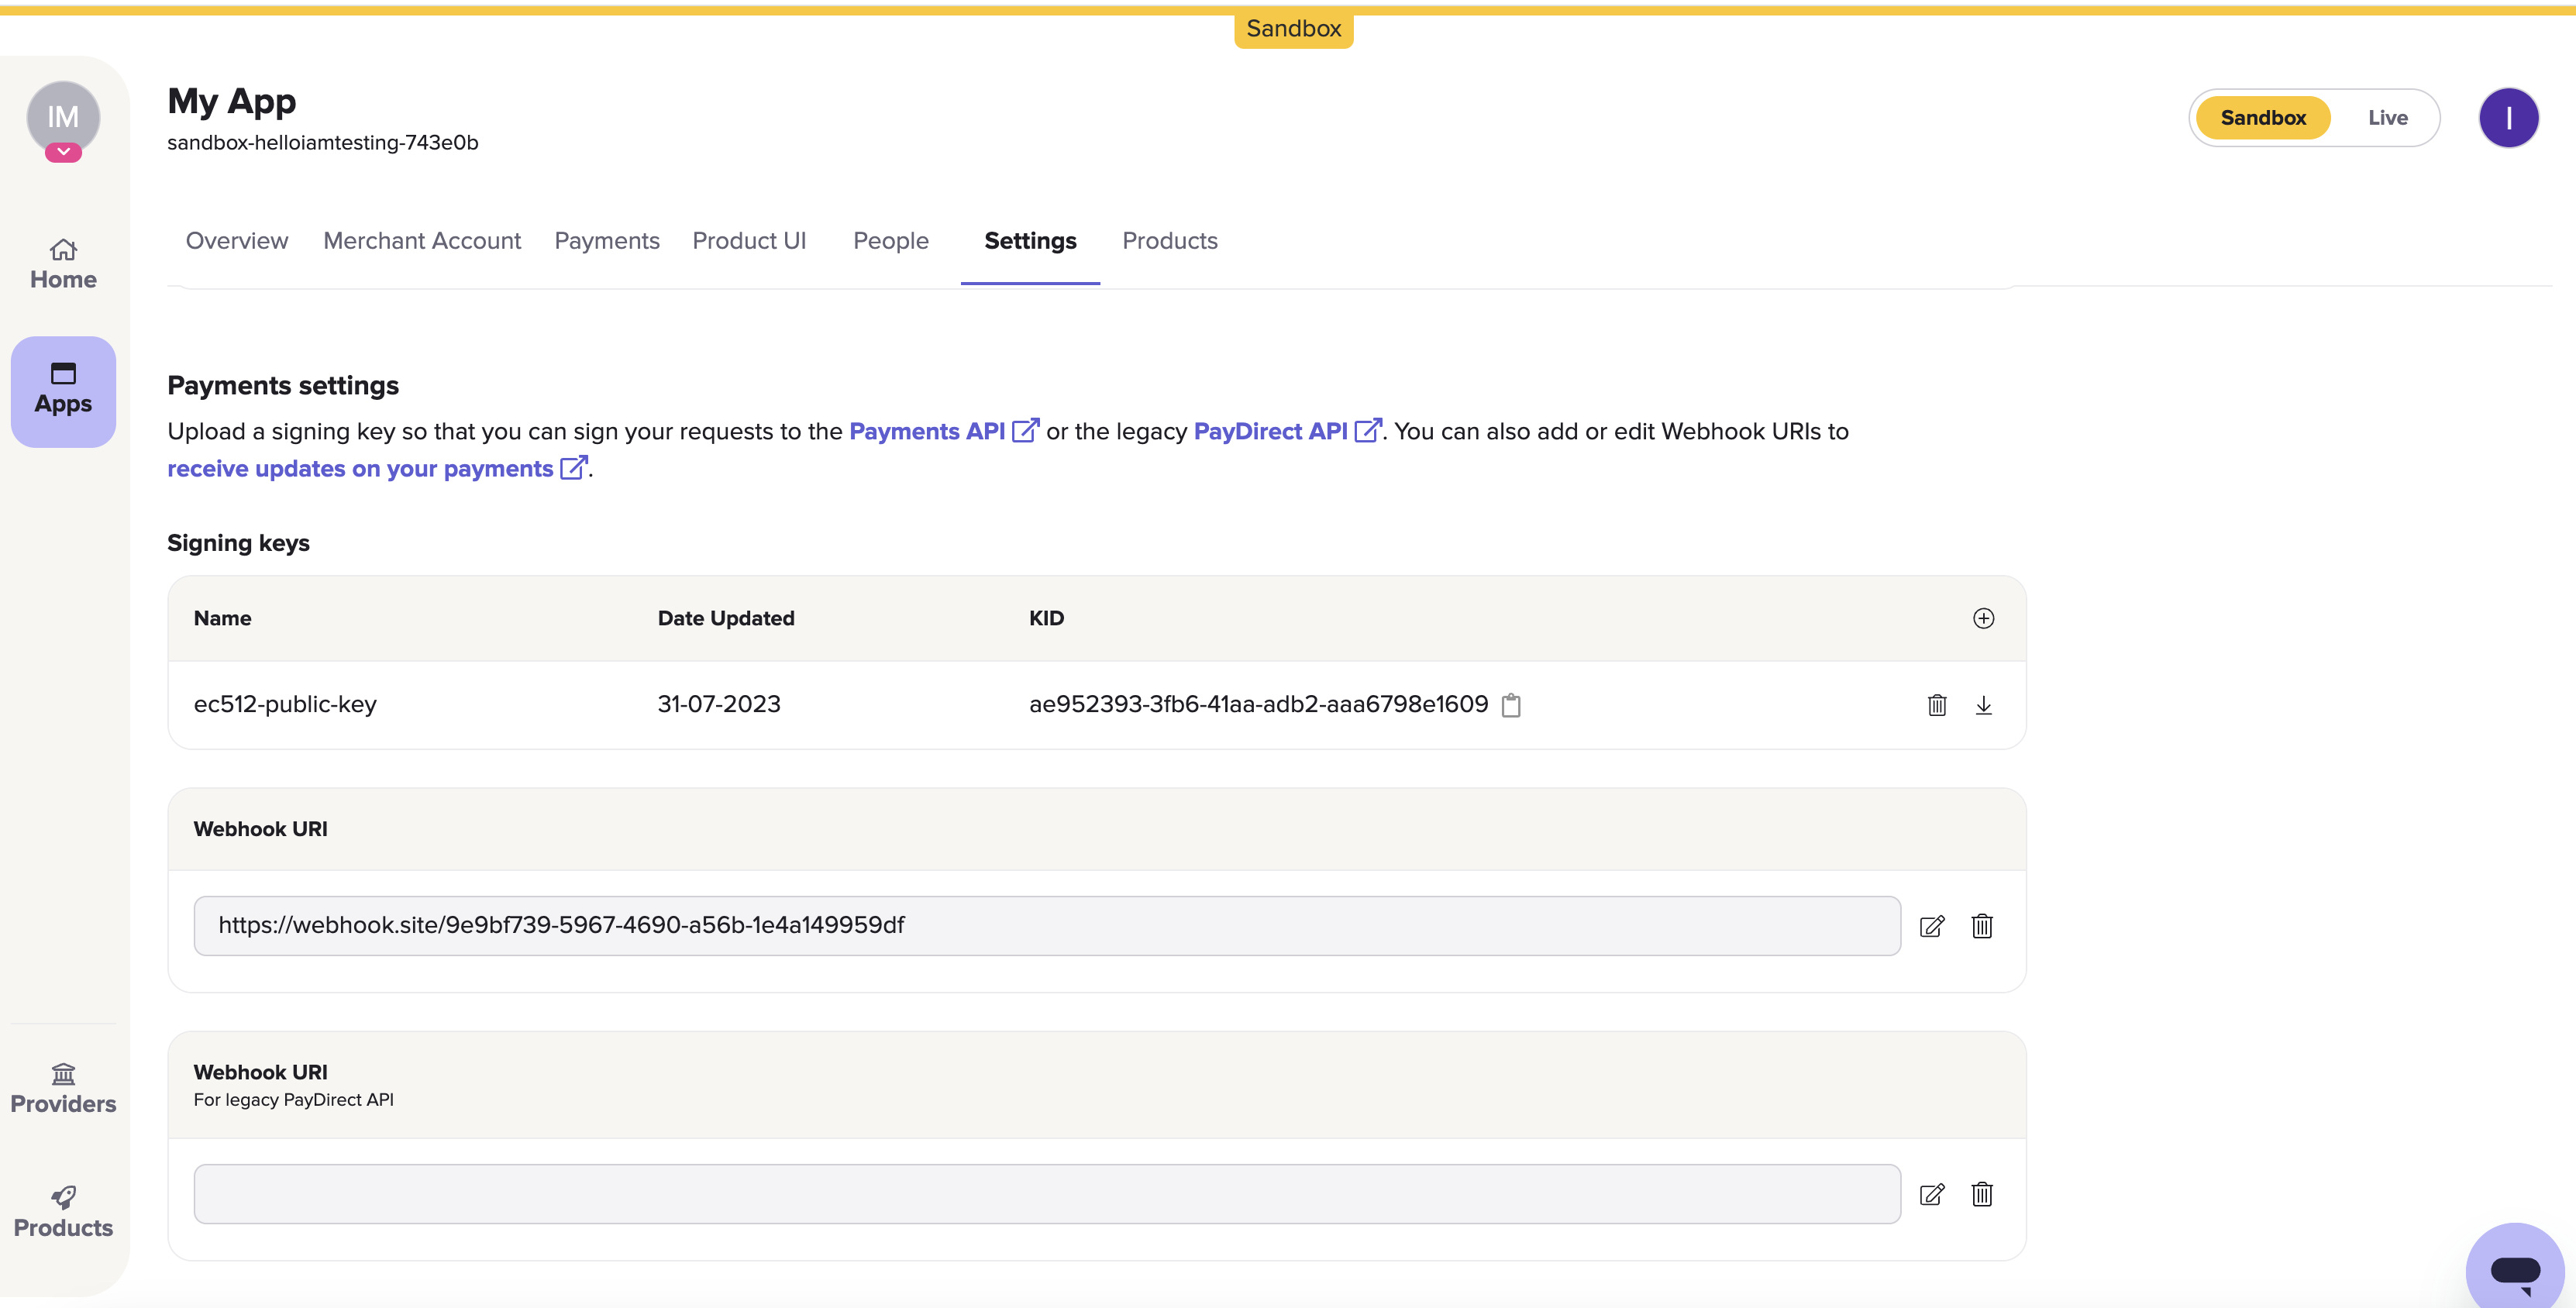
The Payments settings > Signing keys section on the Settings page in Console. Just beneath it is the Webhook URI box.
1.2 Set your webhook URI
On the Settings page, the next box after the Signing keys box is the Webhook URI box. Here, click the edit icon to the right of the box and enter URI where you would like webhooks to be sent.
Webhooks are the recommended way for you to receive updates about anything you do with the TrueLayer API. For example, it can tell you if any VRP mandates, payments, or payouts you make are successful.
Our documentation explains how you can validate your webhook signatures using the public key you uploaded in the last step. You can also test webhooks locally when building your integration.
Learn more about about the possible payment and mandate webhooks you can receive.
2. Create and top up your merchant account
A merchant account is an account that TrueLayer manages on your behalf. This enables a variety of functionalities including closed-loop payments. You cannot make a payout unless you have a merchant account with enough money in it.
When you set up a merchant account, you specify a preferred business account to connect to your merchant account. This business account is what you use to manually top up your merchant account, and can be used to withdraw funds securely too.
Top up your merchant account by making a transfer in from a linked business account or accepting pay-ins from customers.
In sandbox? Skip this stepIf you're testing in the sandbox environment, you can skip straight to section 3.
However, before you go live, you need to complete the following steps.
2.1 Link your business account
When you first create your app, you decide on a client_id. Your client_id is linked to your merchant account. To top up and withdraw funds from your merchant account, you need to link your business account details to your client_id.
To link your business account, contact us with your client_id and the IBAN of your account. If you are allowlisting a UK account, you can supply a sort code and account number (SCAN) instead of an IBAN.
2.2 Top up your merchant account manually
Send funds to your merchant account through a bank transfer.
To find out your merchant account bank details, you can either:
- Navigate to the Merchant Account page in Console, and click the Details tab.
Ensure that you select the correct currency. - Use one of the merchant account endpoints, such as
/v3/merchant-accountsor/v3/merchant-accounts/{id}.
2.3. (Optional) Set up low balance notifications
Optionally, you can set up webhooks that notify you when the balance in your merchant account is low. To do this, contact us and specify a threshold you don't want your merchant account to fall below. This is useful to ensure your account always has enough funds to fulfil customers' payout requests.
Once enabled, you receive the balance_notification webhook for your merchant account. Learn more about this feature and how to set it up.
2.4 Set up withdrawals from your merchant account
Withdraw funds to the business account that you linked earlier.
There are three methods that you can use to do this:
The steps below explain how you can set up these withdrawal methods.
2.4.a Configure sweeping in Console
To set up sweeping in Console:
- Navigate to the Merchant Account page in Console and select your merchant account.
- Select the Merchant Account Sweeping tab.
- Enter an Amount. This is the minimum amount that must be in your merchant account before you are able to sweep money from it.
- Select an Interval of Daily, Weekly, or Fortnightly. This is how often money is moved from your merchant account, provided that you have the minimum amount in it at the time.
Learn more about sweeping setup in Console.
2.4.b Configure sweeping through the API
In order to make any API requests, including to set up sweeping, you must first set up authentication for your requests. This is explained in section 3.
To set up sweeping, make a POST request to the /v3/merchant-accounts/{id}/sweeping endpoint. In your request, ensure that you include:
- Your merchant account
idas a path parameter. - The value above which to sweep funds in a minor denomination for the
max_amount_in_minorparameter. - A value of
daily,weekly, orfortnightlyfor thefrequencyparameter.
To check your existing sweeping settings, or to delete them, make a request to the same endpoint as a GET or DELETE request respectively.
Learn more about setting up sweeping through the API.
2.4.c Make a payout to your business account
You can also withdraw funds from your merchant account by making a payout.
When you create a payout, you must specify a beneficiary. First, you need to specify a beneficiary type. This can be external_account, payment_source, or business_account.
For the purposes of this guide, select business_account. You don't need to provide any other information. The payout is sent to your allowlisted business account.
3. Payment authentication
Before you can create payments, your Payments API requests must be authenticated and include appropriate headers. This ensures that your payments are secure and can be sent or retried without issues.
3.1 Sign your requests
Request signing requires a key pair (one public, one private). Any payment requests made to your merchant account are verified against your public key hosted in Console. Generate a private key using this guide.
As only you have the private key that matches your public key, only you can create payments through your integration.
TrueLayer offers and maintains a variety of libraries to help you sign your requests. These are available here on Github.
3.2 Include an idempotency key
Put generally, idempotency with an API is the ability to repeat the same request multiple times without the API considering each request to be a new request.
It’s important that you generate and include an idempotency key with your payments requests to minimise the risk of a payment being created multiple times by accident. You this by including a key in the Idempotency-Key header for your requests. Learn more about how to fill this header.
3.3 Generate an access_token
access_tokenEach payment you create requires its own access_token. You can use the same access_token for multiple payments; every access_token , once generated, has a validity of up to 60 minutes.
To generate an access token, use the /connect/token endpoint. Provide your client_id and client_secret, as well as the scopes for the payment. The scopes determine what types of payment the access_token can be used for. For a closed-loop payment, you must include the payments scope.
Learn more about how to configure and generate a payment access token.
4. Pay-in configuration and creation
To create a pay-in, send a POST request to the /v3/payments endpoint with the details of the payment.
The exact details you need to include depend on your integration. In this example, we’ll assume the payment is to your merchant account, in EUR from France, and that the payer needs to select a bank and scheme with no fee.
The interactive window and expandable code block below contain the JSON body for this example.
Expand to access the request above as plain text
{
	"amount_in_minor": 15000,
	"currency": "EUR",
	"payment_method": {
		"provider_selection": {
      "type": "user_selected",
      "filter": {
        "countries": [
          "FR"
        ],
        "release_channel": "general_availability",
        "customer_segments": [
          "retail"
        ]
      },
      "scheme_selection": {
        "type": "user_selected",
        "allow_remitter_fee": false
      }
    },
		"type": "bank_transfer",
		"beneficiary": {
			"type": "merchant_account",
			"merchant_account_id": "2a485b0a-a29c-4aa2-bcef-b34d0f6f8d51"
		}
	},
	"user":
    {
        "id": "f61c0ec7-0f83-414e-8e5f-aace86e0ed35",
        "name": "Jonathan Sandbridge",
        "email": "[email protected]",
        "phone": "+44123456789",
        "date_of_birth": "1992-11-28",
        "address":
        {
            "address_line1": "40 Finsbury Square",
            "city": "London",
            "state": "London",
            "zip": "EC2A 1AE",
            "country_code": "GB"
        }
    }

}To test payments with simplified request signing, we recommend you use our payments Insomnia collection and plugin.
4.1 Payment amount and currency
You specify the payment amount and currency in the amount_in_minor and currency parameters when you create a payment.
The amount_in_minor value must be in the smallest denomination of a currency: pence for GBP, or cents for EUR. In the example on this page, the amount_in_minor is 15000, and the currency is EUR, so the payment is for 150 EUR.
The currency parameter must be either GBP or EUR. Note that you cannot make a payment from a GBP account to a EUR account or vice versa.
4.2 Provider and scheme selection
Your user must choose which bank account to pay from, and which scheme to make the payment through.
The payment_method.provider_selection parameter contains some options that change how your user chooses a banking provider.
The first option is whether provider selection is preselected or user_selected. This determines whether you let the user select a provider from a list, or preselect one in your payment creation request. If you choose to let the user select one, the providers are determined by the payment currency and any filters that you apply.
The second option is the method that you choose for provider_selection.scheme_selection, which only applies to EUR payments. These options include instant_preferred, instant_only, user_selected and preselected. Your choice of scheme selection method determines whether the user can choose to pay via SEPA Instant or SEPA Credit. You can also filter out payment schemes that require a fee.
In the example payment creation request, both provider and scheme selection are user_selected, and payment schemes that require a fee are disabled.
If applicable, during the authorisation flow your user sees one page where they can select a banking provider and another where they can select the payment scheme.
4.3 Beneficiary
When you create a payment, you can choose whether the beneficiary is a merchant_account or an external_account.
For a closed-loop pay-in, you must use a merchant account as the beneficiary. To do this, provide the merchant_account_id to be paid in the payment_method.beneficiary.type parameter. However, you can also add some optional details and metadata, and also optionally enable age- or name-based verification.
For payments to an external account, you must provide the beneficiary’s name, bank details (such as SCAN and IBAN) and a reference to identify the payment. You provide these in the account_holder_name, account_identifier and reference parameters.
4.4 User details
When you create a payment, you must provide various details about the user. These help you identify who made each payment.
However, you also need to collect user details as they're part of anti-money-laundering measures, which means that they're mandatory in all of your payment requests unless you're a regulated PISP. For a single payment into a merchant account like this, you must collect the user's name and one of their email address or phone number.
Additionally, if you provide the user’s email address or phone number, the user can choose to save their payment details for a faster and smoother experience with TrueLayer-driven checkouts in the future.
4.5 (Optional) Metadata
You can choose to define metadata for each payment. To do this, provide key-value pairs as part of the metadata parameter. An example where this can be useful if you need a unique ID to reconcile your payments.
4.6 (Optional) Add name- or age-based verification
TrueLayer offers an optional feature where they can verify whether a user's name, or that they're over 18 years old. If you enable this, the payment goes via an intermediary account, which means it never settles in your merchant account if the user is underage for example.
To include verification as part your payment, you need to include the optional beneficiary.verification parameter in a payment to your merchant account. You can test this in sandbox by default, but need to contact us to enable it in production.
Learn more about name- and age-based verification and how to enable it .
4.6 (Optional) Add Signup+ to your payment
Signup+ is a TrueLayer product that enables you to retrieve information about a user once they have created a payment or created a connection. This information includes name, date of birth, and address. You can use this information to prepopulate fields in the signup or checkout flow, making your users' checkouts far smoother.
To add Signup+ as a product in a payment, add the related_products.signup_plus{} parameter in your request:
//...
{
  "related_products": {
    "signup_plus": {}
    }
}
//
This ensures that the appropriate Signup+ wording displays in TrueLayer's user interface and that you are billed correctly. SU+ is available to test in sandbox by default, but you need to contact us to enable it in production.
See our Signup+ docs for information about integrating.
4.7 Payment creation request and headers
Before you send your payment creation request, you must ensure that you send your request contains these three headers:
- Your
access_token, generated in step 3.3, included as a bearer header. - An
Idempotency-Keyheader, which should be a UUID. - A
Tl-Signatureheader, which your signing library generates.
If your request includes these headers, you can create a payment.
When you make a successful payment creation request, you receive a response that contains the payment id, a user id, a resource_token, and the payment status:
{
	"id": "87b6b98b-7ee5-4874-8953-1b147f38c666",
	"user": {
		"id": "f61c0ec7-0f83-414e-8e5f-aace86e0ed35"
	},
	"resource_token": "eyJhbGciOiJIUzI1NiIsInR5cCI6IkpXVCJ9.eyJzY29wZSI6InBheW1lbnQiLCJjbGllbnRfaWQiOiJzYW5kYm94LXRvbXRlc3QtYTRkNDMyIiwianRpIjoiODdiNmI5OGItN2VlNS00ODc0LTg5NTMtMWIxNDdmMzhjNjY2IiwibmJmIjoxNzAwNDg5NjA5LCJleHAiOjE3MDA0OTA1MDksImlzcyI6Imh0dHBzOi8vYXBpLnRydWVsYXllci1zYW5kYm94LmNvbSIsImF1ZCI6Imh0dHBzOi8vYXBpLnRydWVsYXllci1zYW5kYm94LmNvbSJ9.kP1R9JjdwbYf6zO_gz-C9vUqUKtnO5Yt7V9cKgnFgko",
	"status": "authorization_required"
}
5. Payment authorisation
Once you’ve created your payment, your user needs to authorise the payment with their bank. The payment authorisation flow differs depending on how you configured the payment to be authorised.
There are a variety of ways you can integrate an authorisation user interface. To do this, you can use the Web SDK or hosted page. To improve the experience for mobile users, you can use our mobile SDKs for iOS, Android, and React Native.
This screenshot shows a typical payment authorisation journey. In this example, we'll use the Web SDK to create the payment.
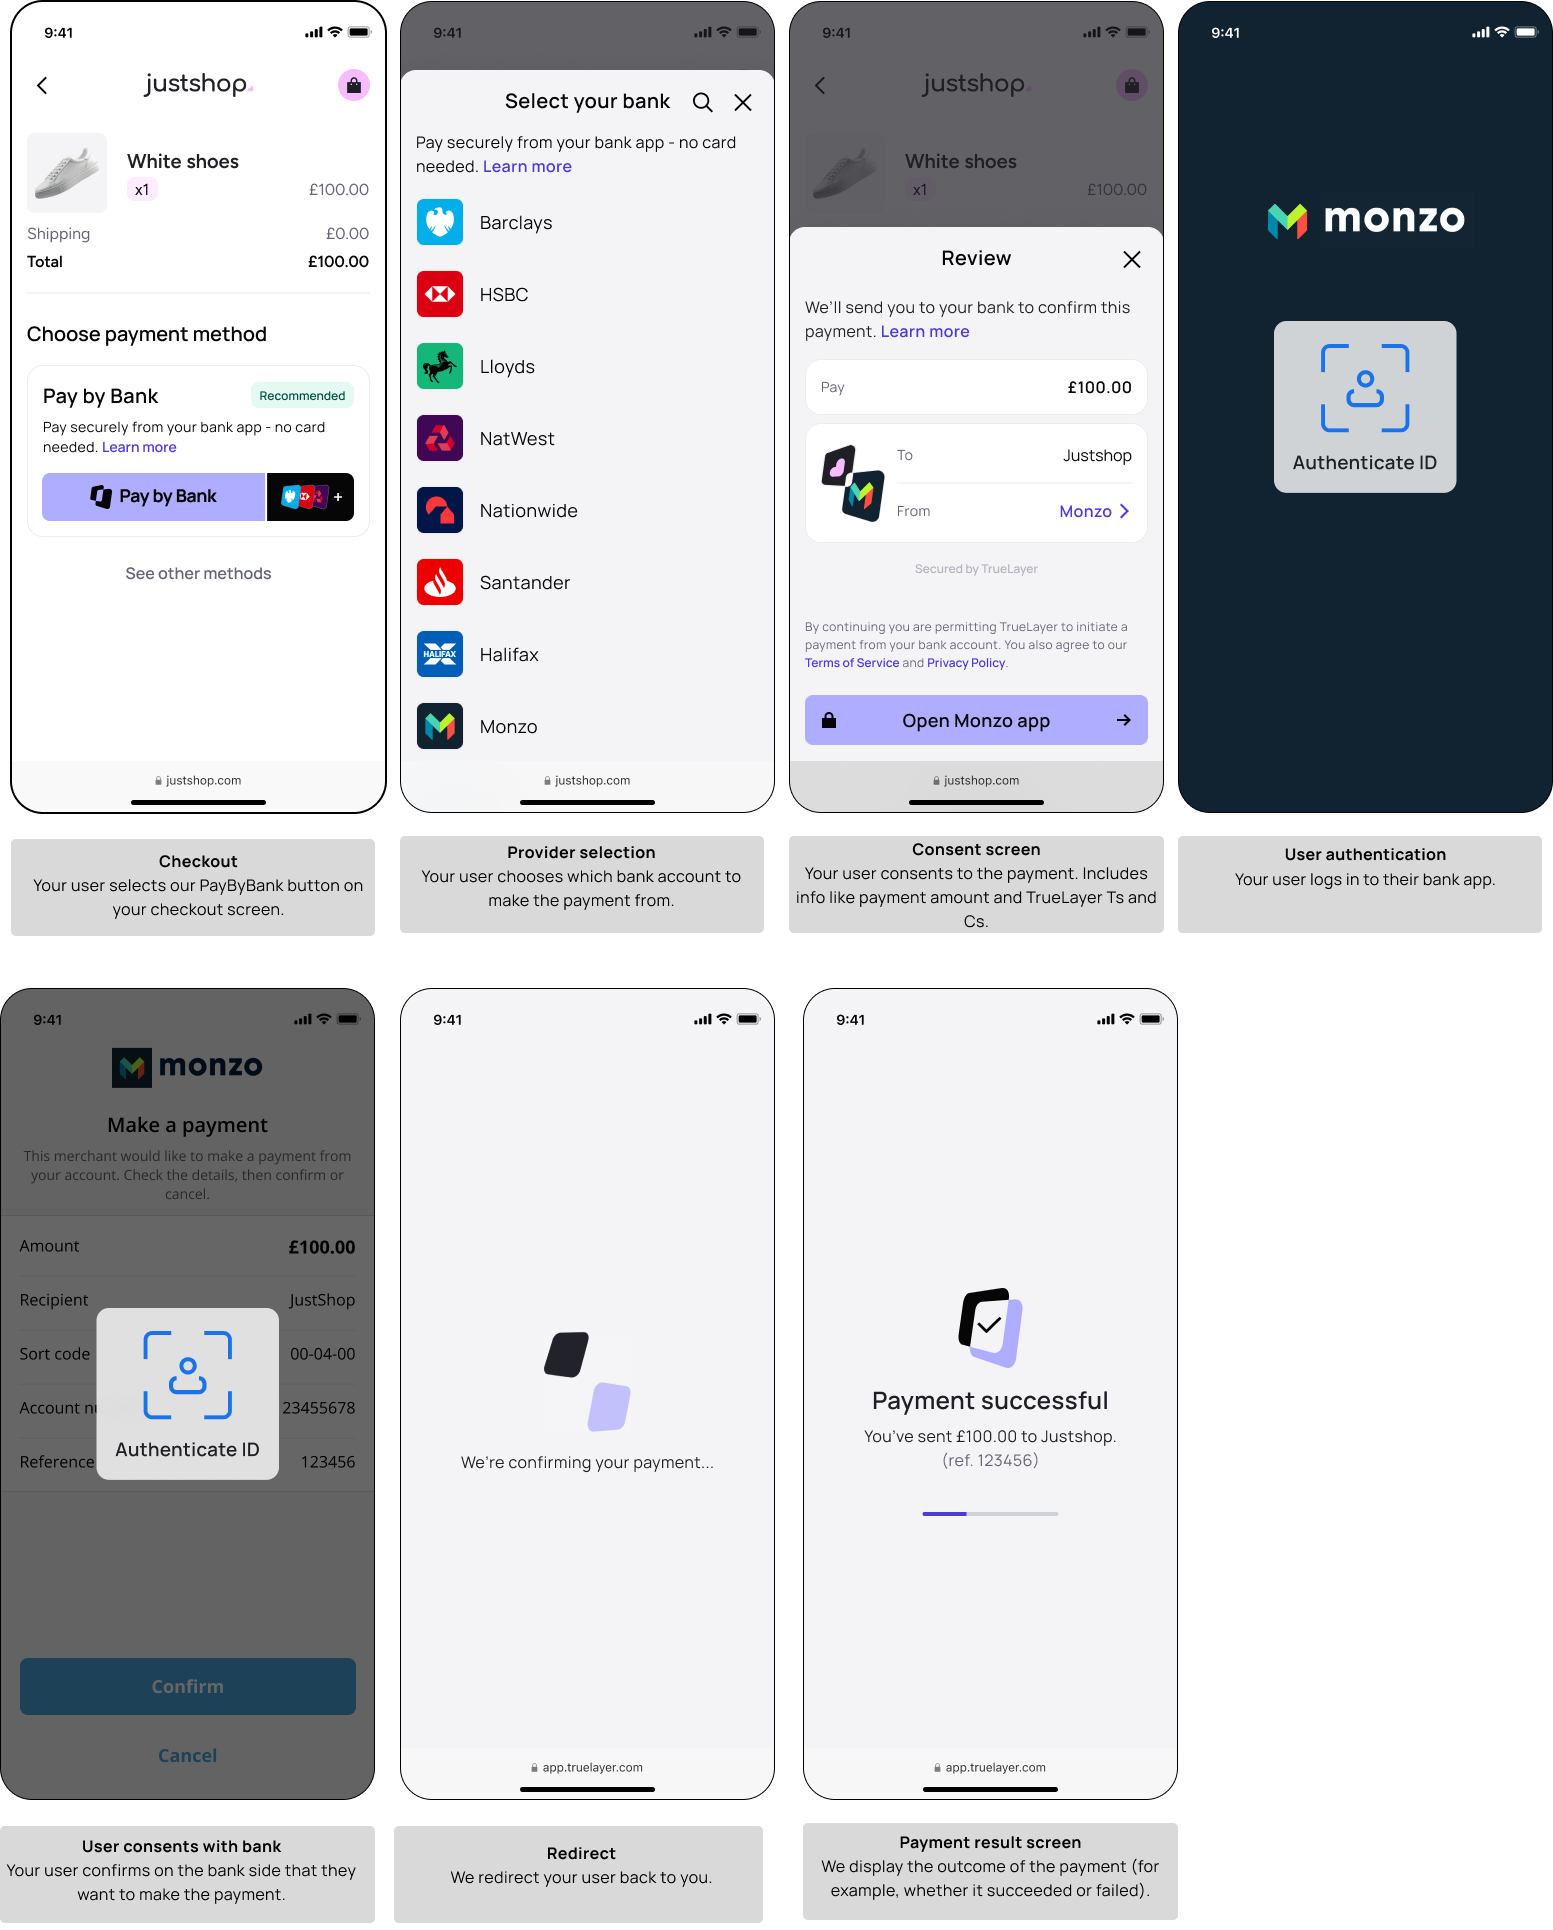
An example user journey on the Web SDK.
In this flow, your user selects the TrueLayer Pay By Bank button, which you mount on your checkout screen. They choose the bank account which they would like to pay with, log in to their bank, consent to the payment and are shown the outcome.
6. Review and track the pay-in
After your user successfully authorises a payment to your merchant account, it has a status of executed. When the status of the payment is settled, the funds are available in your merchant account.
You can check the status of payments in these ways:
- Use the payments view in Console.
- Monitor webhook notifications for your payments, including the
payment_creditablewebhook. - Poll endpoints to check the status of the payment.
The simplest method is to check in Console, but we strongly recommend that you configure webhooks at the beginning of your integration.
6.1 Check payments to your merchant account in Console
After you sign into Console, go to Payments > Payments V3 > Payments. This displays the payments view.
Within the payments view, you can see and filter your incoming and outgoing payments.
When you check the payments view, you can find the payment you made earlier. The best way to do this is to check for the payment id. However, you can also check the payments view for information such as the reference, status, value, and time and date of the payment.
6.2 Set up webhooks
When a payment moves from one status to another, TrueLayer sends you a webhook to the Webhook URI you set in step 1.2. Use these to track the progress of every payment you create. How you handle webhooks depends on your integration, but the following information can help.
Each webhook you receive has two headers:
X-TL-Webhook-Timestamp: The time you received the webhook at, in ISO-8601 format.TL-Signature: A JSON web signature with a detached payload you can use to verify the webhook.
It is essential that you validate the signature of each received webhook to ensure if was sent from TrueLayer. The logic for this is similar to request signing, and we offer libraries to help you verify these signatures.
The JSON body of each webhook contains a type, which tells you what the webhook is for. They also all contain an event_id and event_version. To learn about the types of webhook notification that you can enable, see the Payments API webhook reference.
The payment_creditable webhook
payment_creditable webhookThe payment_creditable webhook feature gives you control over when it's safe to treat a payment as complete. Since settlement times vary across schemes—seconds for UK Faster Payments or SEPA Instant, but hours or days for standard SEPA—this webhook allows you to decide when to credit users or fulfil orders.
You can stick with the default “settled” status or opt for advanced behaviours: risk-based (credit low-risk when “executed,” wait for high-risk to settle), time-bound (auto-credit if not settled within a set window), post-settlement delays, or value-based thresholds. These modes are configurable by country, scheme, payment segments, and value, giving you flexibility to balance speed with risk.
This webhook is enabled by default, and we recommend listening for it to determine when to consider a payment complete.
Read more about the payment_creditable webhook.
You have now successfully created a closed-loop pay-in. The following steps explain how to create a corresponding closed-loop payout.
7. Payout configuration and creation
If you have successfully created a pay-in to your merchant account, you can create a closed-loop payout to the same account that made the payment. To do this, create a payout and provide the payment_source_id that was contained in the payment_settled webhook for the payment you created earlier.
In this example sandbox payout, we'll make a payout back to the source that paid us earlier, for 10% of the original amount. We'll add a simple reference of Payout - John Sandbridge.
The interactive window and expandable code block below contain the JSON body for the example payment creation request described above.
Expand to access the request above as plain text
{
	"merchant_account_id": "2a485b0a-a29c-4aa2-bcef-b34d0f6f8d51",
	"amount_in_minor": 150,
	"currency": "EUR",
	"beneficiary": {
		"type": "payment_source",
		"user_id": "c7022d14-3f53-4162-99de-1d615b77b960",
		"payment_source_id": "c7022d14-3f53-4162-99de-1d615b77b960",
		"reference": "Payout - John Sandbridge"
	}
}
7.1 Merchant account id
idWhenever you make a payout from your merchant account, you must include the merchant account id in the merchant_account_id parameter. This ensures that your payout is deducted from the correct merchant account.
You included your merchant account id when you created the pay-in, but you can also get it through the /v3/merchant-accounts endpoint, or in Payments > Merchant Account > Details in Console.
7.2 Payment amount and currency
You specify the payout amount and currency in the amount_in_minor and currency parameters at payment creation.
The amount_in_minor value must be in the smallest denomination of a currency (pence for GBP, cents for EUR).
The currency parameter must be either GBP or EUR. Note that you cannot make a payment from a GBP account to a EUR account or vice versa.
7.3 Beneficiary details
There are three types of beneficiary for a payout: an external account, a payment source, or a business account. For a closed-loop payout, you use a payment source as the beneficiary.
A payment source is defined at the moment you receive a payment into your merchant account. You can use this payment source to make a payment back to the account that was originally used to pay.
To specify a payment source as the beneficiary of a payout, use the payment_source.id value returned in the payment_settled webhook. You can also find the payment source ID in the remitter details if you select a payment in the Console payments view.
You must also include the user_id in the beneficiary object for your payout. Find this in the payment_settled webhook.
The beneficiary object also contains a reference parameter. You can enter a string in this parameter, which displays as a payout reference for the beneficiary.
7.4 (Optional) Metadata
You choose to define metadata for each payout. To do this, provide key-value pairs as part of the metadata parameter. An example where this can be useful if you need a unique ID to reconcile your payouts.
7.5 Payout creation request and headers
Before you send your payout creation request, ensure that your request contains these three headers (they're the same as the headers you used when you created the pay-in):
- Your
access_token, generated in step 3.3, included as a bearer header. - An
Idempotency-Keyheader, which should be a UUID. - A
Tl-Signatureheader, which your signing library generates.
If your request includes these headers, you can create a payout.
When you make a successful payout creation request, you receive a response that contains only the id of the payout:
{
	"id": "2d651ac4-3c75-487a-9c4d-6497378fae89"
}
7.6 Monitor your payout
After you create the payout, the positive terminal status is executed rather than settled. This is because only the user’s bank can confirm the payment settlement once the funds are sent from your merchant account.
Payout retry behaviour
Payouts are executed over an instant payment scheme, so they usually settle within minutes.
However, sometimes the payout cannot execute instantly, for example because the beneficiary’s bank is experiencing issues with a payment scheme. In these cases the payout is retried four times, over an average duration of 1 hour.
Contact us to change the behaviour of payout retries.
You have now successfully made a closed-loop payout and completed your closed-loop payment. The steps below are optional, but including them in your integration optimises the user experience.
8. (Optional) Improve the returning user payment flow
When your user pays you for the first time, they provide you with information on their side including the bank they choose to pay with. Payment API responses also contain a unique id for each new user. You can store this, or build your own infrastructure to record when a user is returning to pay you again.
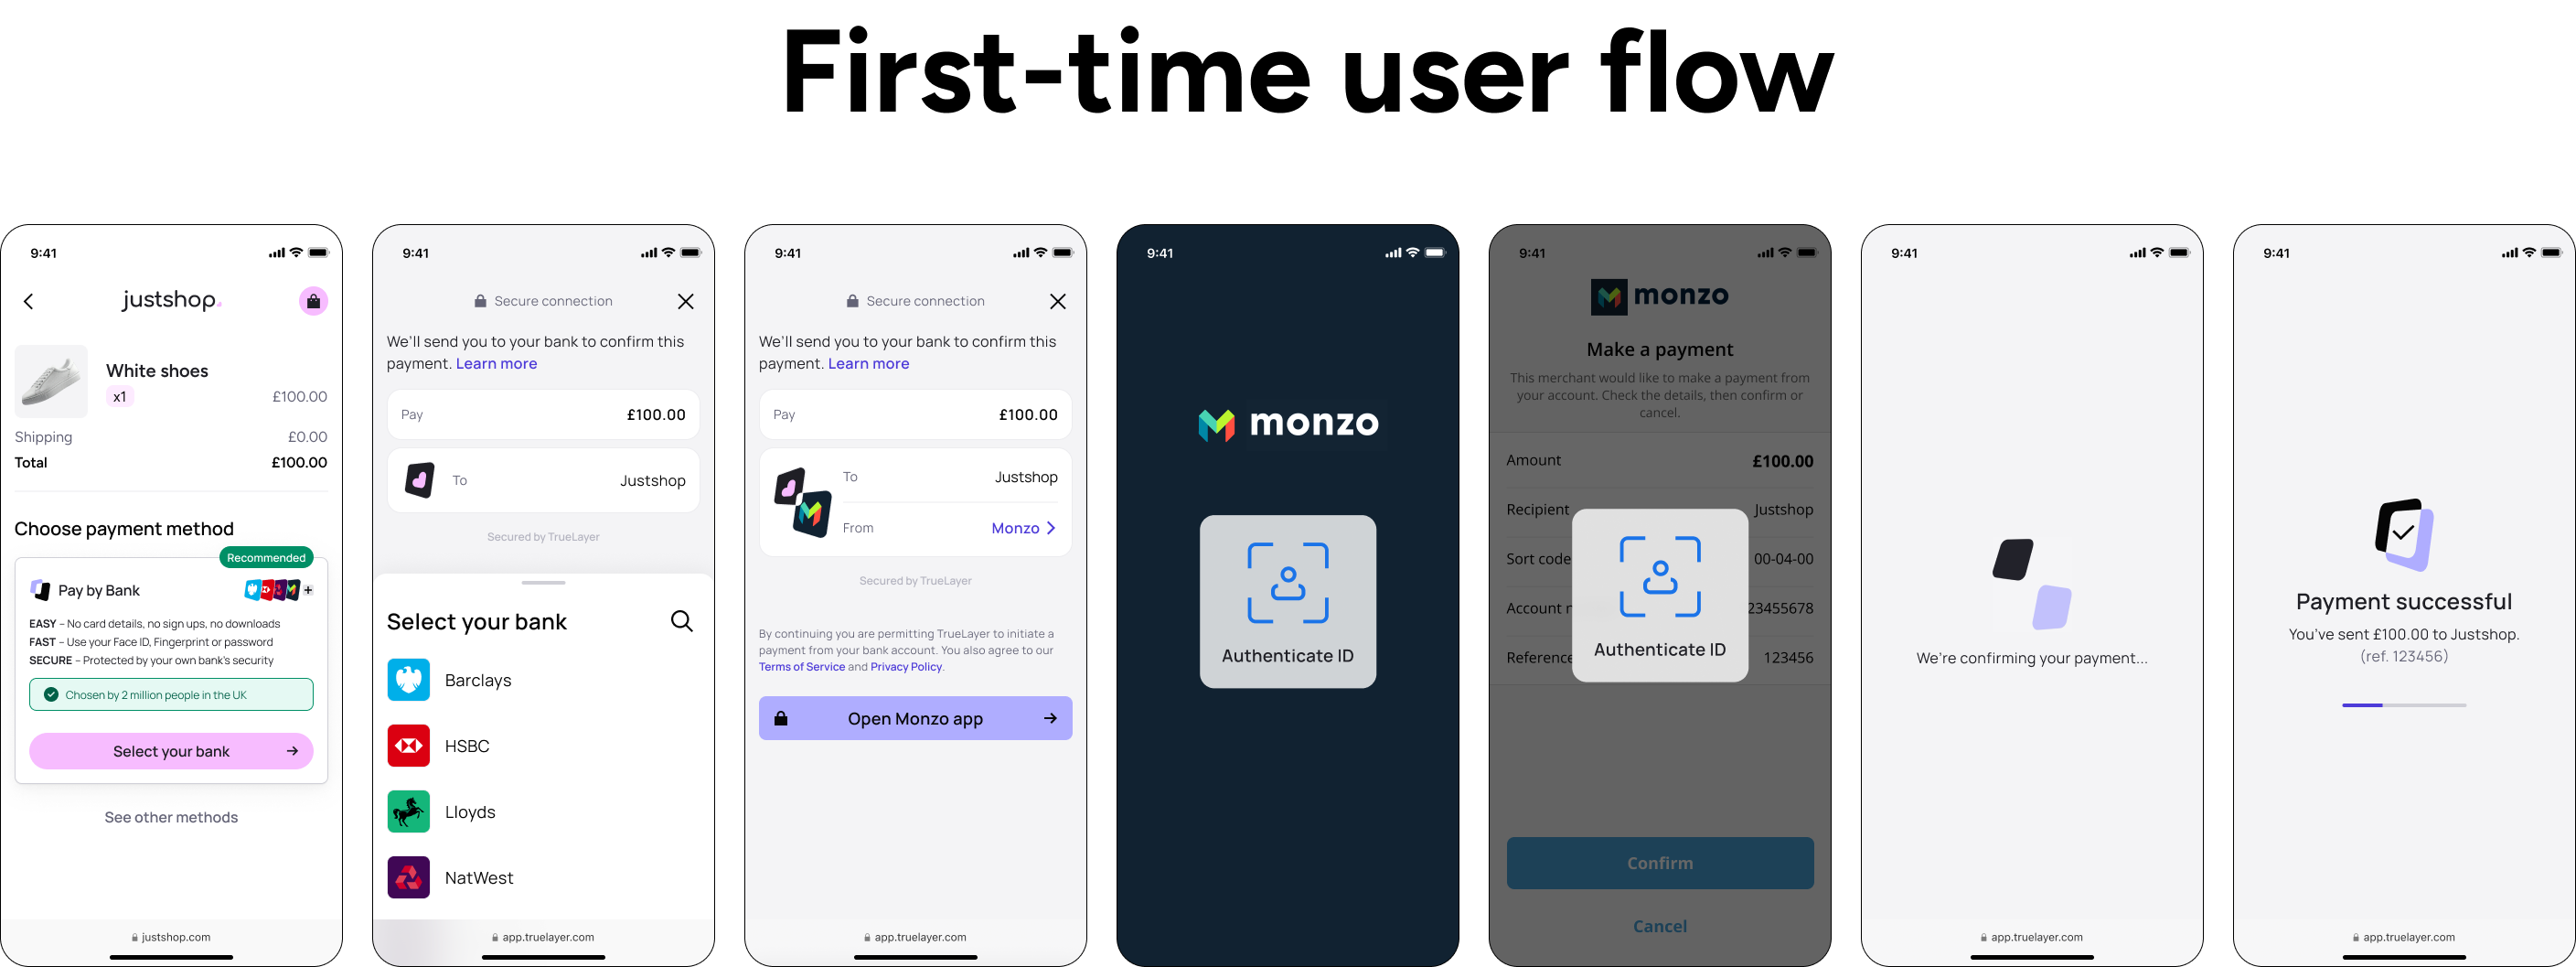
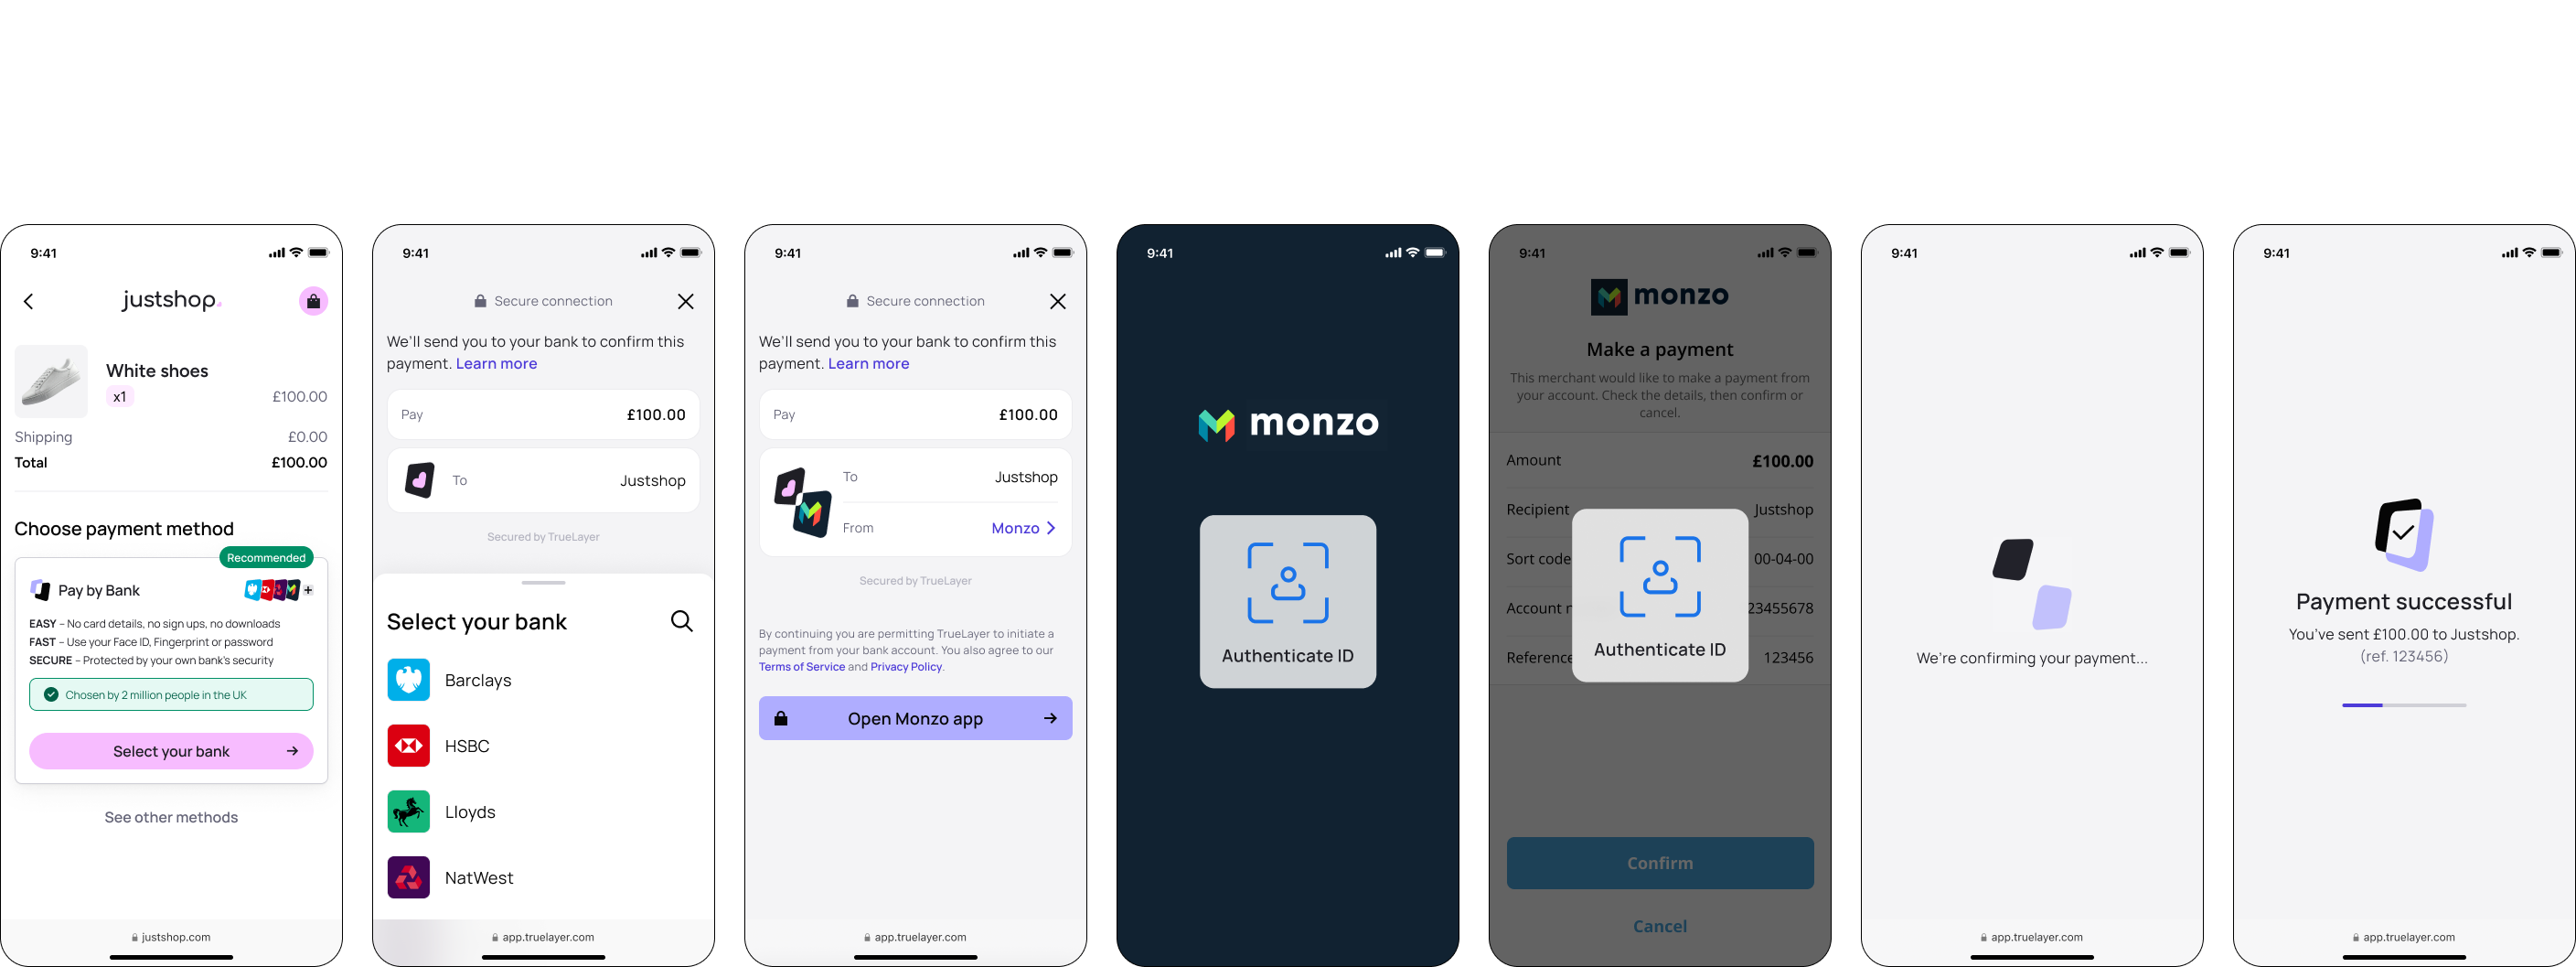
You can then use this information to preselect the user's preferred bank next time they pay you. This reduces the amount of information the user needs to provide, improving their experience.
In the example flow here, the preferred account is displayed as the default method. However, your payment app's UI can offer this in a variety of ways. For example, an option named Pay with your saved details.
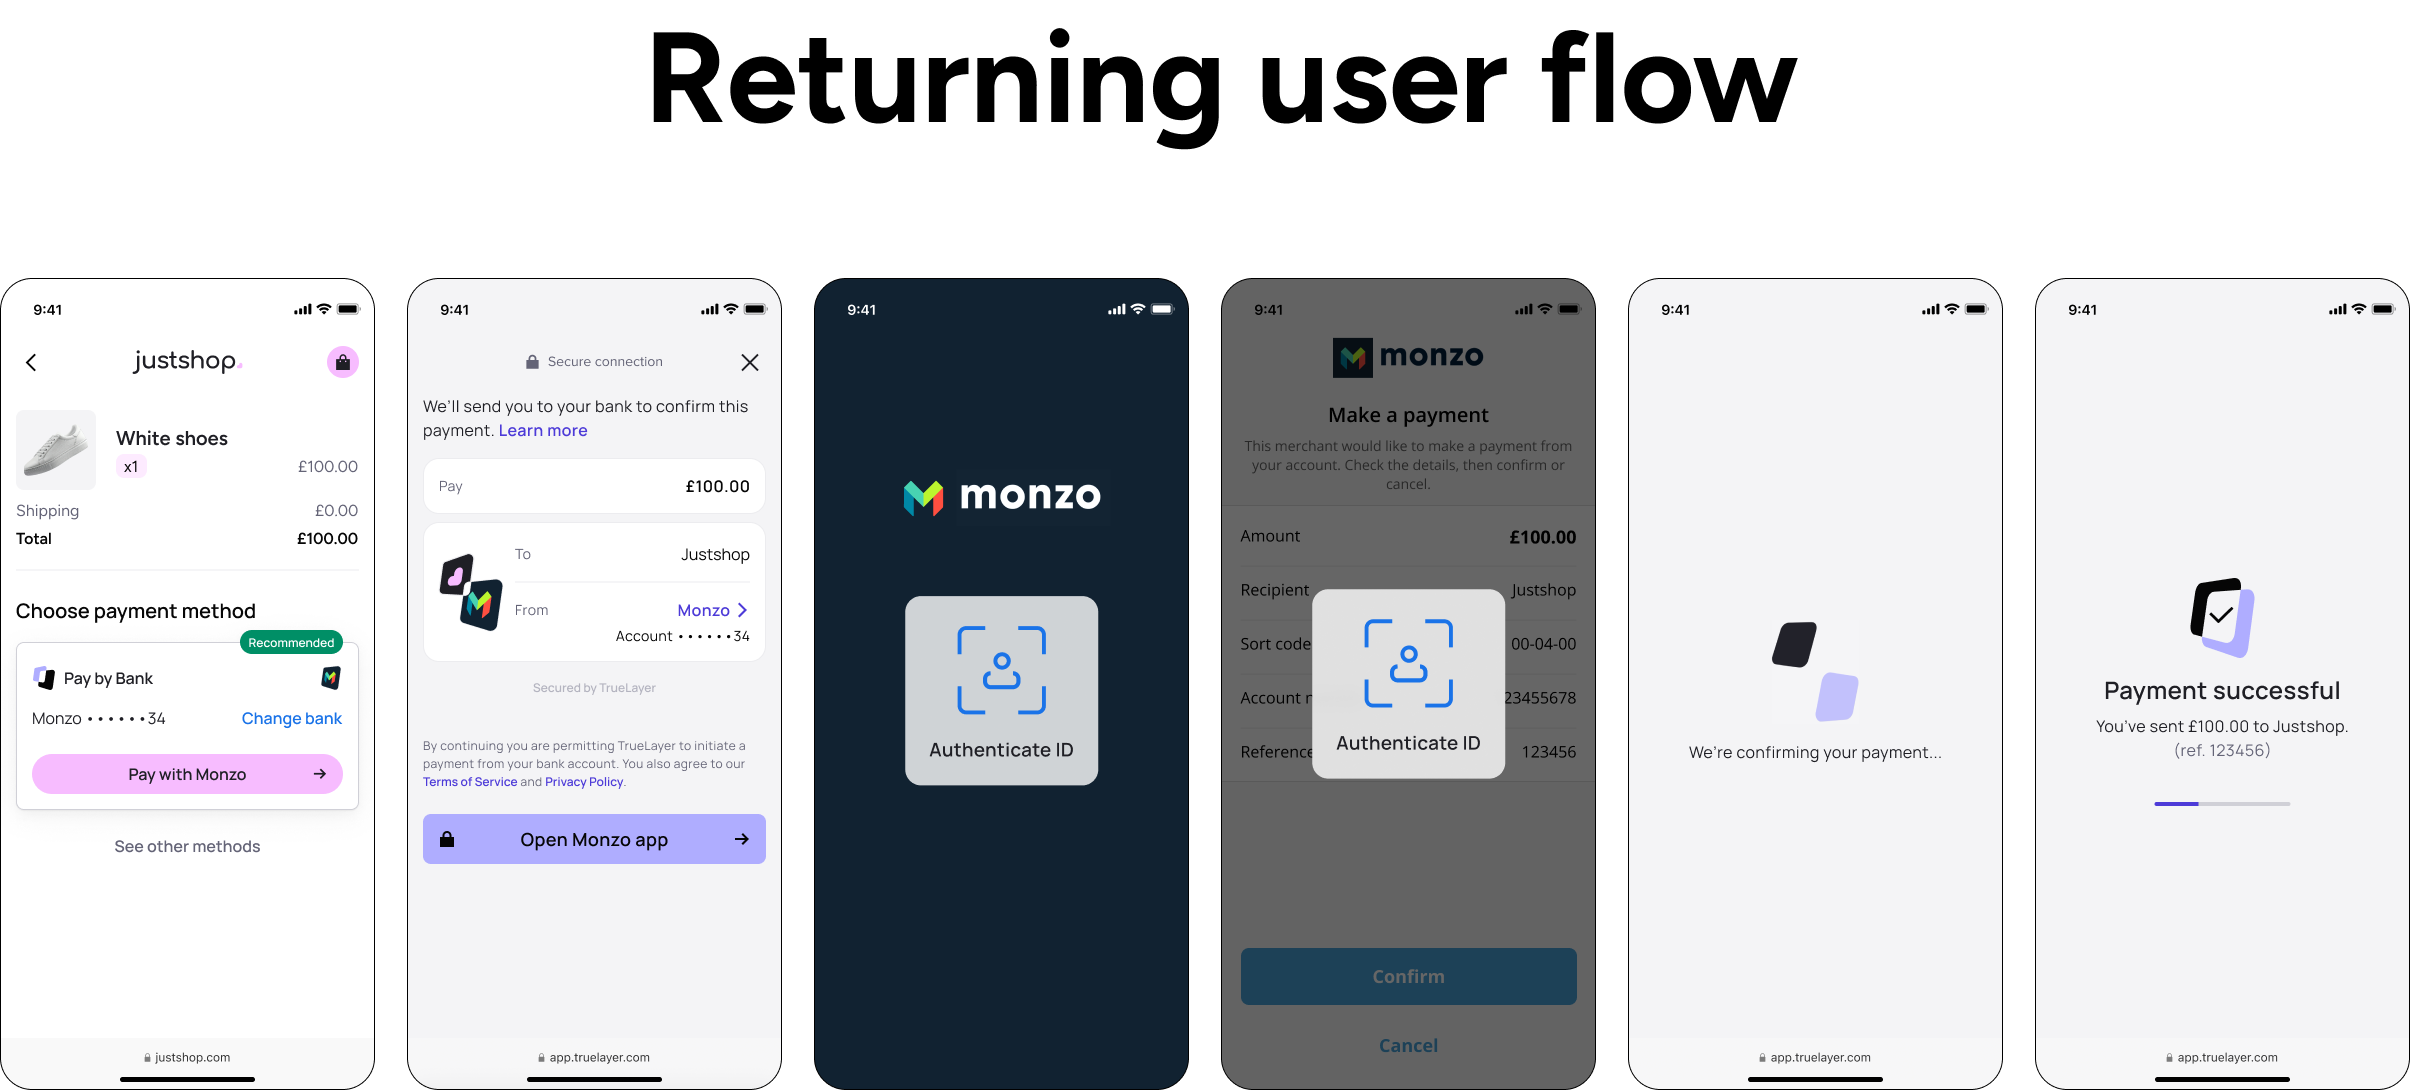
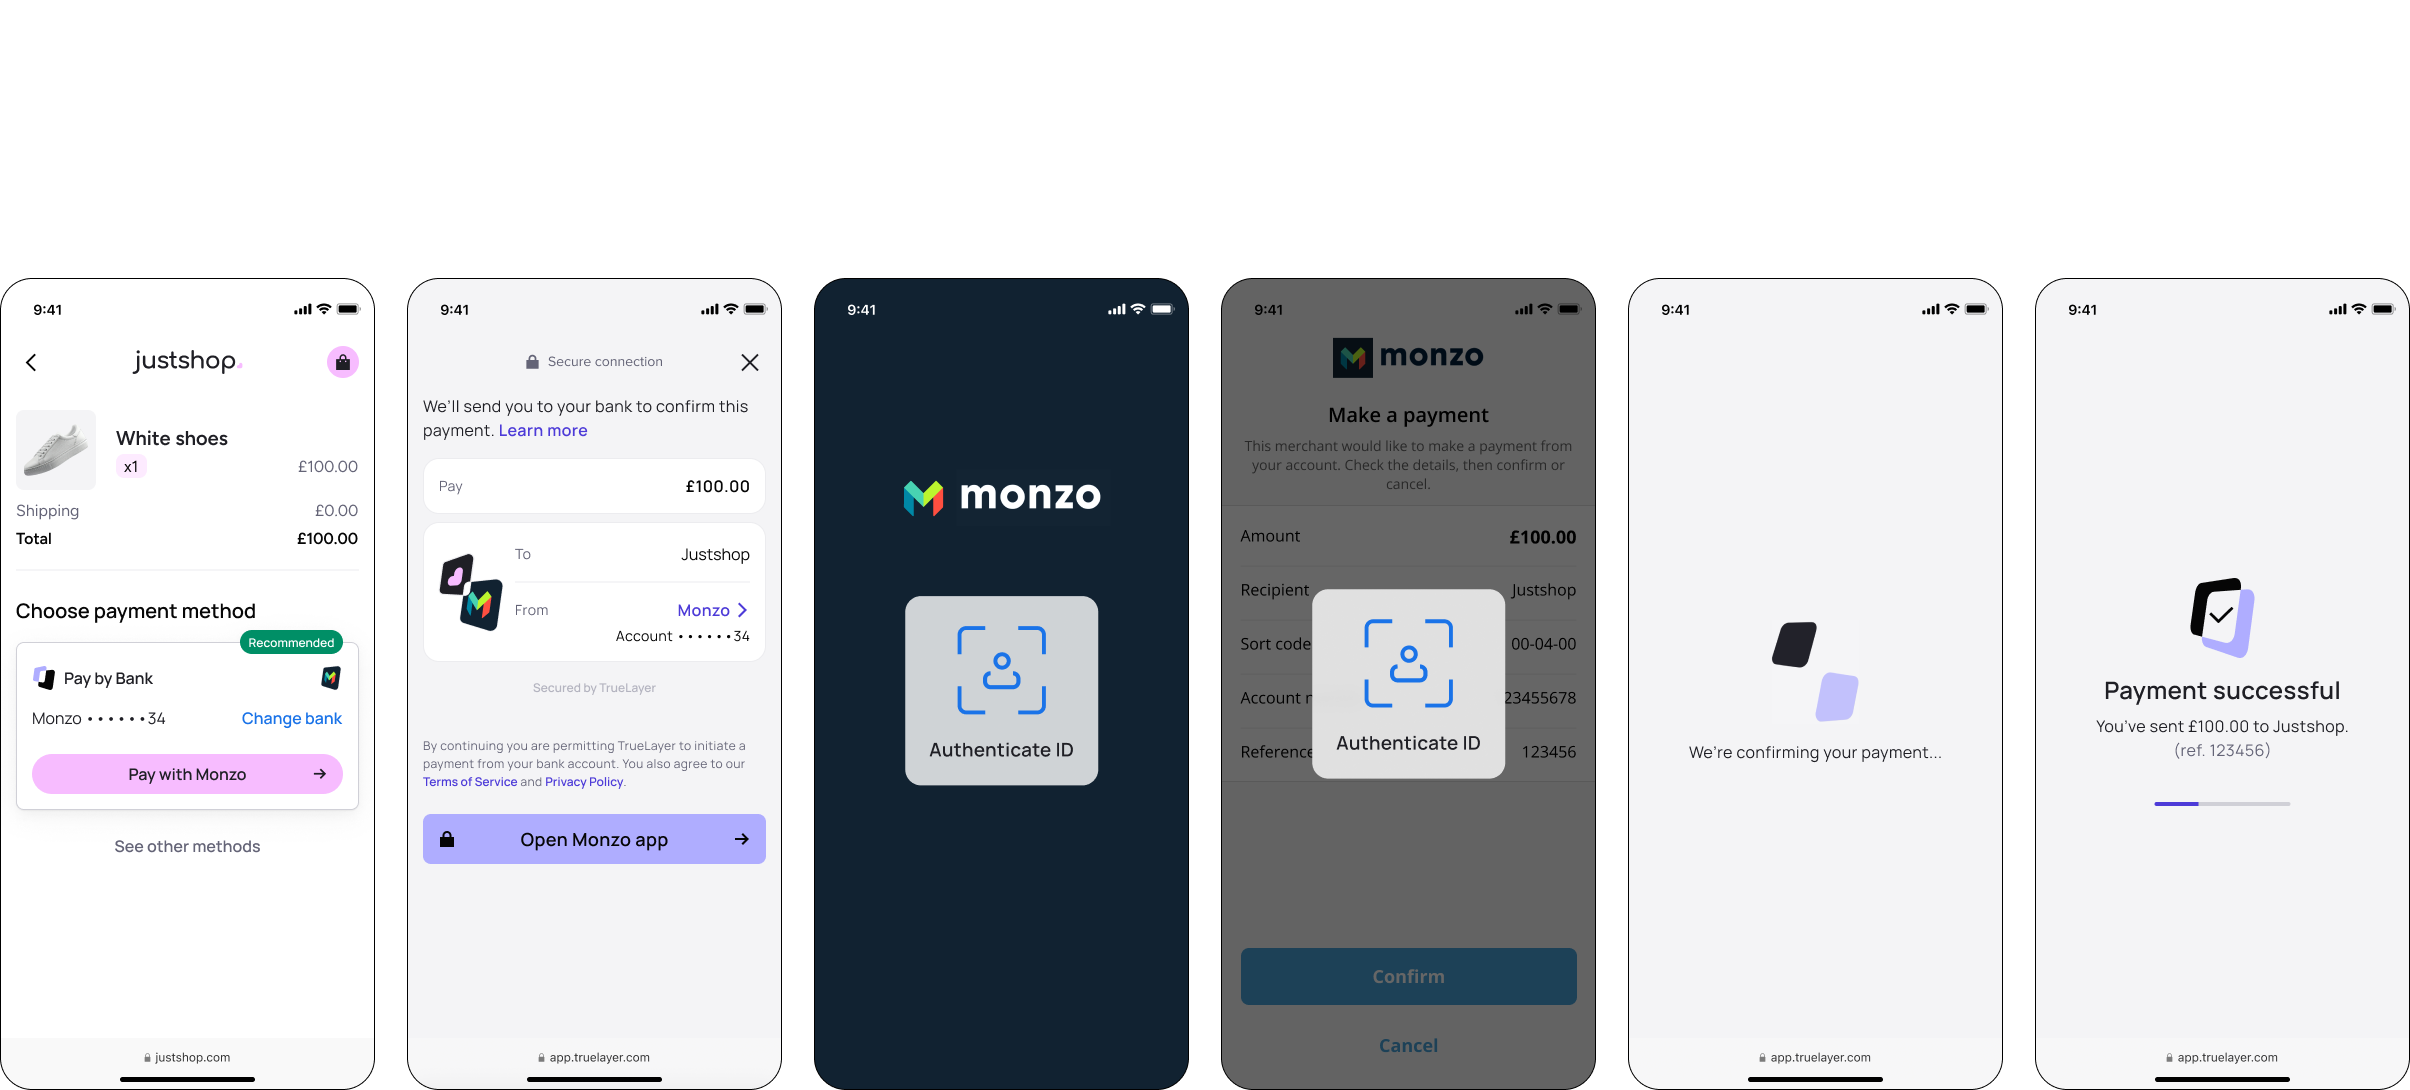
The pay-in we created in step 4 of this guide used the user_selected provider and scheme selection method. This enabled the customer to select a banking provider and also whether to use SEPA Instant or SEPA Credit as the payment scheme. To enable the simpler returning user flow, the pay-in should use the preselected provider and scheme selection methods.
8.1 Returning user pay-in configuration and creation
To create a pay-in, as in step 4, send a POST request to the /v3/payments endpoint with the details of the payment.
The payment_method.provider_selection parameter lets you change how your user chooses a banking provider. For a return user, use preselected as the value for the payment_method.provider_selection.type parameter.
To make this payment in the sandbox environment, we'll use a sandbox provider, mock-payments-fr-redirect. This sandbox provider is designed for testing French payments where the user is redirected after payment authorisation, and also supports instant and non-instant payment schemes.
The interactive window and expandable code block below contain the JSON body for this example.
Expand to access the request above as plain text
{
	"amount_in_minor": 30000,
	"currency": "EUR",
	"payment_method": {
		"provider_selection": {
      "type": "preselected",
      "scheme_selection": {
        "type": "user_selected",
        "allow_remitter_fee": false
      },
			"provider_id": "mock-payments-fr-redirect"
    },
		"type": "bank_transfer",
		"beneficiary": {
			"type": "merchant_account",
			"merchant_account_id": "2a485b0a-a29c-4aa2-bcef-b34d0f6f8d51"
		}
	},
	"user":
    {
        "id": "f61c0ec7-0f83-414e-8e5f-aace86e0ed35",
        "name": "Jonathan Sandbridge",
        "email": "[email protected]",
        "phone": "+44123456789",
        "date_of_birth": "1992-11-28",
        "address":
        {
            "address_line1": "1, Hardwick Street",
            "city": "London",
            "state": "London",
            "zip": "EC1R 4RB",
            "country_code": "GB"
        }
    }

}As the returning user pay-in flow is largely the same as the original pay-in flow explained in step 4, we only explain how to configure the
provider_selectionparameter below.Note that this example still includes the user's information such as name, email, and date of birth in the request, even though this information was included before. It's important to provider user information for each payment.
8.2 Obtain the provider_id from the previous payment
provider_id from the previous paymentYou have now set the provider selection method to preselected. You now need to provide the bank for the user to pay with.
Use the payment_method.provider_id value returned in the payment_settled webhook from when the user first paid you.
You can also find the provider ID in the Details section in the right panel when you select a payment in the Console payments view.
Once you have the provider_id, use it as the value for the payment_method.provider_selection.provider_id parameter in your payment.
8.3 Specify the scheme selection method
With a payment that has a preselected provider, there are four available behaviours for scheme selection, which you specify in the payment_method.scheme_selection.type parameter:
instant_only: Ensures that the payment is made over an instant payment scheme and does not fall back to a non-instant scheme, failing, if this isn't possible.instant_preferred: Attempts to make the payment over an instant payment scheme and falls back to a non-instant scheme if this isn't possible.user_selected: Lets the user choose between instant and non-instant payment schemes. Most relevant when there is a fee payable for an instant payment.preselected: Use this and provide ascheme_idto specify the scheme that the payment must be made over.
In this payment, the user will be able to choose whether to pay with an instant or non-instant payment scheme. Provide a value of user_selected for the payment_method.scheme_selection.type parameter.
This example payment doesn't give the user the option to select a payment scheme that incurs an additional fee. Use a value of false for the Boolean scheme_selection.allow_remitter_fee parameter.
8.4 remitter object
remitter objectIn a returning payment with the preselected provider selection method, you can optionally include the payment details the user used before. We recommend that you do this, as it simplifies the authorisation process for users. Depending on their banking provider, it either skips account selection, or preselects the account for them.
The remitter object contains two parameters that you need to complete: account_holder_name and account_identifier.
8.4.1 account_holder_name parameter
account_holder_name parameterThis should be the name associated with the account making the payment. This field isn't technically required, but you should include it if possible.
8.4.2 account_identifier parameter
account_identifier parameterThe number of child parameters with the account_identifier parameter changes based on the type of account the user is paying from. Typically, this value is either SCAN or IBAN, and corresponds to whether your user is paying from a UK sort code and account number, or from an IBAN.
The first parameter you need to include is account_identifier.type, which should have a value of sort_code_account_number or iban (you can also use bban or nrb in rare use cases). Then, based on your choice, provide the following information:
sort_code_account_number: Provide the sort code and account number of the user in theaccount_identifier.sort_codeandaccount_identifier.account_numberparameters respectivelyiban: Provide the IBAN of the user in theaccount_identifier.ibanparameter.
8.4.3 remitter object examples
remitter object examplesThis code block contains an example of the remitter object for both SCAN and IBAN payments.
{
//...
  "remitter": {
    "account_holder_name": "John Sandbridge",
    "account_identifier": {
      "type": "sort_code_account_number",
      "sort_code": "040668",
      "account_number": "00000871"
      }
    }
//...
}
{
//...
"remitter": {
"account_holder_name": "John Sandbridge",
"account_identifier": {
"type": "iban",
"iban": "GB75CLRB04066800000871"
}
}
//...
}8.5 Authenticate a returning user pay-in
If you provide the information in the previous steps in the payment_method.provider_selection parameter of your payment, you can create the payment. As with the previous pay-in, you need to ensure the payment includes the following three headers:
- Your
access_token, generated in step 2.3, included as a bearer header. - An
Idempotency-Keyheader, which should be a UUID. - A
Tl-Signatureheader, which your signing library generates.
If your request includes these headers, you can create the payment.
As with your previous payment creation request, you receive a response that contains the payment id, a user id, a resource_token, and the payment status:
{
	"id": "0afd1f6a-f611-48ce-9488-321129bb3a70",
	"user": {
		"id": "f61c0ec7-0f83-414e-8e5f-aace86e0ed35"
	},
	"resource_token": "eyJhbGciOiJIUzI1NiIsInR5cCI6IkpXVCJ9.eyJzY29wZSI6InBheW1lbnQiLCJjbGllbnRfaWQiOiJzYW5kYm94LXRvbXRlc3QtYTRkNDMyIiwianRpIjoiMGFmZDFmNmEtZjYxMS00OGNlLTk0ODgtMzIxMTI5YmIzYTcwIiwibmJmIjoxNzA1OTM5NTk3LCJleHAiOjE3MDU5NDA0OTcsImlzcyI6Imh0dHBzOi8vYXBpLnRydWVsYXllci1zYW5kYm94LmNvbSIsImF1ZCI6Imh0dHBzOi8vYXBpLnRydWVsYXllci1zYW5kYm94LmNvbSJ9.yeiHD5yqU18nf7-8tPpkEUGCxy13va8WLsEPFvkgfBY",
	"status": "authorization_required"
}
Updated 21 days ago
Next steps
If you completed all of the steps in this guide, you completed a closed-loop payment. If you did this in sandbox and don't have full access to the live environment, you could contact us and start to test in production at this point.
Read more about how to configure pay-ins and payouts, or learn more about the webhooks available for your integration.