Payouts integration checklist
Every step you need to take to set up an open-loop payouts integration.
This is an overview of the steps required to integrate open-loop payouts. Each step also contains links to more detailed documentation.
Use this page to check you’ve achieved everything needed for your integration.
Closed-loop payoutsIf you want to create a closed-loop payout, see our payments integration checklist. A closed-loop payout cannot exist without a closed-loop pay-in, so you need to learn how to create a pay-in first.
Introduction
A open-loop payment is a payout from your merchant account to an external account. The payout does not need to have previously paid you, you just need their bank details in the form of sort code and account number, or IBAN.


There are a number of general parts to a closed-loop payment integration:
- Console signup and webhook configuration
- Create and top up your merchant account
- Payout authentication
- Payout creation and configuration
- Payout monitoring
Each of these parts are included in the steps outlined on this page.
1. Console signup and webhook configuration
The first step of any integration is to sign up to Console. Learn more about this process and what you can do in Console in our Console quickstart guide.
When you sign up to Console, you create your client credentials and upload your signing keys to secure your API requests. See our guide to generating keys.
On Console, you can upload keys, configure webhook URIs, view and administrate your payments, and more. Learn more about Settings page in Console.
1.1 Upload your public key
Once you’ve signed up to Console, you need to upload your public key. To do this, open the Settings page and click the + icon to the right under the Signing keys heading.
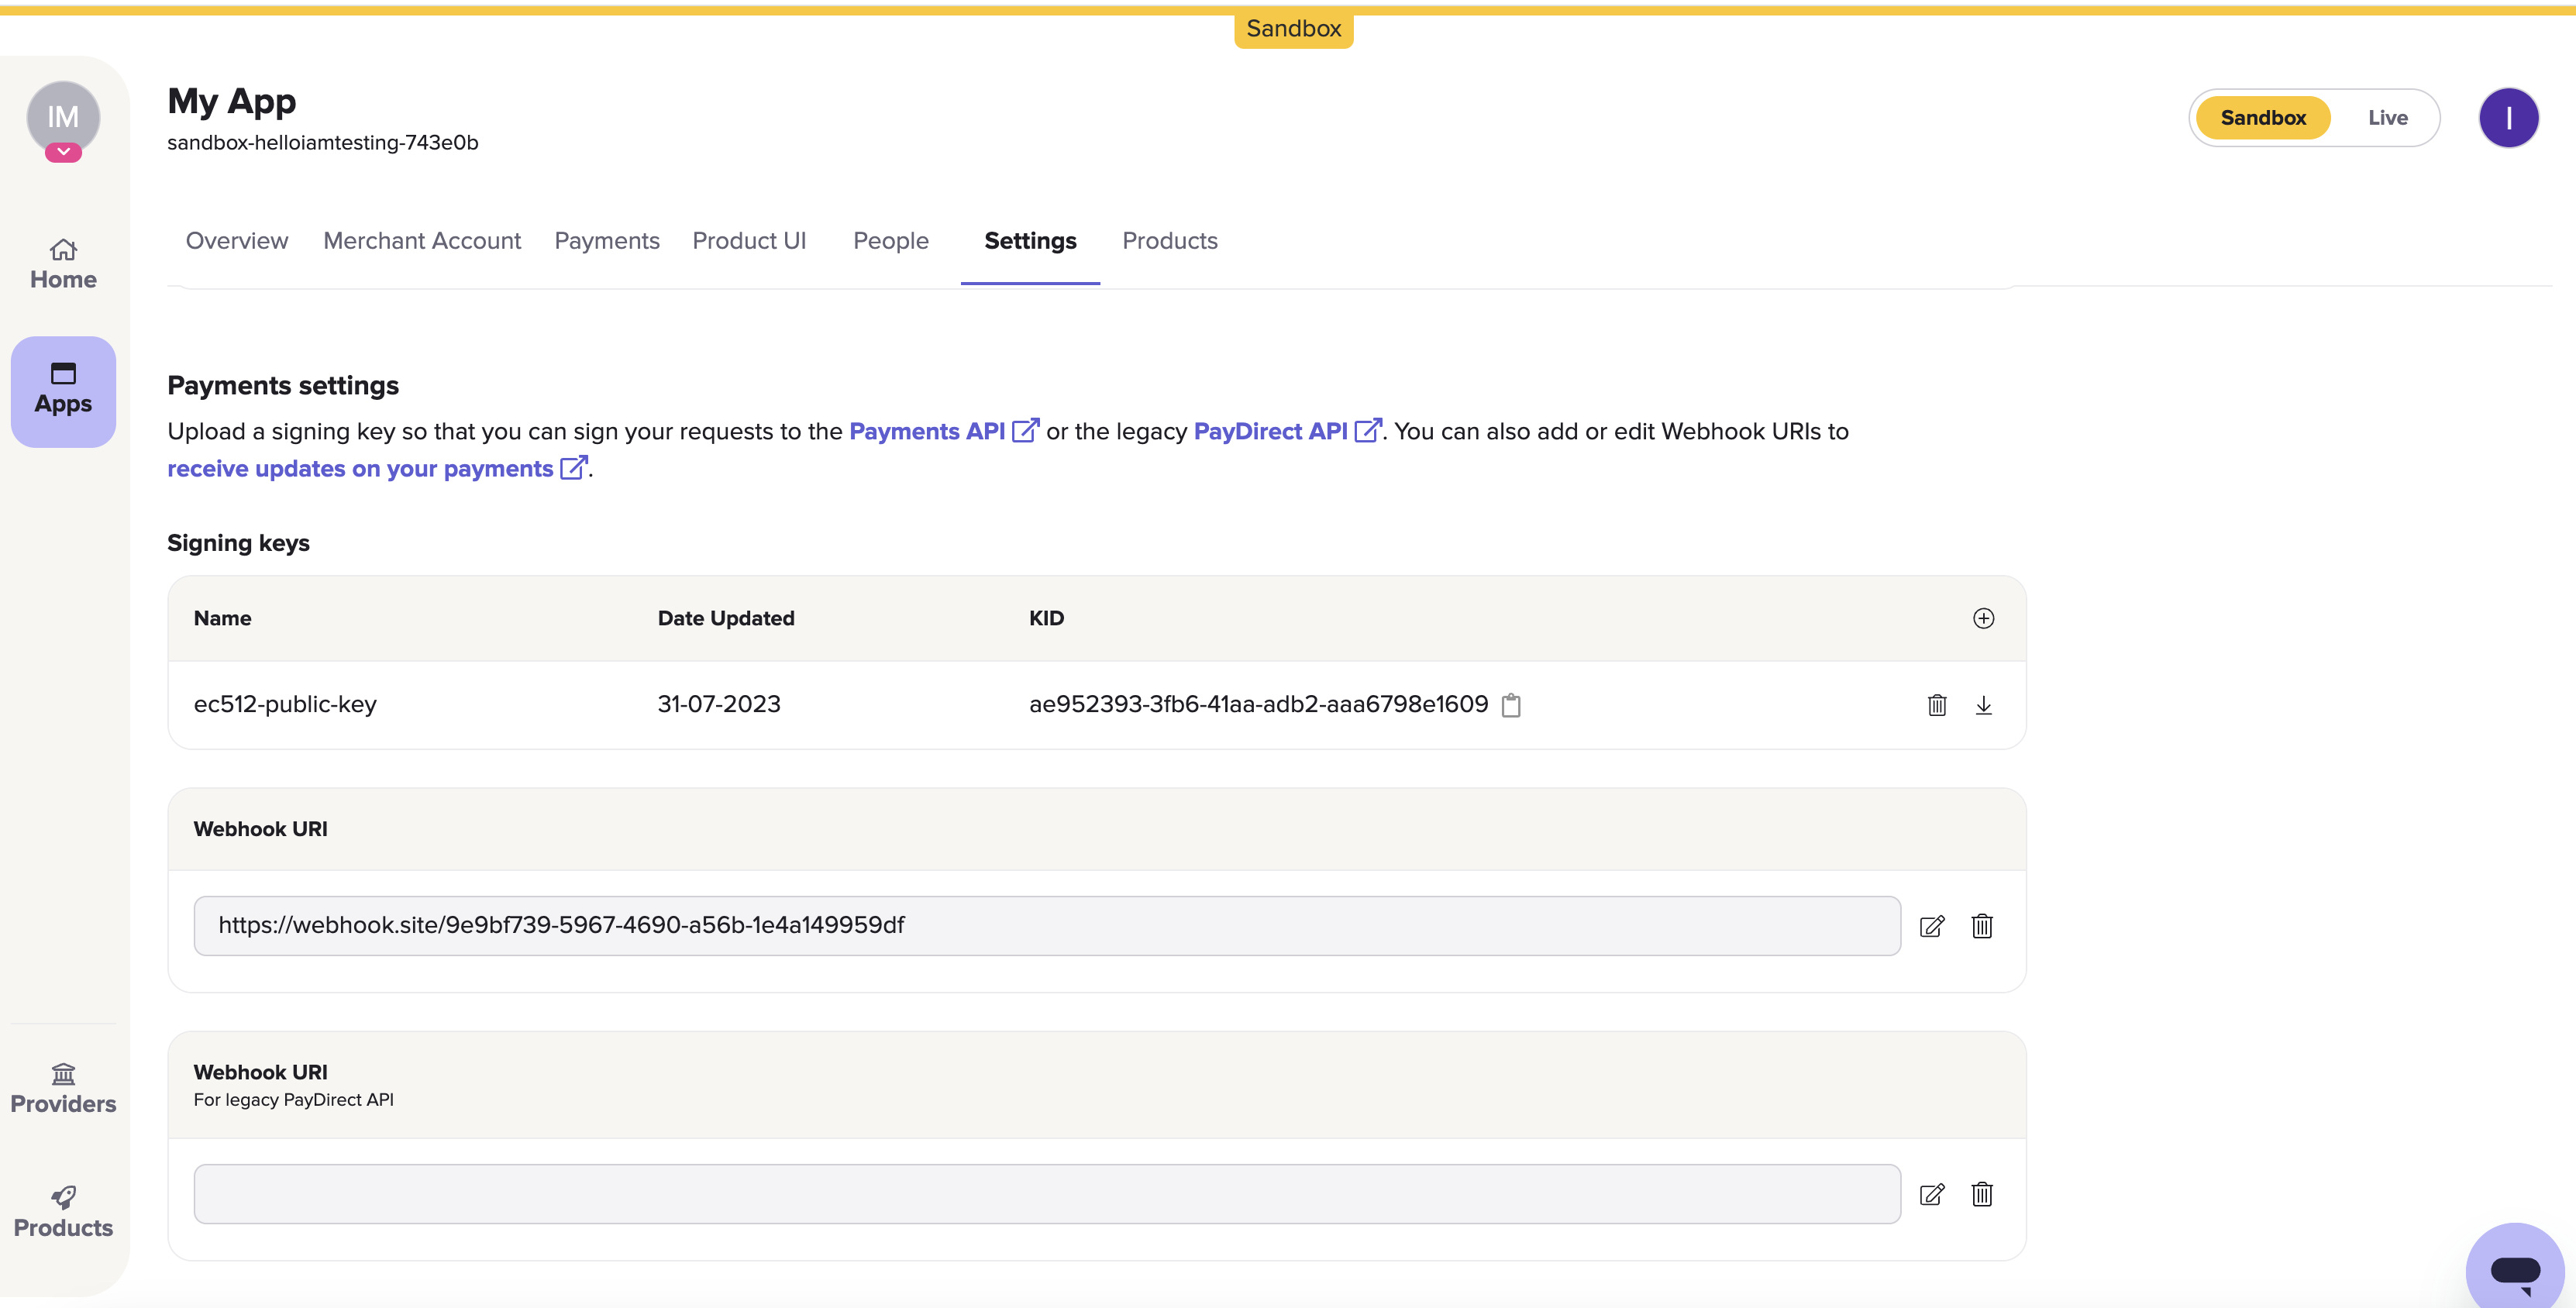
The Payments settings > Signing keys section on the Settings page in Console. Just beneath it is the Webhook URI box.
1.2 Set your webhook URI
On the Settings page, the next box after the Signing keys box is the Webhook URI box. Here, click the edit icon to the right of the box and enter URI where you would like webhooks to be sent.
Webhooks are the recommended way for you to receive updates about anything you do with the TrueLayer API. For example, it can tell you if any VRP mandates, payments, or payouts you make are successful.
Our documentation explains how you can validate your webhook signatures using the public key you uploaded in the last step. You can also test webhooks locally when building your integration.
Learn more about about the possible payment and payout webhooks you can receive.
2. Create and top up your merchant account
It's not possible to make an open-loop payout unless you have an approved merchant account with sufficient funds.
A merchant account is an account that TrueLayer manages on your behalf. This enables a variety of functionalities such as closed-loop payments, verified payouts, and more.
When you set up a merchant account, you specify your preferred business account that's connected to your merchant account. You use this account to top up your merchant account.
Sandbox vs live testingIf you're doing initial testing in the sandbox environment, you can skip this section and go straight to section 3.
However, before you take your integration live, you need to complete the following steps.
2.1 Link your business account
When you create your Console account and an app, you decide on a client_id. Your client_id is linked to your merchant account. In order to top up and withdraw funds from your merchant account, you need to link your business account details to your client_id.
To link your business account, you need to contact us (typically your integration partner) with your client_id and the IBAN of your business account. You can also provide your sort code and account number if whitelisting a UK business account.
2.2 Top up your merchant account
Now that you have whitelisted your business account, you can add funds to it. To do this, send funds to the account details for your merchant account. To find out your details, you can either:
- Navigate to the Merchant Account page in Console, and click the Details tab.
Ensure that you select the correct currency. - Use one of the merchant account endpoints, such as
/v3/merchant-accountsor/v3/merchant-accounts/{id}.
You can also top up your merchant account by receiving closed-loop pay-ins through the Payments API v3, or through payments on a mandate. However, as part of an open-loop payout integration, it's simpler to pay through bank details so you don't need to configure pay-ins.
2.3. Set up low balance notifications
Optionally, you can set up webhooks that notify you when the balance in your merchant account is low. To do this, contact us and specify a threshold you don't want your merchant account to fall below. This is useful to ensure your account always has enough funds to fulfil customers' payout requests.
Once enabled, you receive the balance_notification webhook for your merchant account. Learn more about this feature and how to set it up.
2.4 Set up withdrawals from your merchant account
If your integration is for open-loop payouts only, you are not likely to need to withdraw funds from your merchant account. This is because you deposit the funds with the intent to pay it out to users. Nonetheless, you may need to withdraw funds, which you can do through one of two methods:
- Sweeping, where funds are automatically paid out from your account above a threshold at a specified interval.
- Manual payouts to your business account.
The steps below explain how you can set up these withdrawal methods.
2.4.a Configure sweeping in Console
To set up sweeping in Console:
- Navigate to the Merchant Account page in Console and select your merchant account.
- Open the Merchant Account Sweeping tab.
- Enter an Amount to sweep funds above, and select an Interval of Daily, Weekly, or Fortnightly.
Learn more about sweeping configuration in Console.
2.4.b Configure sweeping through the API
To set up sweeping, you make a POST request to the /v3/merchant-accounts/{id}/sweeping endpoint. In your request, ensure that you include:
- Your merchant account
idas a path parameter. - The value above which to sweep funds in a minor denomination for the
max_amount_in_minorparameter. - A value of
daily,weekly, orfortnightlyfor thefrequencyparameter.
To check your existing sweeping settings, or to delete them, make a request to the same endpoint as a GET or DELETE request respectively.
Learn more about setting up sweeping through the API.
2.4.c Make a payout to your business account
You can withdraw funds from your merchant account by making a payout, in largely the same method as explained on this page.
When you create a payout, you specify external_account, payment_source, or business_account as the type of the beneficiary of the payout. If you select business_account, you don't need to provide any other information, and the payout is sent to the whitelisted business account for the merchant account.
3. Payout authentication
Before you can create open-loop payouts, Payments API requests must be authenticated properly and include appropriate headers. This ensures your payouts are secure and can be sent or retried without issues.
3.1 Sign your requests
Request signing ensures that any payment requests made to your merchant account are verified against your public key hosted in Console. As only you have the private key that matches your public key, only you can create payments through your integration.
TrueLayer offers and maintains a variety of libraries to help you sign your request. These are available here on Github.
An important part of using our request signing libraries is to include your private key. You uploaded your public key to Console earlier. You can generate these through the command line.
3.2 Include an idempotency key
Put generally, idempotency with an API is the ability to repeat the same request multiple times without the API considering each request to be a new request.
It’s important that you generate and include an idempotency key with your payout requests to minimise the risk of a payment being created multiple times by accident. You this by including a key in the Idempotency-Key header for your requests. Learn more about how to fill this header.
3.3 Generate an access_token
access_tokenTo generate an access token, use the /token endpoint. Provide your client_id and client_secret, as well as the scopes for the payment. The scopes determine what types of payment the access_token can be used for. For closed-loop payments, you must include the payments scope.
You can reuse an access_token to create payouts for as long as it is valid. Access tokens are valid for 60 minutes.
Learn more about how to configure and generate a payout access token.
4. Payout configuration and creation
To create a payout, you send a POST request to the /v3/payout endpoint with the details of the payout.
The exact details you need to include depend on your integration. In this example, we’ll assume the payment is to a UK account in GBP. This section explains each part of this request in more depth. Note that the payout has a type of external_account, which you need to specify to create an open-loop payout.
Below is an example of the JSON you need to include in the payout request. You can click on elements in the request to see more information.
Expand this to access the request above as plain text
{
	"merchant_account_id": "200552da-13da-43c5-a9ba-04ee1502ac57",
	"amount_in_minor": 1,
	"currency": "GBP",
	"beneficiary": {
		"type": "external_account",
		"account_holder_name": "JOHN SANDBRIDGE",
		"account_identifier": {
			"type": "sort_code_account_number",
			"sort_code": "040668",
			"account_number": "00000871"
		},
		"reference": "Example of a reference that identifies the payment",
		"address": {
			"address_line1": "40 Finsbury Square",
			"state": "London",
			"city": "London",
			"country_code": "GB",
			"zip": "EC2A 1AE"
		},
		"date_of_birth": "1990-01-31"
	}
}To test payments with simplified request signing, we recommend you use our payments Insomnia collection and plugin.
4.1 Payout amount and currency
You specify the payment amount and currency in the amount_in_minor and currency parameters at payout creation.
As the amount_in_minor parameter must be in the minor denomination of a currency, the value is equivalent to pence for GBP, or cents for EUR.
4.2 Beneficiary
The beneficiary object is essential for an open-loop payout. In this object, you specify the bank details that the payout will be made to and a variety of personal information to ensure the payout is sent to the correct person. You can also include a reference that the payee will see, to help them identify your payment.
4.2.1 Payout type
There are three values you can specify for the beneficiary.type parameter. These correspond to three different types of payout:
external_account: Use this for this payout, as this is for open-loop payouts to external accounts.payment_source: Use this for a closed-loop payout, where you payout to an account that previously paid in.business_account: Use this with your merchant accountidto payout to your whitelisted business account.
4.2.2 Account identifier
When you create a payout to an external source, you need to provide bank details to pay out to in the account_identifier object.
For account_identifier.type, you can specify either sort_code_account_number or iban. Specify the appropriate one for when you want to use SCAN for UK payments, or IBAN for EU payments. Depending upon the type you specify, you also need to provide the relevant bank details within the account_identifier object.
4.2.3 Reference
When you create a payout, you must provide a string in the reference parameter. Typically, this should help the beneficiary identify that the payout has come from you. As such, you could provide a value that makes reference to your business' name, with an ID to help you identify and reconcile the payout.
4.2.4 User details
When you create a payment, you must provide various details about the user. These are used as part of anti-money-laundering measures, and can help you to identify who made each payment.
It's mandatory to provide the name of the person you're sending the payout to in the account_holder_name parameter. You also provide their bank details in the account_identifier object.
From an API perspective, it's optional to provide extra user details in the date_of_birth and address parameters. However, we recommend you include these in all payouts, as it helps with sanctions screening and reduces the number of RFIs raised for your payouts.
Learn more about user details in your payout requests.
4.3 Metadata
You can opt to provide metadata with each payment. To do this, provide key-value pairs as part of the metadata parameter. For example, this can be useful if you need a unique ID to reconcile your payments.
4.4 Payout creation request and headers
Before you send your open-loop payout request, you must ensure that you send your request contains three headers:
- Your
access_token, generated in step 2.3, included as a Bearer header. - An
Idempotency-Keyheader, which should be a UUID. - A
Tl-Signatureheader, which your signing library generates.
If your request includes these headers, you can create a payment.
When you make a successful paymout creation request, you receive a response that contains only the id of the payout:
{
  "id": "0cd1b0f7-71bc-4d24-b209-95259dadcc20"
}
5. Payout monitoring and retries
When you make a payout, the terminal status is executed or failed rather than settled. This is because settlement is confirmed by the recipient's bank. You can think of this as similar to the post. When you send a letter, it's executed, and when it arrives, it's settled. Only the recipient is able to confirm its arrival.
To ensure your users receive their payouts as quickly as possible, payout retries are enabled by default, but you can configure them further. You should also set up webhooks so that you know when payouts reach different statuses.
5.1 Payout retries
All TrueLayer payouts are executed over an instant payment scheme by default, meaning they should settle within minutes.
However, sometimes payouts cannot execute instantly, for example because the beneficiary’s bank is experiencing issues with a payment scheme. In these cases the payout is retried multiple times, over an average duration of 1 hour. It then makes a final payout attempt over a non-instant scheme (in the EU), which typically are more reliable.
You can contact us to change the behaviour of payout retries. For example, how long they're retried for, or to disable the functionality.
5.2 Set up webhooks and monitor payouts
When each payout reaches certain points in its lifecycle (or statuses), TrueLayer sends you a webhook to the Webhook URI you set in step 1.2. Use these to track the progress of every payout you create. How you handle webhooks depends on your integration, but the following information can help.
Each webhook you receive has two headers:
X-TL-Webhook-Timestamp: The time you received the webhook at, in ISO-8601 format.TL-Signature: A JSON web signature with a detached payload you can use to verify the webhook.
It is essential that you validate the signature of each received webhook to ensure if was sent from TrueLayer. The logic for this is similar to request signing, and we offer libraries to help you verify these signatures.
The JSON body of each webhook contains a type, which tells you what the webhook is for. They also all contain an event_id and event_version. To learn about the types of webhook notification that you can receive for payouts, see our payouts webhook specifications.
Updated 21 days ago