Create a customised payment and mandate experience with TrueLayer's iOS SDK.
With the TrueLayer SDK for iOS, you can quickly add open banking payments or mandates to your app. Our iOS SDK integrates with TrueLayer's Payments API, making it simple to get up and running.
The SDK presents native screens that allow your users to select their bank and consent to the payment. The user is then redirected to their banking app or website to authorise the payment. It also handles the network requests and errors.
The latest version of the SDK introduces the Intersection Theme UI, TrueLayer's most up-to-date payment experience, built on the Intersection design system. The Intersection Theme UI is the recommended experience and is shown automatically for supported payments. For flows that the Intersection Theme UI doesn't yet cover, the SDK automatically falls back to its previous UI, so a payment or mandate is always possible.
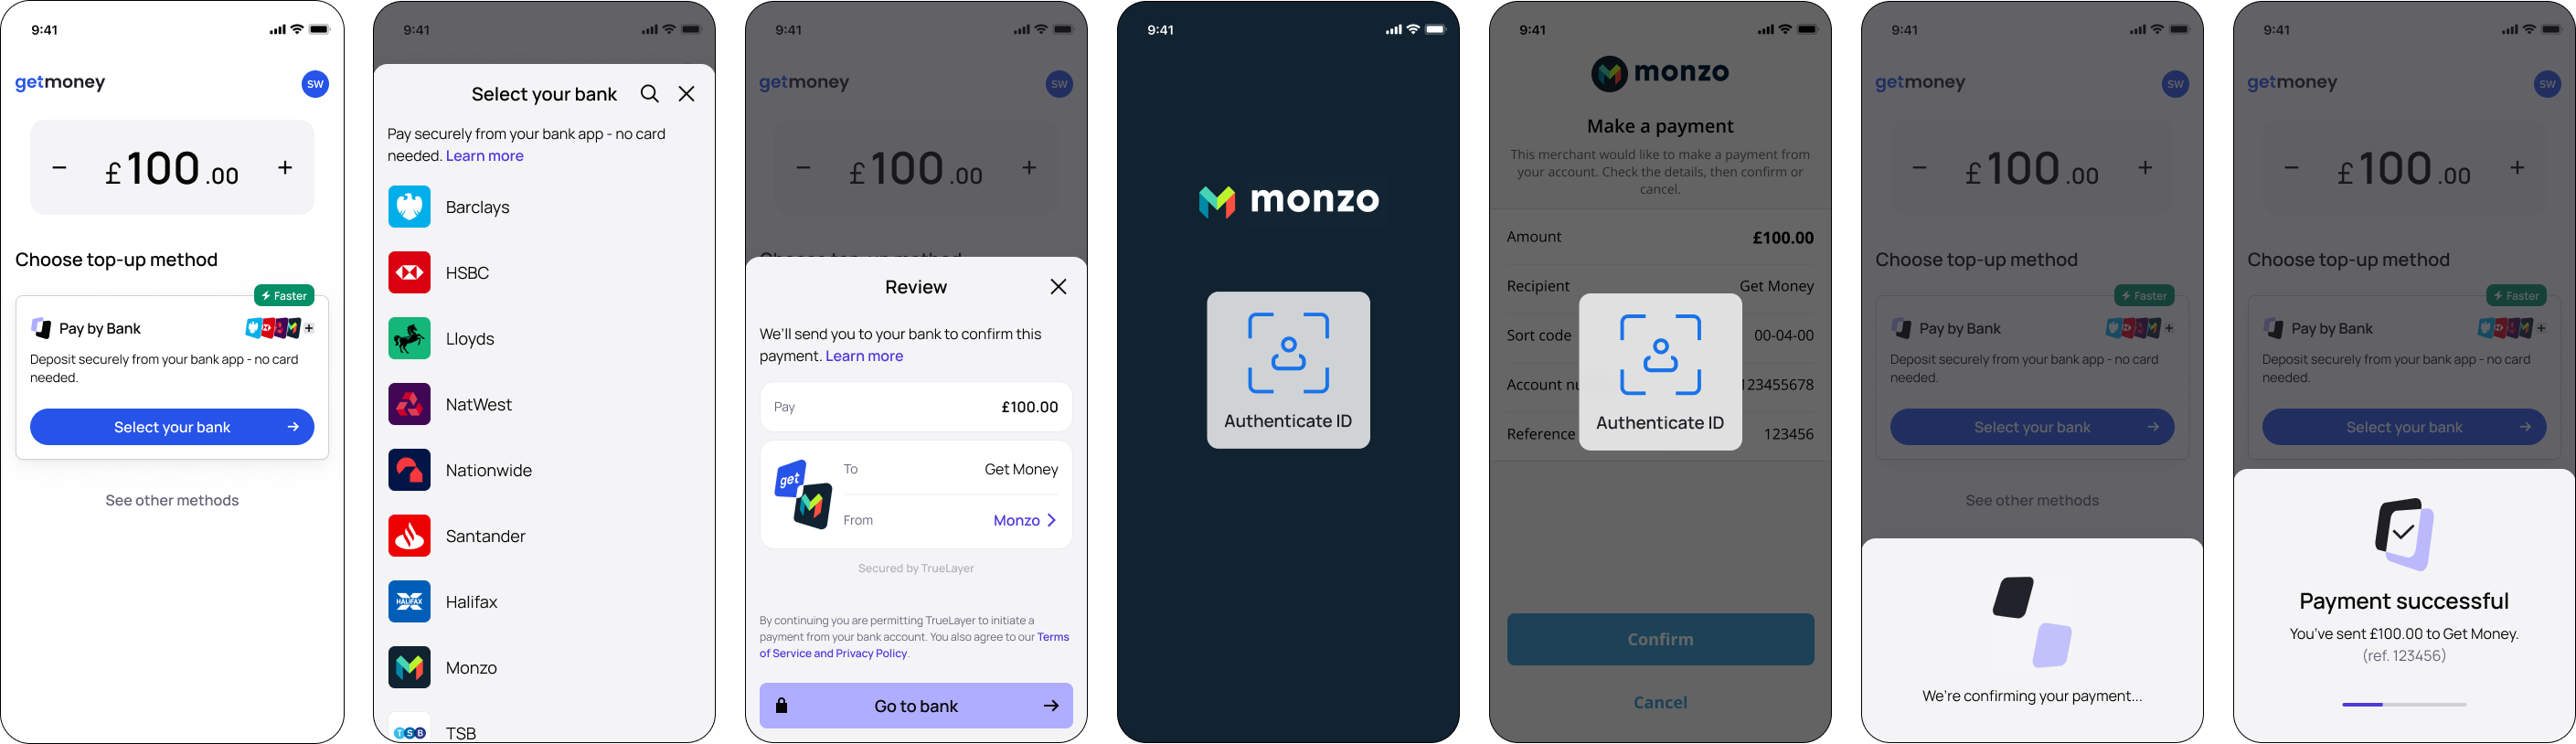
An example user journey for iOS SDK.
If there is an issue meaning that the iOS SDK isn’t available, it falls back to the HPP in a web view to ensure a payment is always possible.
Intersection theme
When you use the iOS SDK, the end user will see one of two user interfaces:
Intersection theme UI — TrueLayer's latest design and the recommended experience. It's shown automatically when all of the following are true:
The flow is for single payments only (the Intersection Theme UI doesn't currently support mandates).
The device is running iOS 15 or later.
The payment currency is GBP, or EUR for a payment in Ireland.
Previous UI — shown automatically for every other flow. This includes mandates, payments on iOS 14, and payments in any other currency or country.
You don't need to select a UI or change your integration to use the Intersection Theme UI: the SDK chooses the appropriate experience for each payment automatically. The integration steps in this guide are identical regardless of which UI is presented.
📘
Support for the Intersection Theme UI is expanding over time. As more currencies, countries, and flows are added, your existing integration will start presenting the Intersection theme UI for them automatically, with no code changes required.
🚧
UI customisation is deprecated
Visual customisation of the SDK (such as custom colours and fonts) applies only to the previous UI and is deprecated. The Intersection Theme UI follows TrueLayer's Prisma design system and is not customisable.
Compatibility
The SDK is currently optimised for the UK, Ireland, France, Germany, Spain, the Netherlands, and Lithuania. Beta testers can also use the iOS SDK for banks in Austria, Belgium, Finland, Poland and Portugal. The user interface can be displayed in English, Spanish, French, German, Dutch, Portuguese, Finnish, Polish and Lithuanian.
At a minimum, the SDK requires:
iOS 14.0
Swift 5.10
📘
The Intersection Theme UI requires iOS 15 or later. On iOS 14, supported payments are presented in the previous UI.
To update to the latest version of the iOS SDK, go to our migration guide.
Payment and mandate authorisation journey
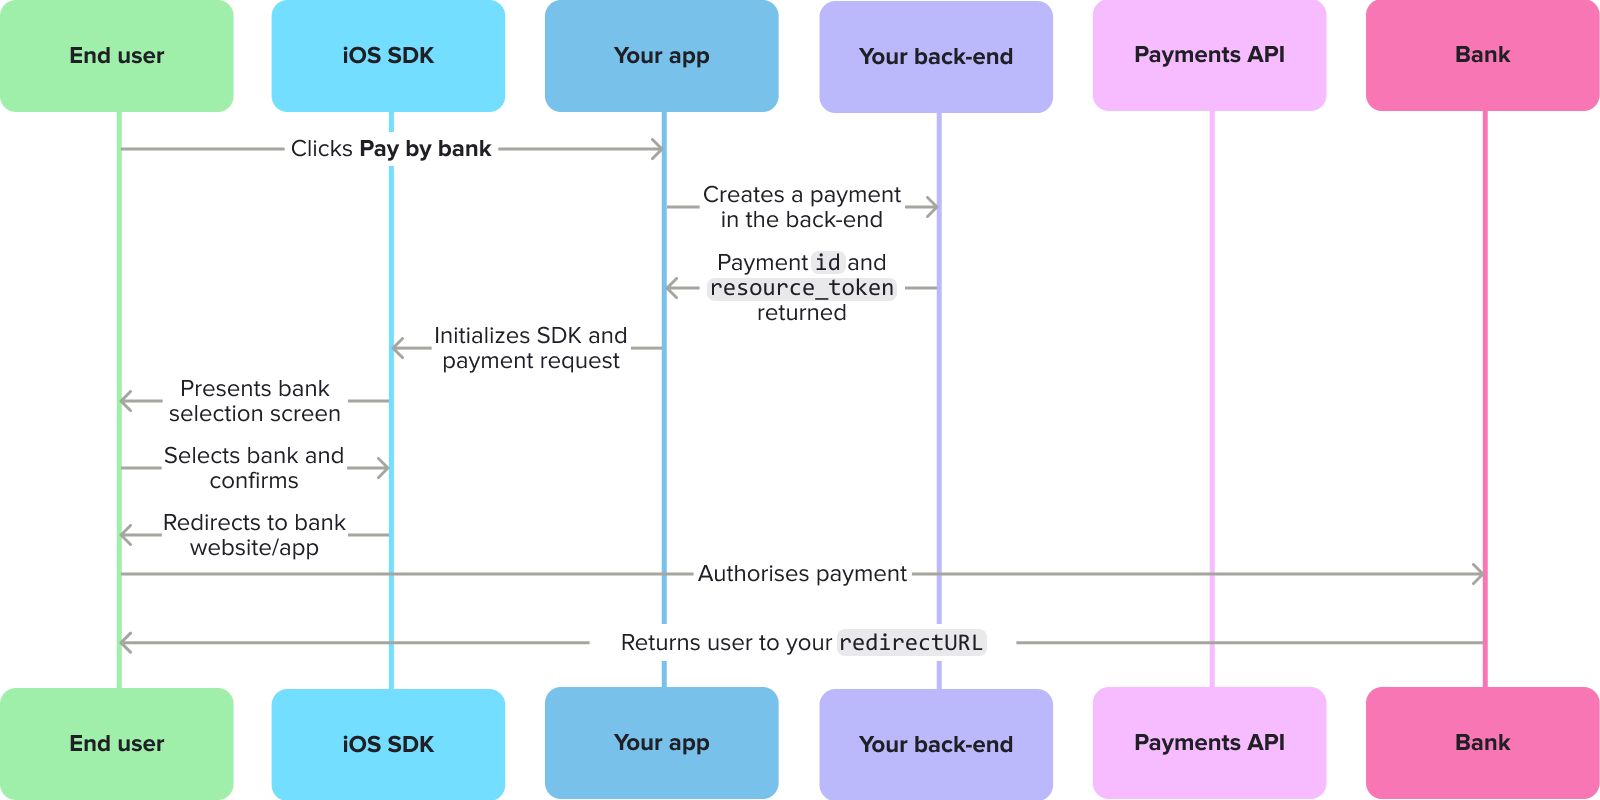
When a customer makes a payment or creates a mandate through your iOS SDK integration:
The user selects Pay By Bank.
Your app creates a payment on the backend side.
Your backend integration creates a payment or mandate and gets an id and resource_token back. If you include signup_plus in related_products at payment creation, the authorisation flow changes to reflect this.
Your app uses the id and resource_token back and initialises the SDK.
Your user selects and confirms their provider on the provider selection screen. If the bank needs additional information from the user, such as IBAN or branch, then the SDK asks the user to enter these. Additionally:
If a bank is unavailable it's greyed out on the provider selection screen, so the user can attempt to use a different bank.
If your user is paying internationally from certain French or Finnish banks, a screen displays that explains how to enable international payments.
The SDK redirects your user to their bank's website or app.
Your user authorises the payment or mandate in their bank's website or app.
Once the authorisation is complete, the bank redirects the user to your redirect URL.
The payment journey with an iOS SDK integration.
Mandate authorisation UI differences
When a user is authorising a mandate through the iOS SDK, the user interface includes options for them to:
Learn more about how mandates work and what data is shared.
The constraints that apply to the mandate, such as its duration, and the payment limits.
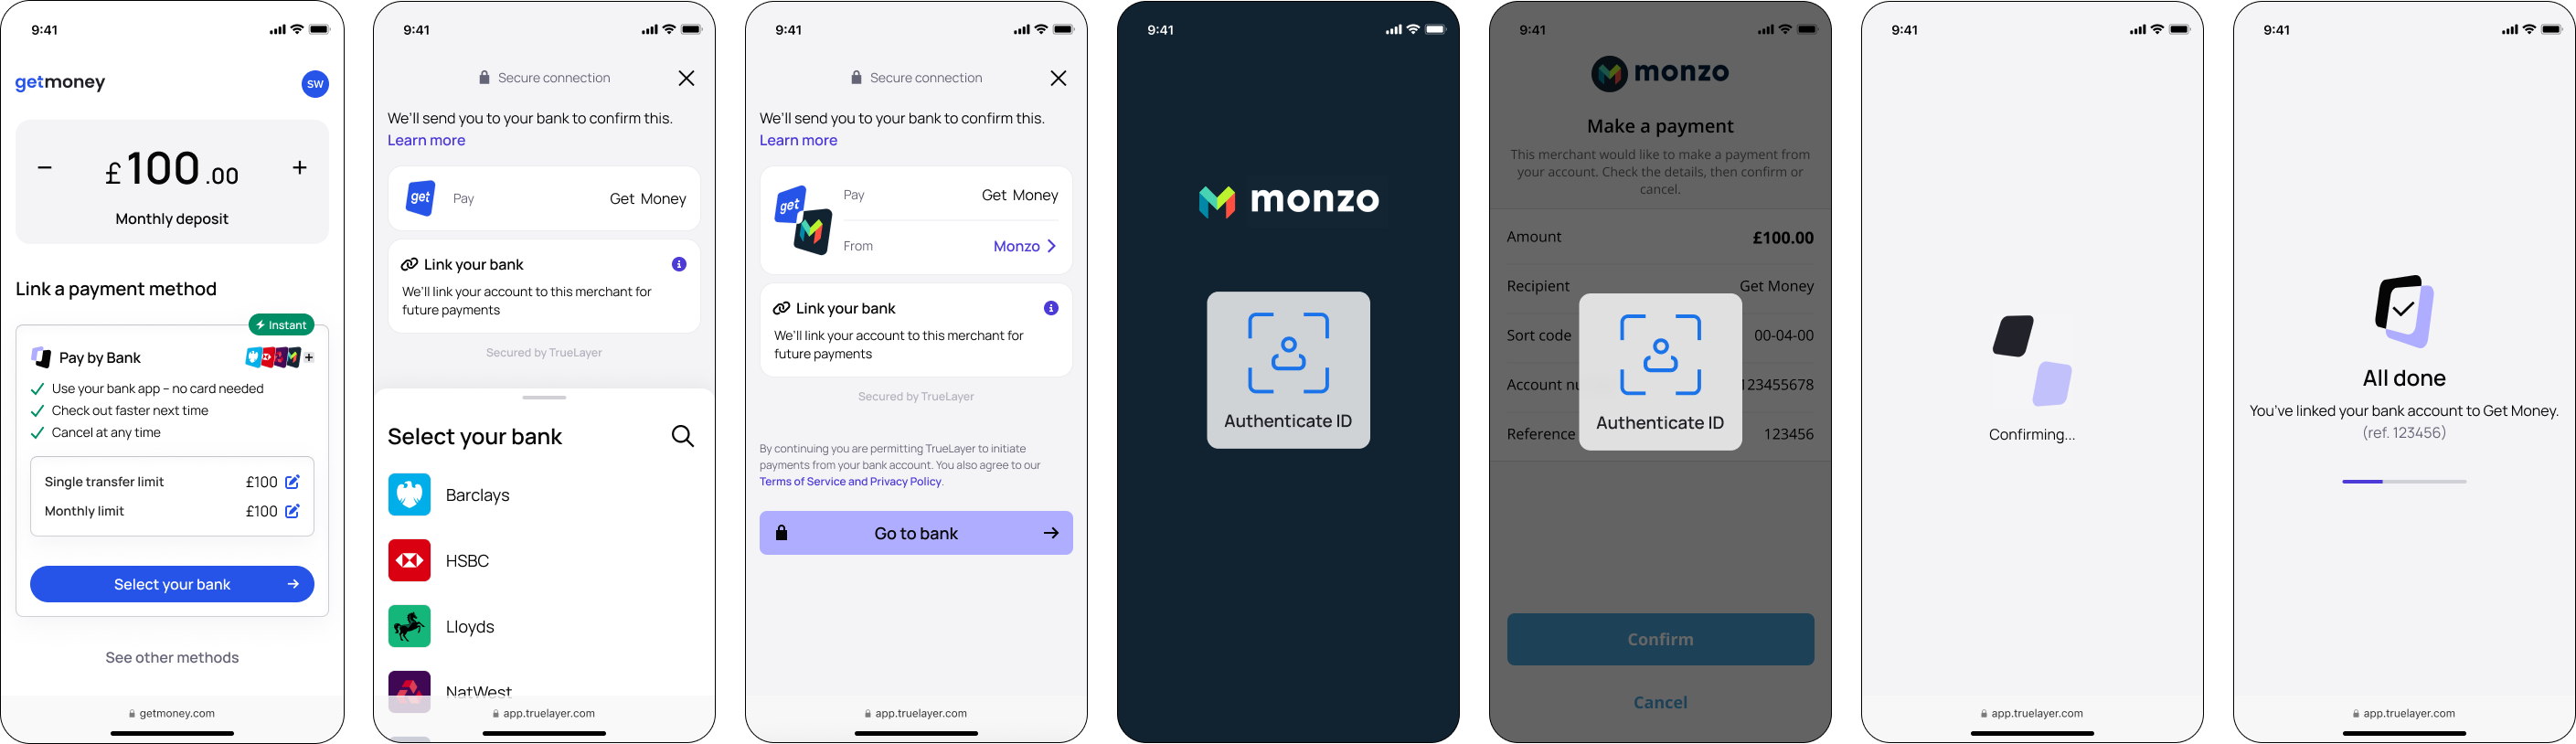
An example of the mandate authorisation flow for iOS.
Payments with iOS
📘
Before you start
Register a redirect URL in Console. Go to Console > Settings > Allowed redirect URIs to do this. Your user is redirected back to your redirect URL, typically your website or application, at the end of the payment journey.
You also need an integration that can create a payment, and get a payment id, to start the iOS SDK. Learn more about how to create a payment, and authenticate, and sign your requests (our payment quickstart guide provides an overview).
There are five general steps to configuring the iOS SDK with the Payments API v3:
When a payment meets the Intersection Theme UI requirements, it is presented in the Intersection Theme UI. Otherwise, the same steps present the payment in the previous UI. No changes to your integration are required for either experience.
The SDK is released as a compiled binary in the form of a series of XCFrameworks artefacts.
To install the SDK using Swift Package Manager:
Open your app in Xcode.
In the Project Navigator, go to the project.
In the Project panel, select the project.
Go to the Package Dependencies tab.
Select +.
Enter https://github.com/Truelayer/truelayer-ios-sdk in the search bar and select Enter.
Select Add Package.
Follow the steps in Xcode to install the SDK.
Install the SDK with CocoaPods
To install the SDK through CocoaPods, specify TrueLayerPaymentsSDK in your Podfile:
pod 'TrueLayerPaymentsSDK
2. Start the SDK
The SDK has two methods: configure(environment:) and processSinglePayment(context:then:), which are used to invoke the SDK and process payments respectively.
The interface that exposes all functions can be accessed through its singleton TrueLayer.Payments.manager.
To use the SDK, you have to invoke its configure(environment:) method. This method should be invoked once.
You also need to specify the environment to process payments in: .production or .sandbox. The environment determines which TrueLayer backend your app will use to process the payment.
You should initialize the SDK inside your AppDelegate, SceneDelegate, or any other container to manage your dependencies.
The following example shows how this can be done using the SceneDelegate:
Once your app has obtained the payment identifier (payment id) and the token (resource_token) from the backend, it can use the SDK to process the payment. This is an example of how to process a payment in Swift:
TrueLayer.Payments.manager.processSinglePayment(
  context: TrueLayer.Payments.Models.SinglePayment.Context(
    identifier: // Your payment ID,
    token: // Your resource token,
    redirectURL: // Your redirect URL
    preferences: // Your possible preferences like type of presentation and country code.
  )) { processResult in
    switch processResult.result {
      case .success(let success):
        // Handle `TrueLayer.Payments.Models.SinglePayment.State`.
        print(success.state)

      case .failure(let failure):
        // Handle `TrueLayer.Payments.Models.SinglePayment.Error`.
        print(failure.error)
    }

    // Handle `resultShown`.
    print(processResult.resultShown)
}
Payment parameters
These are the parameters used above when you process the payment:
identifier: The payment id retrieved from your backend.
token: The payment resource_token retrieved from your backend.
redirectURL: The destination where the user should be redirected once the authorisation flow is done outside of the app (bank website, HPP). This is usually your app's redirect URI set in Console.
📘
To ensure that any redirects back to your app work properly, use universal links for the redirect URI and other links throughout your app. Read the Apple documentation for more information on setting up and troubleshooting universal links.
preferences The preferences parameter enables you to customise the authorisation flow. It contains the following options:
presentationStyle: Determines how the SDK should be presented.
preferredCountryCode: The preferred country to use when displaying the providers. If the country is invalid, or does not include any providers, the value will fallback to the user's locale.
shouldShowResultScreen: Whether the TrueLayer SDK should show the payment result screen. See the display the payment result screen section below.
maximumResultScreenTimeout: The maximum timeout for refreshing the payment result screen.
When the user is redirected back to your app from their bank app or website, we recommend that you re-invoke processSinglePayment(...) with the same Context. This is because some banks require further input from the user, which the SDK can present.
4. Handle redirects and display the authorisation result
The flow for the authorisation through the iOS SDK where the user is sent to their bank to authorise the payment, then redirected to the Client App.
Once the redirects are complete, you receive a success or error callback, which renders in the payment result screen.
Handle redirects from the provider
At the end of a redirect flow the bank app will relaunch your app with the return URI you specified in Console.
In your application, fetch the redirect parameters. These must include the payment id (or identifier in the SDK). For more information on handling deep links, follow the iOS documentation here and here.
Whenever you are redirected to your app, reinvoke the SDK until you receive a success or error callback.
By default the SDK offers a payment result screen, which displays the result of the payment and advises the user on what to do in case of a failed payment. If you disable the payment result screen, a noneShown result is returned, you can use the success or error callback to render a screen for your user when they return to your app.
We also recommend that you check the payment status to confirm the result of a payment.
📘
When your user's default browser is not Safari, some banks and TPP applications may fail to redirect the user.
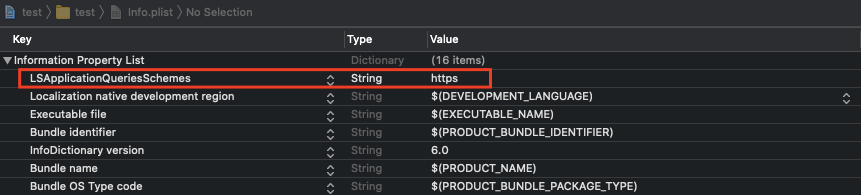
To fix this, go to your iOS app code. Navigate to your info.plist and add the entry LSApplicationQueriesSchemes. Set its Type to string and Value to https.
The Information Property List with LSApplicationQueriesSchemes added.
These are the different payment statuses the SDK can return for TrueLayer.Payments.Models.SinglePayment.Status:
Status returned in TrueLayer.Payments.Models.SinglePayment.Status
Description
.authorizationRequired
The payment requires authorisation by the user making the payment.
.authorizing
The user is currently authorising the payment.
.authorized
The user has authorised the payment with their bank.
.executed
The payment has been executed and sent to the bank for completion.
.settled
The funds have reached the beneficiary account.
.failed
The payment failed. This can be due to various reasons, explained in the Error object.
5. Display the payment result screen
We recommend that you display the payment result screen to your customers (learn more about the payment result screen). The payment results screen shows your user whether the payment succeeds or fails. If it fails, it recommends the appropriate action for them to take to resolve the problem.
Payment result screen configuration
Configuration options for the payment result screen are within the Preferences object when you begin to process the payment.
To enable the payment result screen in the iOS SDK, ensure that the shouldShowResultScreen within the Preferences object retains its default value of true. This ensures that the iOS SDK displays the result of a payment at the end of the authorization flow.
This screen automatically refreshes until the payment is creditable, or until a maximum timeout is reached. You can reduce the duration until the timeout by providing a value for maximumResultScreenTimeout within Preferences. By default, this timeout is 10 seconds, and cannot be set longer as the SDK uses 10s if you pass a greater value.
Mandates with iOS
📘
Before you start
Register a redirect URL in Console. Go to Console > Settings > Allowed redirect URIs to do this. Your user is redirected back to your redirect URL, typically your website or application, at the end of the mandate authorisation journey.
You also need an integration that can create a mandate, and get a mandate id, to start the iOS SDK. Learn more about how to create a mandate, and authenticate, and sign your requests.
Ensure that you are using a minimum of the following software versions:
iOS 13.0
Xcode 13
Swift 5.6
There are five general steps to configuring the iOS SDK with the Payments API v3:
The SDK is released as a compiled binary in the form of a series of XCFrameworks artefacts.
To install the SDK using Swift Package Manager:
Open your app in Xcode.
In the Project Navigator, go to the project.
In the Project panel, select the project.
Go to the Package Dependencies tab.
Select +.
Enter https://github.com/Truelayer/truelayer-ios-sdk in the search bar and select Enter.
Select Add Package.
Follow the steps in Xcode to install the SDK.
Install the SDK with CocoaPods
To install the SDK through CocoaPods, specify TrueLayerPaymentsSDK in your Podfile:
pod 'TrueLayerPaymentsSDK
2. Start the SDK
📘
Although the method to start the SDK makes reference to 'payments', it applies to both payments and mandates.
The SDK has two methods: configure(environment:) and processMandate(context:then:), which are used to invoke the SDK and process mandates respectively.
The interface that exposes all functions can be accessed through its singleton TrueLayer.Payments.manager.
To use the SDK, you have to invoke its configure(environment:) method. This method should be invoked once.
You also need to specify the environment to process mandates in: .production or .sandbox. The environment determines which TrueLayer backend your app will use to process the mandate.
You should initialize the SDK inside your AppDelegate, SceneDelegate, or any other container to manage your dependencies.
The following example shows how this can be done using the SceneDelegate:
Once your app has obtained the mandate identifier (mandate id) and the token (access_token) from the backend, it can use the SDK to process the mandate. This is an example of how to process a mandate in Swift:
TrueLayer.Payments.manager.processMandate(
  context: TrueLayer.Payments.Models.Mandate.Context(
    identifier: // Your mandate ID,
    token: // Your resource token,
    redirectURL: // Your redirect URL
    preferences: // Your possible preferences like type of presentation and country code.
  )) { processResult in
    switch processResult.result {
      case .success(let success):
        // Handle `TrueLayer.Payments.Models.Mandate.State`.
        print(success.state)

      case .failure(let failure):
        // Handle `TrueLayer.Payments.Models.Mandate.Error`.
        print(failure.error)
    }

    // Handle `resultShown`.
    print(processResult.resultShown)
}
Mandate parameters
These are the parameters used above when you process the mandate:
identifier: The mandate id retrieved from your backend.
token: The mandate access_token retrieved from your backend.
redirectURL: The destination where the user should be redirected once the authorisation flow is done outside of the app (bank website, HPP). This is usually your app's redirect URI set in Console.
📘
To ensure that any redirects back to your app work properly, use universal links for the redirect URI and other links throughout your app. Read the Apple documentation for more information on setting up and troubleshooting universal links.
preferences The preferences parameter enables you to customise the authorisation flow. It contains the following options:
presentationStyle: Determines how the SDK should be presented.
shouldShowResultScreen: Whether the TrueLayer SDK should show the mandate result screen. See the display the mandate result screen section below.
maximumResultScreenTimeout: The maximum timeout for refreshing the mandate result screen. See the display the mandate result screen section below.
When the user is redirected back to your app from their bank app or website, we recommend that you re-invoke processMandate(...) with the same Context. This is because some banks require further input from the user, which the SDK can present.
4. Handle redirects and display the authorisation result
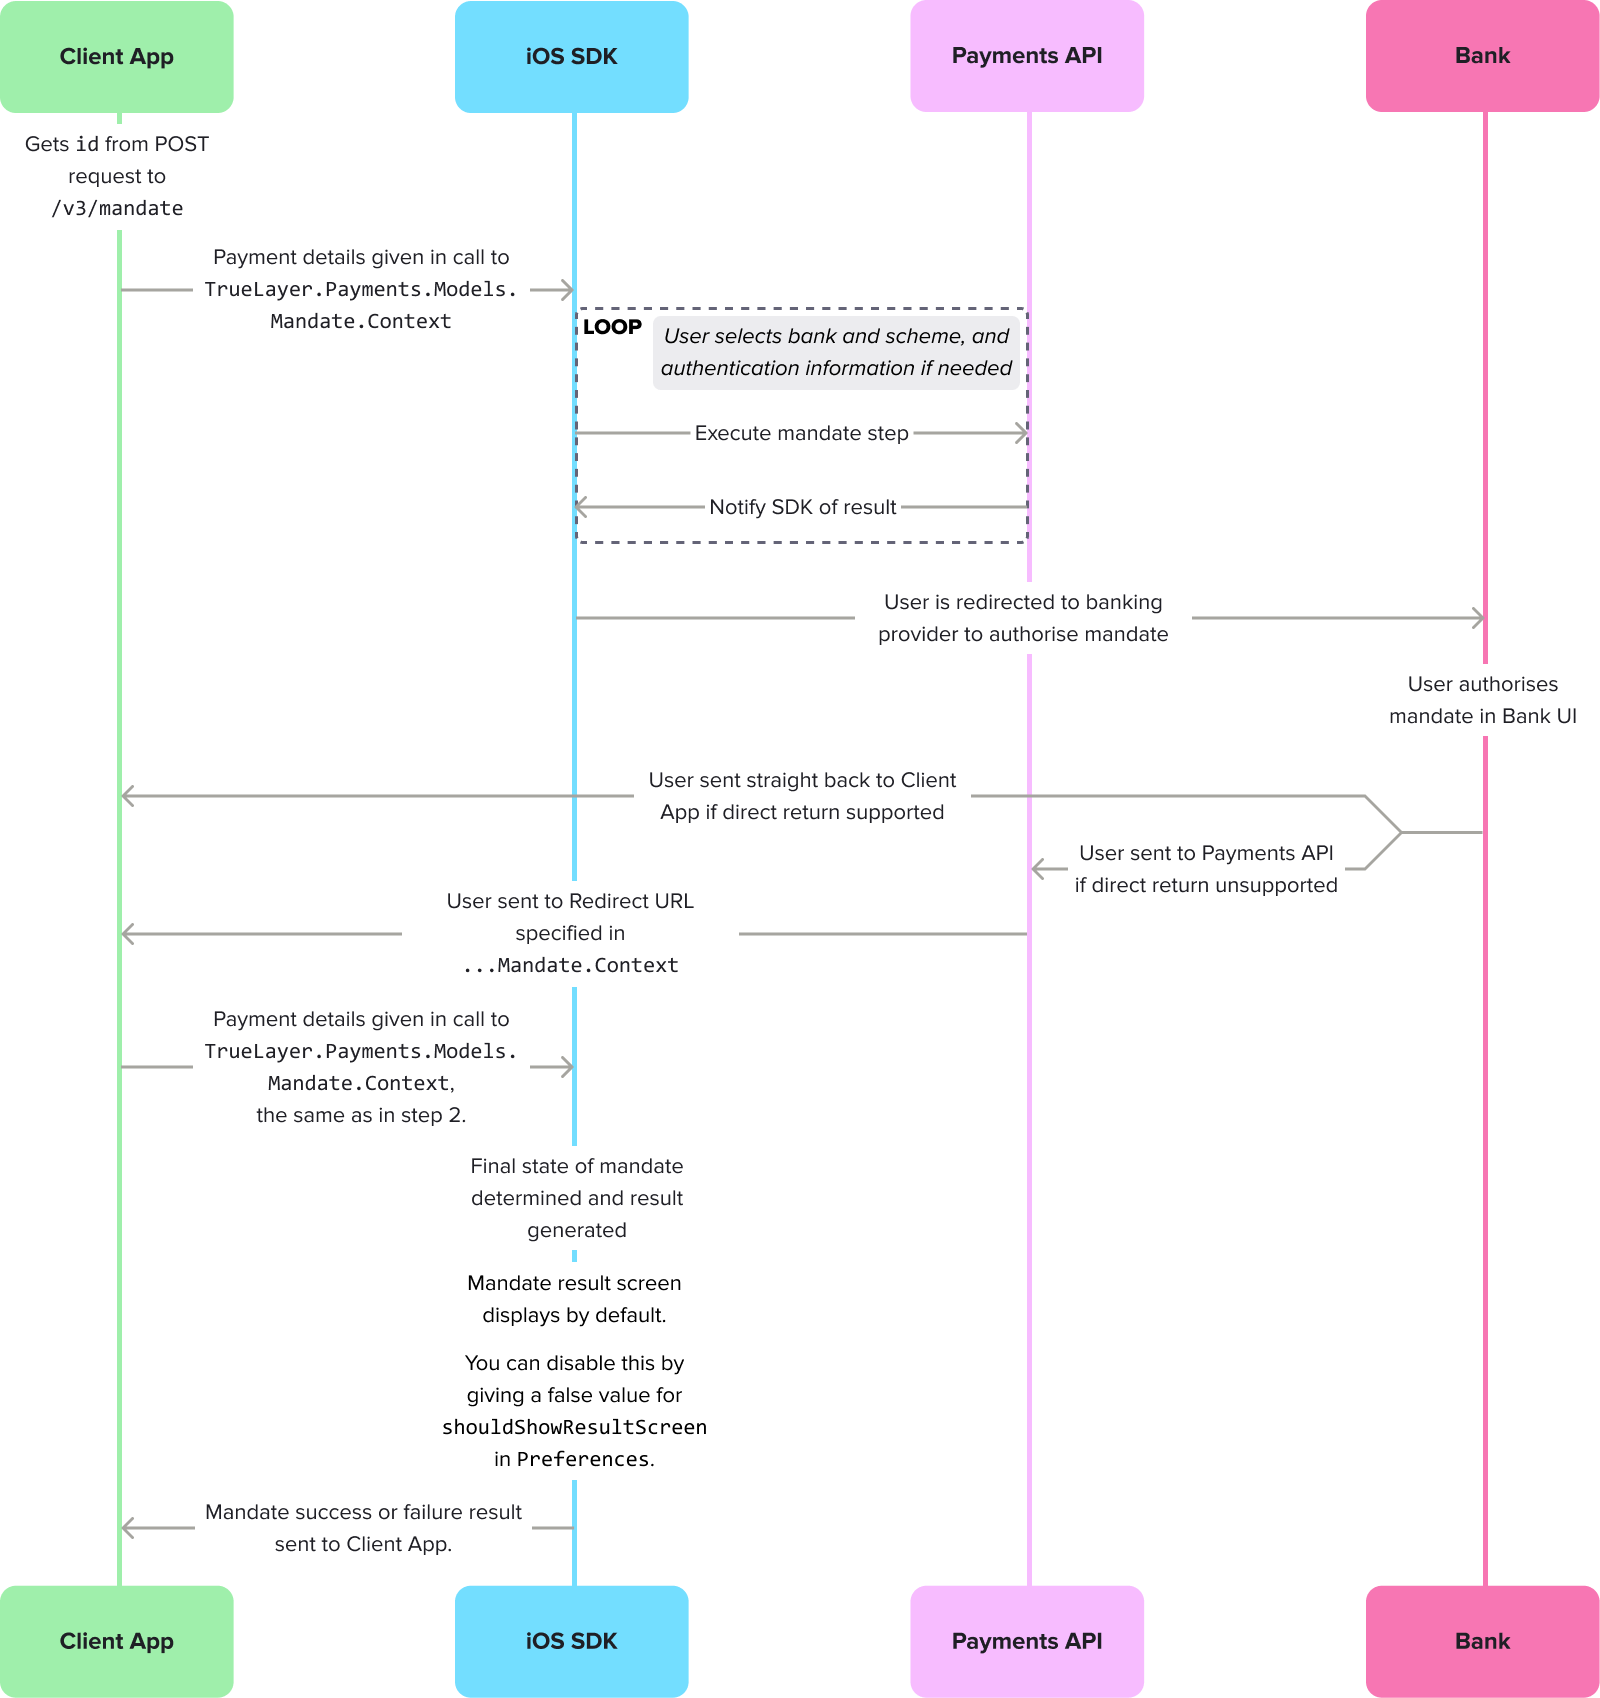
The flow for the authorisation through the iOS SDK where the user is sent to their bank to authorise the mandate, then redirected to the Client App.
Once the redirects are complete, you receive a success or error callback, which renders in the mandate result screen.
Handle redirects from the provider
At the end of a redirect flow the bank app will relaunch your app with the return URI you specified in Console.
In your application fetch the redirect parameters. These must include the mandate id (or identifier in the SDK). For more information on handling deep links, follow the iOS documentation here and here.
Whenever you are redirected to your app, you should reinvoke the SDK, until you receive a success or error callback.
By default the SDK offers a mandate result screen, which displays the result of the payment and advises the user on what to do in case of a failed payment. If you disable the mandate result screen, a noneShown result is returned, you can use the success or error callback to render a screen for your user when they return to your app.
We also recommend that you check the payment status to confirm the result of a payment.
📘
When your user's default browser is not Safari, some banks and TPP applications may fail to redirect the user.
To fix this, go to your iOS app code. Navigate to your info.plist and add the entry LSApplicationQueriesSchemes. Set its Type to string and Value to https.
The Information Property List with LSApplicationQueriesSchemes added.
These are the different mandate statuses the SDK can return for TrueLayer.Payments.Models.Mandate.Status:
Status returned in TrueLayer.Payments.Models.Mandate.Status
Description
.authorizationRequired
The mandate requires authorisation by the user.
.authorizing
The user is currently authorising the mandate.
.authorized
The user has authorised the mandate with their bank.
.revoked
The mandate has been revoked and is no longer valid.
.failed
The mandate failed. This can be due to various reasons, explained in the Error object.
5. Display the mandate result screen
We recommend that you display the mandate result screen to your customers (learn more about the mandate result screen). The mandate results screen shows your user the result of the mandate. If it fails, it recommends the appropriate action for them to take to resolve the problem.
Mandate result screen configuration
Configuration options for the mandate result screen are within the Preferences object when you begin to process the mandate.
To enable the mandate result screen in the iOS SDK, ensure that the shouldShowResultScreen within the Preferences object retains its default value of true. This ensures that the iOS SDK displays the result of a mandate at the end of the authorization flow.
This screen automatically refreshes until the mandate is authorised, or until a maximum timeout is reached. You can reduce the duration until the timeout by providing a value for maximumResultScreenTimeout within Preferences. By default, this timeout is 10 seconds, and cannot be set longer as the SDK uses 10s if you pass a greater value.
📘
Prisma
Prisma is the TrueLayer design system. Go to the Prisma site for everything you need to create seamless payment flows for the best user experience.
You'll find research-backed UX patterns, assets eg bank logos for authorisation screens, and comprehensive brand and checkout guidelines, all designed to reduce friction and boost conversion rates.
Example flows for every TrueLayer UI are available on request, with options tailored to your specific vertical.
Updated about 1 month ago
Next steps
Learn how to authorise a payment or mandate with the iOS SDK, or how to customise your integration.