Hosted page
Enable your users to Pay By Bank with the hosted page.
The hosted payment page (HPP) is a prebuilt UI that you can use for your payment authorisation journey. This flow collects all payment information required from your users and guides them through the payment authorisation journey.
If we develop new features or support new geographies, you do not need to make any updates or changes to support these in your flow.
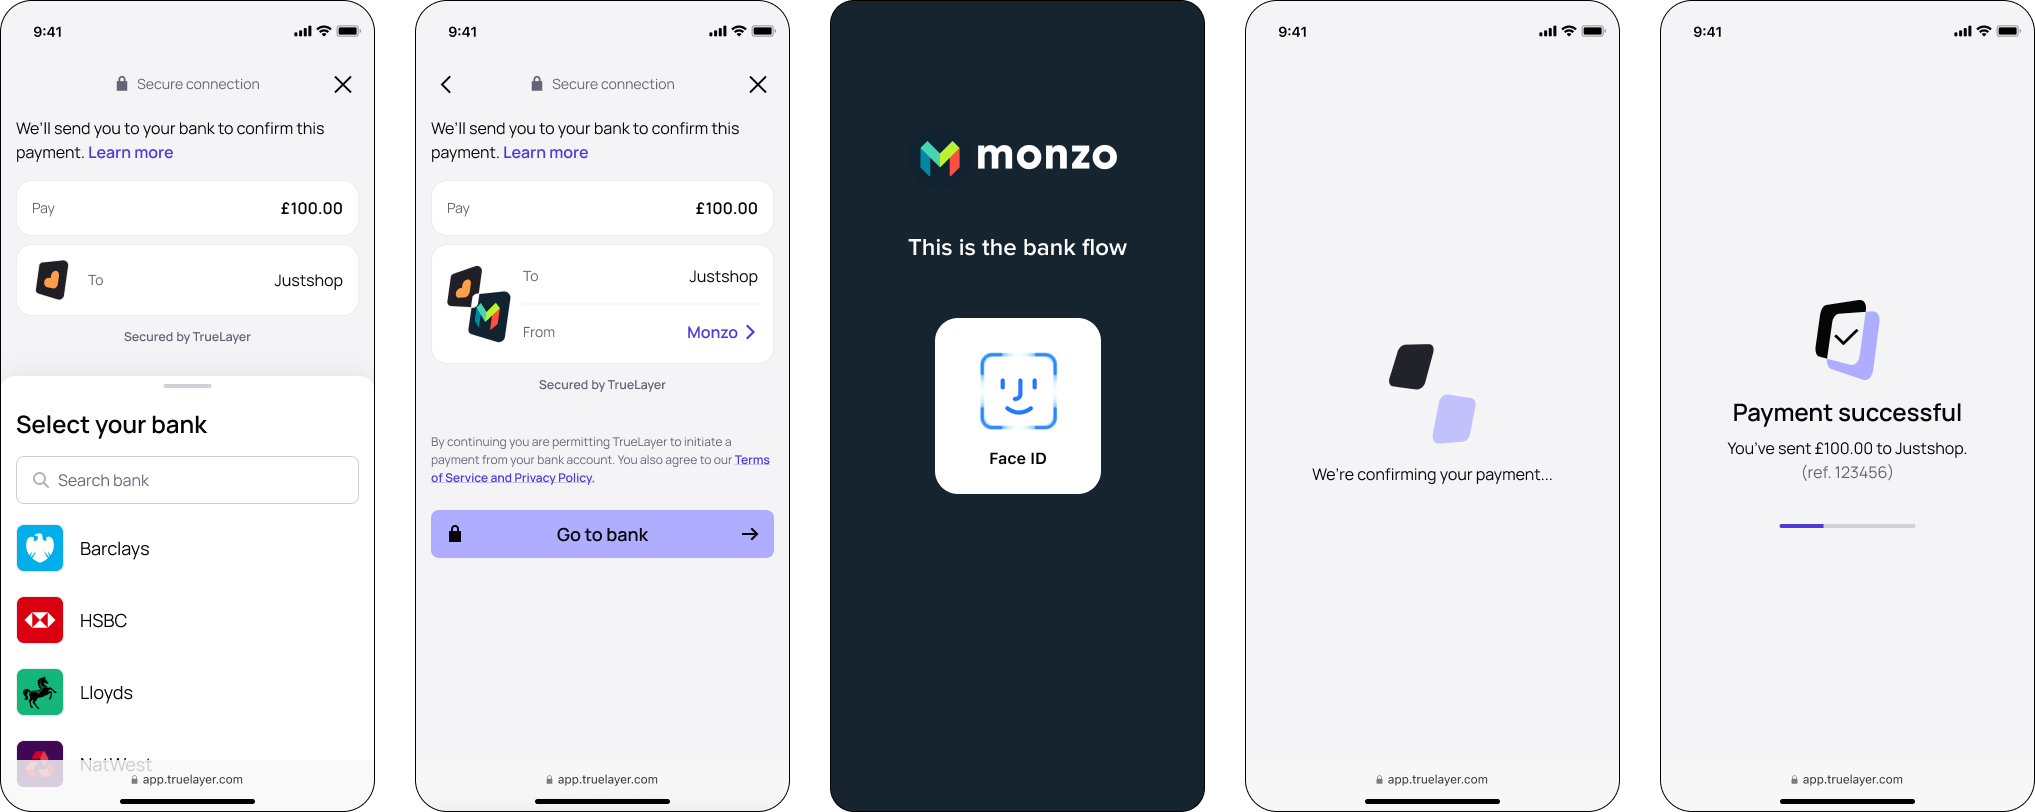
Screens from the hosted payment page flow.
The HPP user journey
When a customer makes a payment through the hosted payment page, it generally follows this the flow below. Some parts of the flow change based on the currency and region, and the provider and scheme selection method you chose at payment creation.
- The user selects the Instant Bank Payment option.
- Your integration creates a payment with TrueLayer and gets a payment
idandresource_tokenin response. - Your system uses the ID and token to build the HPP URL and then displays it to your user.
- Your user selects their bank on the screen.
- If a bank is unavailable, it's greyed out on the provider selection screen, so the user can attempt to use a different bank.
- If your user is paying internationally from certain French or Finnish banks, a screen displays that explains how to enable international payments.
- Your user enters any additional information that the bank requires, and confirms.
If the user is making a EUR payment through a provider that supports multiple payment schemes, they select a scheme at this point. - If their bank supports app-to-app authentication, desktop users see a QR code. Scanning the code enables them to continue the payment using the banking app on their phone. They can also continue on desktop.
- The HPP redirects your user to their bank's website or app.
- Your user authorises the payment in their bank's website or app.
- Once the authorisation is complete, the bank redirects the user to the HPP's payment result screen.
- After the user acknowledges the payment result screen, they are redirected to your <<return URI that you set in Console.

A diagram that shows the flow of actions between different parts of a hosted payment page payment.
HPP mobile handoff
The HPP lets the user scan a QR code to open their banking app on their phone to authorise a payment. This is usually a far smoother experience and improves the user experience.
HPP features
The hosted payment page UI includes:
- A bank selection screen
- A scheme selection screen for EUR payments, if the bank supports multiple payment schemes
- Screens for collecting any additional inputs needed from your user
- A consent screen
- A QR code that allows desktop users to continue the payment on their mobile phone
- Functionality that enables users to authorise payments, such as:
- Redirecting the user to their bank to authorise the payment
- Using embedded payment authorisation for banks that need it (displaying input fields if needed)
- The ability to specify how long single payments stay in a pending state before success of failure, so you can run checks before a payment execution
- Built-in result screens to inform of success, or to help users with failed payments or mandates
You can use the HPP to enable your users to authorise mandates as well as payments.
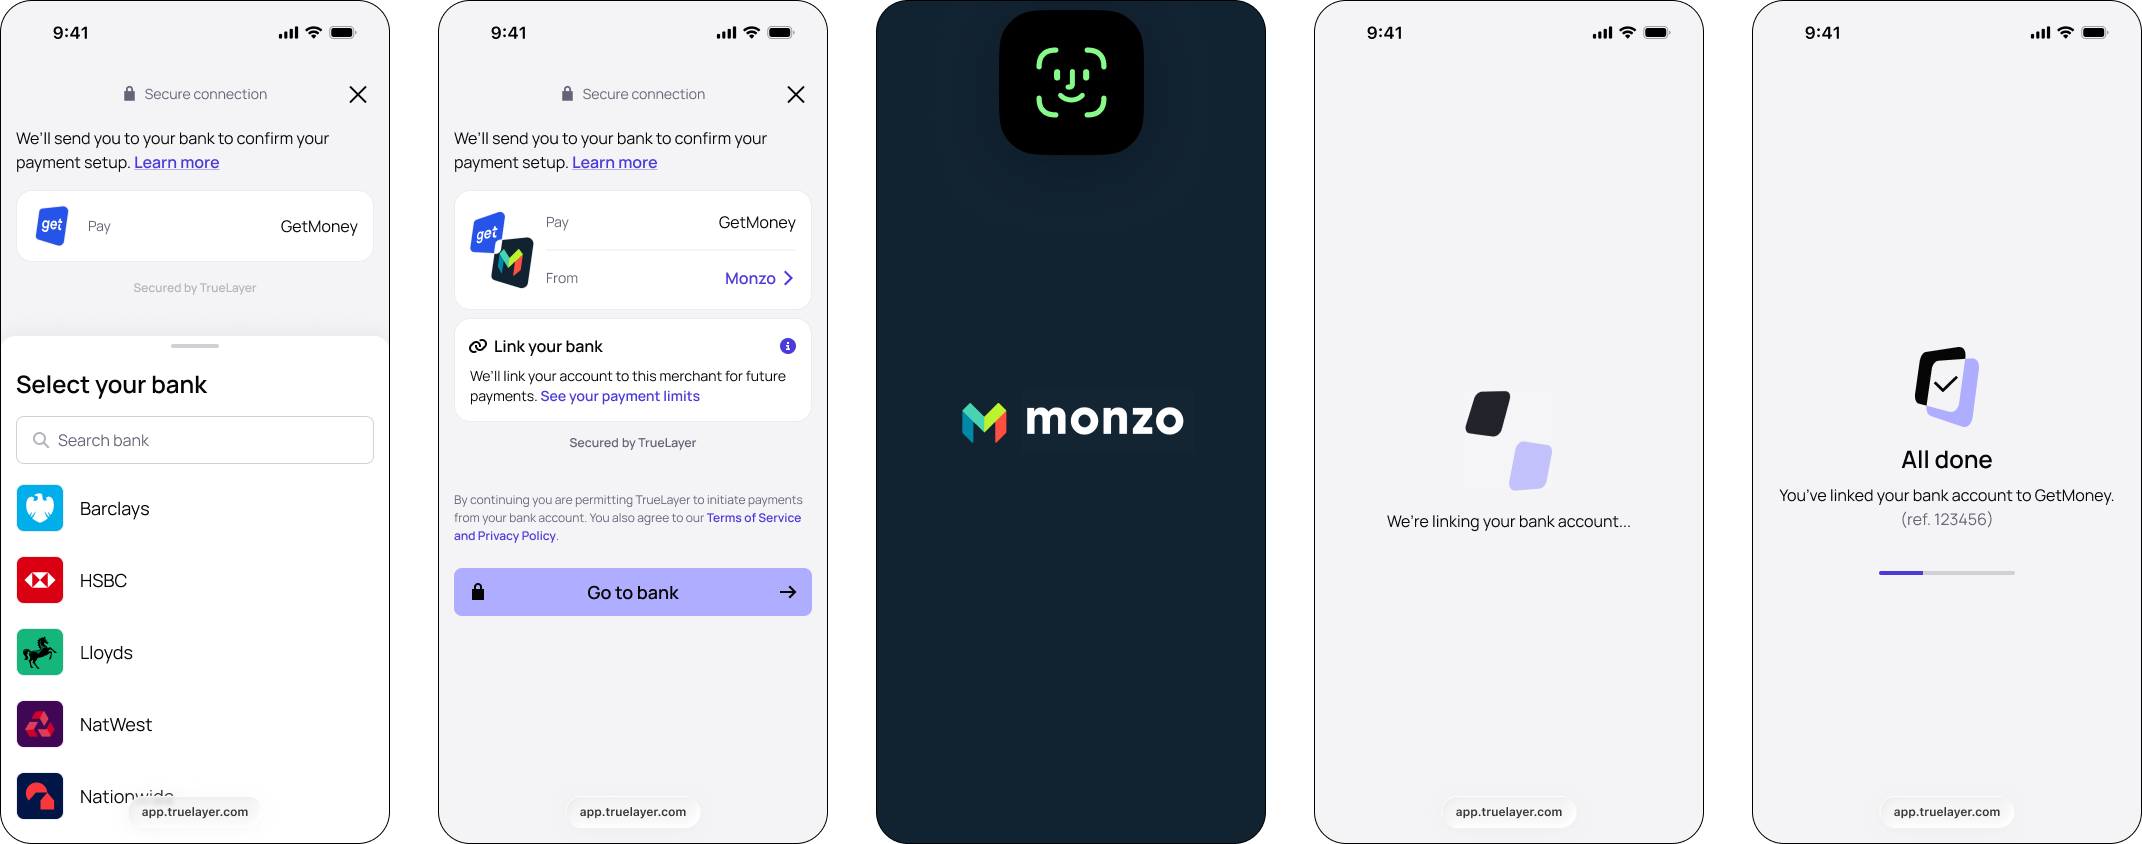
The flow for setting up a variable recurring payment mandate through the HPP.
HPP browser compatibility
The HPP works best with the following browsers:
- Chrome
- Edge
- Firefox
- Safari
Supported countries
The hosted payment page is currently optimised for the UK, Ireland, France, Germany, Spain, the Netherlands, Italy and Lithuania.
Beta testers can also use the HPP for banks in Austria, Belgium, Finland, Poland and Portugal.
The user interface can be displayed in English, Spanish, French, Italian, German, Dutch, Portuguese, Polish, Finnish and Lithuanian.
Payments and mandates with the hosted page
Before you can create payments with the hosted payment page, you need to register for Console and add aredirect_uri to your app.
You also need a payment or mandate id and resource_token. These are returned after a successful request to the /v3/payments endpoint. As such, you must have configured the Payments API v3 and be able to create payments before you can use the HPP.
Once you have registered for Console, added a redirect_uri, and integrated the Payments API v3, there are three steps to creating payments. These are:
- building a HPP URL (you can do this yourself, but we recommend using the
hosted_pageobject when you create your initial payment) - directing your users to the HPP URL
- confirming the payment result.
1.1 Build an HPP URL with the Payment request hosted_page object
hosted_page objectIf you are using a hosted page (HPP or the latest hosted page), we recommend using the hosted_page object inside your payment requests. This autogenerates a hosted page URI and returns it directly in the Payment request creation response. You can then use this to open the HPP and start the payment authorisation journey, without having to build the URI yourself.
Below are the parameters to include in your request.
| Field | Description |
|---|---|
| return_uri | The URI where the user will be redirected to after the authorization flow has completed on the hosted page. You must register the |
| country_code | The country code of the user. This is used to determine which banks to show on the hosted page initially. The country code must be in ISO 3166-1 alpha-2 format. |
| language_code | The language code of the user. This is used to determine which language to show on the hosted page, overriding the browser's locale. The language code must be in ISO 639-1 format. |
Therefore, the hosted_page object inside the Create Payment request will look like this:
{
	"amount_in_minor": 1,
	"currency": "GBP",
	"payment_method": {
		"provider_selection": {
			"type": "user_selected"
		},
		"type": "bank_transfer",
		"beneficiary": {
			[...]
		}
  },

  "hosted_page": {
    "country_code": "GB",
    "return_uri": "http://localhost:8080/redirect.php",
    "language_code": "en"
  },

	"user": {
		[...]
	}
}
In response, you receive a hosted page URI, alongside the other information you receive in a Create Payment response:
 "hosted_page": {
    "uri": "https://payment.truelayer.com/payments?lng=en#payment_id=0afd1f6a-f611-48ce-9488-321129bb3a70&resource_token=eyJhbGciOiJIUzI1NiIsInR5cCI6IkpXVCJ9.eyJwYXltZW50X2lkIjoiMGFmZDFmNmEtZjYxMS00OGNlLTk0ODgtMzIxMTI5YmIzYTcwIiwiaWF0IjoxNTE2MjM5MDIyfQ.awUcg4OfxW8lNGB0HUdSfcEpCAiMg_zHudX95EsqvtE&return_uri=https%3A%2F%2Fmy-domain.com%2Fmy-return-page"
  }
Check the Create Payment API reference for more information.
1.2 Build a HPP URL yourself
After creating a payment or a payment on a mandate with the Payments API, you can build a hosted payment page URL for the transaction. The URL can include the following hash parameters:
| Hash parameter | Required? | Description |
|---|---|---|
payment_id or mandate_id | Yes | Returned by Payments API on payment creation or mandate creation. |
resource_token | Yes | Returned on payment creation. |
return_uri | Yes | Where the user is redirected when they exit the payment flow. This should match one of the entries you've added to your redirect_uri allow list in Console. |
max_wait_for_result | No | A value in seconds that specifies how long to wait to display the payment result screen after authorisation. Cannot be used with mandates. If omitted, the default value is 3 seconds. The maximum possible value is 60 seconds. A value over 60 is treated as 60 seconds. |
signup | No | A Boolean parameter that determines whether or not to display additional wording as part of a Signup+ flow. Must have a value of true or false. |
To build the URL, substitute these parameters for the text and enclosing curly brackets in the URLs below:
| Environment | Payment type | URL structure |
|---|---|---|
| Sandbox | Payment | https://payment.truelayer-sandbox.com/payments#payment_id={payment_id}&resource_token={resource_token)&return_uri={return_uri} |
| Sandbox | Payment on a mandate | https://payment.truelayer-sandbox.com/mandates#mandate_id={payment_id}&resource_token={resource_token)&return_uri={return_uri} |
| Production | Payment | https://payment.truelayer.com/payments#payment_id={payment_id}&resource_token={resource_token)&return_uri={return_uri} |
| Production | Payment on a mandate | https://payment.truelayer.com/mandates#mandate_id={payment_id}&resource_token={resource_token}&return_uri={return_uri} |
Here are examples of hosted payment page links built correctly in sandbox:
https://payment.truelayer-sandbox.com/payments#payment_id=6755dacf-7dd8-4577-ba11-667b6aca8474&resource_token=eyJhbGciOiJIUzI1NiIsInR5cCI6IkpXVCJ9.eyJjbGllbnRfaWQiOiJwZW5ueWRldi1lNTkzOGEiLCJqdGkiOiI2NzU1ZGFjZi03ZGQ4LTQ1NzctYmExMS02NjdiNmFjYTg0YmYiOjE2MzQ2Mzk1NDQsImV4cCI6MTYzNDY0MDQ0NCwiaXNzIjoiaHR0cHM6Ly9hcGkmRldiIsImF1ZCI6Imh0dHBzOi8vYXBpLnQ3ci5kZXYifQ.vlEvoSdFv8g7t21RlXYyus01uEZlalK89P4Ii7Avl_8&return_uri=http://www.yourwebaddress.com/redirecthttps://payment.truelayer-sandbox.com/mandates#mandate_id=6755dacf-7dd8-4577-ba11-667b6aca8474&resource_token=eyJhbGciOiJIUzI1NiIsInR5cCI6IkpXVCJ9.eyJjbGllbnRfaWQiOiJwZW5ueWRldi1lNTkzOGEiLCJqdGkiOiI2NzU1ZGFjZi03ZGQ4LTQ1NzctYmExMS02NjdiNmFjYTg0YmYiOjE2MzQ2Mzk1NDQsImV4cCI6MTYzNDY0MDQ0NCwiaXNzIjoiaHR0cHM6Ly9hcGkmRldiIsImF1ZCI6Imh0dHBzOi8vYXBpLnQ3ci5kZXYifQ.vlEvoSdFv8g7t21RlXYyus01uEZlalK89P4Ii7Avl_8&return_uri=http://localhost:3000/redirecthttps://payment.truelayer-sandbox.com/payments#payment_id=6755dacf-7dd8-4577-ba11-667b6aca8474&resource_token=eyJhbGciOiJIUzI1NiIsInR5cCI6IkpXVCJ9.eyJjbGllbnRfaWQiOiJwZW5ueWRldi1lNTkzOGEiLCJqdGkiOiI2NzU1ZGFjZi03ZGQ4LTQ1NzctYmExMS02NjdiNmFjYTg0YmYiOjE2MzQ2Mzk1NDQsImV4cCI6MTYzNDY0MDQ0NCwiaXNzIjoiaHR0cHM6Ly9hcGkmRldiIsImF1ZCI6Imh0dHBzOi8vYXBpLnQ3ci5kZXYifQ.vlEvoSdFv8g7t21RlXYyus01uEZlalK89P4Ii7Avl_8&return_uri=http://www.yourwebaddress.com/redirect&max_wait_for_result=30Here are examples of hosted payment page links built correctly in production:
https://payment.truelayer.com/payments#payment_id={payment_id}&resource_token={resource_token}&return_uri={return_uri}https://payment.truelayer.com/mandates#mandate_id={payment_id}&resource_token={resource_token}&return_uri={return_uri}https://payment.truelayer.com/payments#payment_id=6755dacf-7dd8-4577-ba11-667b6aca8474&resource_token=eyJhbGciOiJIUzI1NiIsInR5cCI6IkpXVCJ9.eyJjbGllbnRfaWQiOiJwZW5ueWRldi1lNTkzOGEiLCJqdGkiOiI2NzU1ZGFjZi03ZGQ4LTQ1NzctYmExMS02NjdiNmFjYTg0YmYiOjE2MzQ2Mzk1NDQsImV4cCI6MTYzNDY0MDQ0NCwiaXNzIjoiaHR0cHM6Ly9hcGkmRldiIsImF1ZCI6Imh0dHBzOi8vYXBpLnQ3ci5kZXYifQ.vlEvoSdFv8g7t21RlXYyus01uEZlalK89P4Ii7Avl_8&return_uri=http://www.yourwebaddress.com/redirect&max_wait_for_result=30 "hosted_page": {
"uri": "https://payment.truelayer.com/payments?lng=en#payment_id=0afd1f6a-f611-48ce-9488-321129bb3a70&resource_token=eyJhbGciOiJIUzI1NiIsInR5cCI6IkpXVCJ9.eyJwYXltZW50X2lkIjoiMGFmZDFmNmEtZjYxMS00OGNlLTk0ODgtMzIxMTI5YmIzYTcwIiwiaWF0IjoxNTE2MjM5MDIyfQ.awUcg4OfxW8lNGB0HUdSfcEpCAiMg_zHudX95EsqvtE&return_uri=https%3A%2F%2Fmy-domain.com%2Fmy-return-page"
}2. Direct your user to the HPP
The next step is to guide your user to the HPP URL you built. Once they access it, the HPP takes them through a flow where they can authorise the payment or mandate.
You should direct your users to the HPP through a button that highlights the benefits and convenience of paying through TrueLayer. For example, a button in your app named Instant Bank Payment.
3. Confirm the payment result
After the user has successfully authorised their payment they are redirected to the return_uri you set in Console, which is specified in your hosted payment page URL. The payment or mandate id is appended as a query parameter to your return_uri. For single payments and mandates, examples of the return_uri are as below:
Single payment: http://localhost:3000/redirect?payment_id=6755dacf-7dd8-4577-ba11-667b6aca8474
Mandate: http://localhost:3000/redirect?mandate_id=7fbd4cb8-0924-4a3d-a72c-f3d3a82ac7c8
If your user chooses not to complete the payment and cancels on the hosted payment page, an extra error query parameter is appended, tl_hpp_abandoned. For example:
http://localhost:3000/redirect?payment_id=6755dacf-7dd8-4577-ba11-667b6aca8474&error=tl_hpp_abandoned
In order to communicate either the payment or mandate result to your user, you must retrieve its status via webhooks. Learn how to receive webhook notifications for your payments or mandates.
Updated about 2 months ago