Android SDK
Create a payment and mandate experience with TrueLayer's Android SDK.
With the TrueLayer SDK for Android, you can quickly add a user interface to your app to initiate an open banking payment, or to create a recurring payment mandate. This page guides you through how to set up and use the TrueLayer SDK in your Android app.
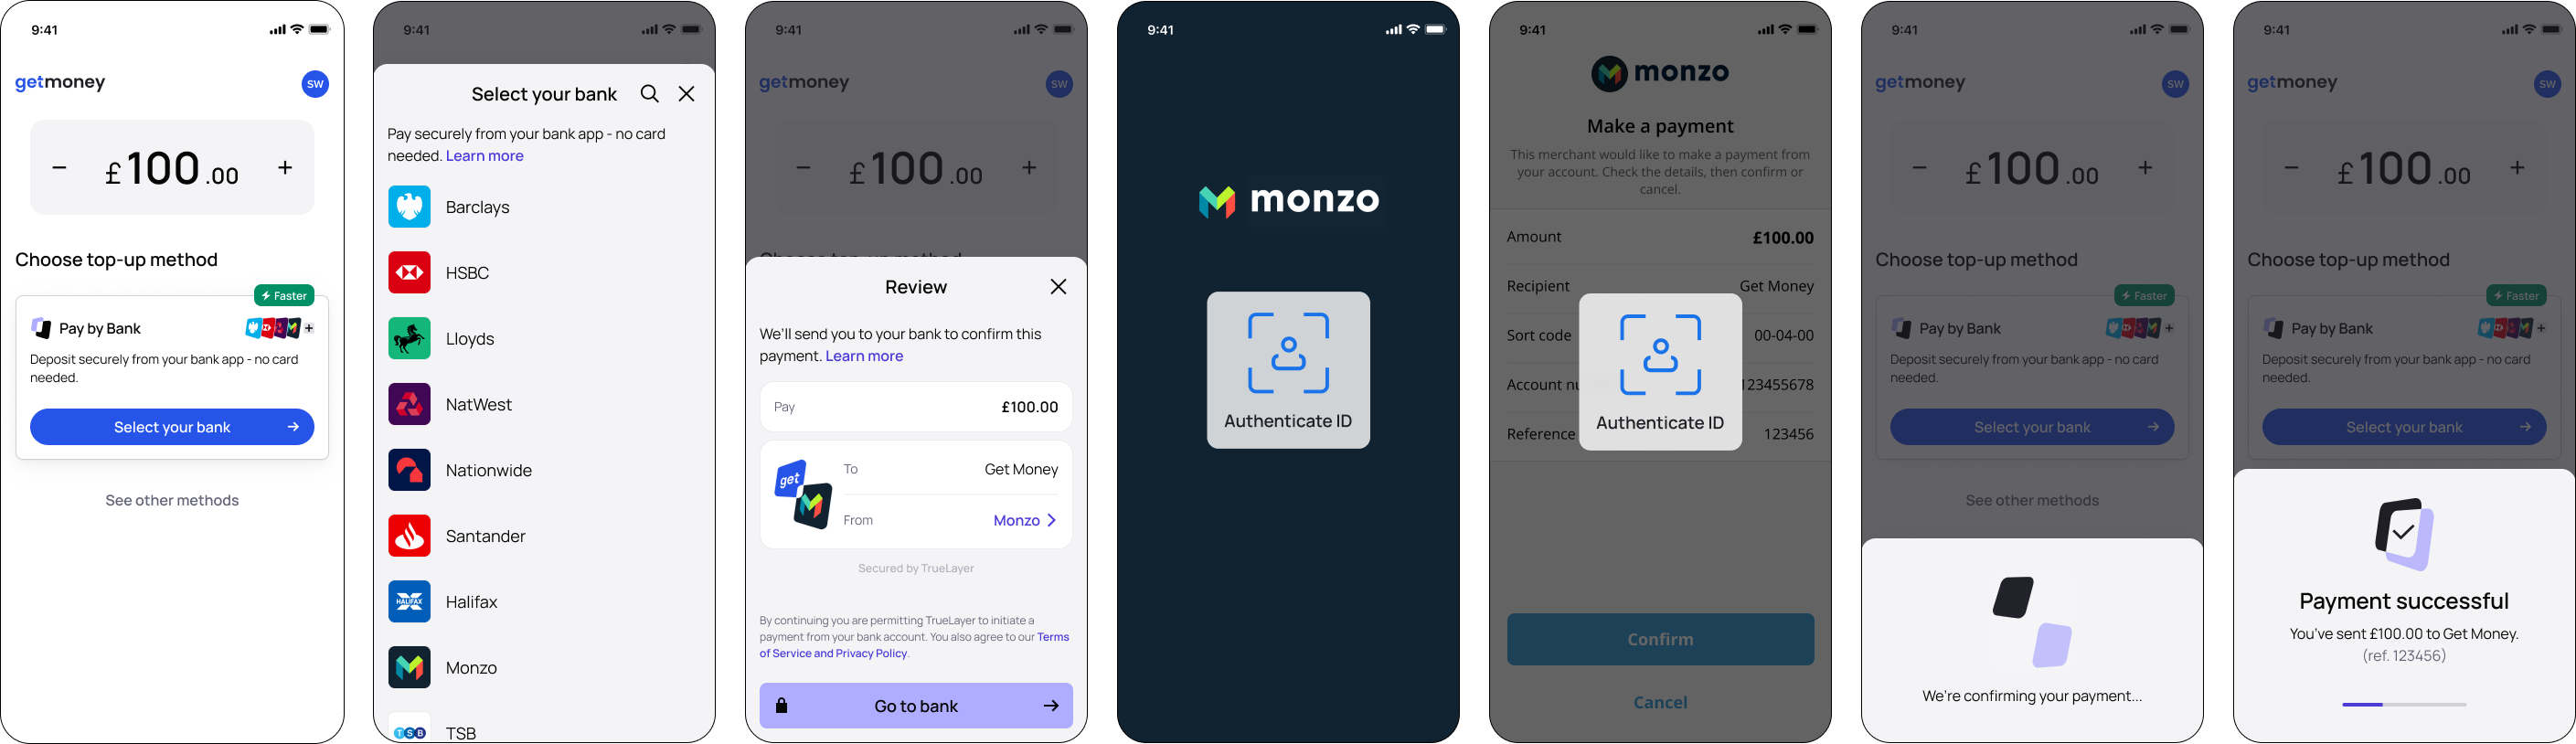
Example of the Android SDK user flow.
The Android SDK presents native screens that allows your users to select their bank and consent to the payment or mandate. Then, it redirects them to their banking app or website to authorise the payment or mandate. It also handles network requests and errors and gives you some options to customise the user interface.
If there is an issue meaning that the Android SDK isn’t available, it falls back to the HPP in a web view to ensure a payment is always possible.
Compatibility
The SDK is designed to work with Android 7.0 (API level 24) and above. It is currently optimised for the UK, Ireland, France, Germany, Spain, the Netherlands, and Lithuania.
Beta testers can also use the Android SDK for banks in Austria, Belgium, Finland, Poland and Portugal.
The user interface can be displayed in English, Spanish, French, German, Dutch, Portuguese, Polish, Finnish and Lithuanian.
To update to the latest version of the Android SDK, see our migration guide.
Before you start
Register a return URI in Console. Go to Console > Settings > Allowed redirect URIs to do this. Your user is redirected back to your redirect URL, typically your website or application, at the end of the payment journey.
You also need an integration that can create a payment, and get a payment id, to start the Android SDK. Learn more about how to create a payment, and authenticate, and sign your requests (our payment quickstart guide provides an overview).
Payment or mandate flow
When a customer makes a payment or creates a mandate through your integration:
- The user chooses to pay with an instant bank payment, or to set up a recurring payment mandate.
- Your backend creates a payment or mandate with TrueLayer and you get an
idandresource_token.
If you includesignup_plusinrelated_productsat payment creation, the authorisation flow changes to reflect this. - Your app uses the
idandresource_tokenand initialises the SDK. - Your user selects and confirms their provider on the provider selection screen. If the bank needs additional information from the user, such as IBAN or branch, then the SDK asks the user to enter these. Additionally:
- If a bank is unavailable it's greyed out on the provider selection screen, so the user can attempt to use a different bank.
- If your user is paying internationally from certain French or Finnish banks, a screen displays that explains how to enable international payments.
- If paying via a European provider that supports it, the user can select to pay with SEPA Instant or SEPA Credit.
- Your user authorises the payment or mandate depends on the authorisation flow the banking provider uses:
- For providers that use a redirect flow, the mobile SDK redirects your user to their bank's website or app. Your user authorises the payment in their bank's website or app.
- For providers that use an embedded flow, the mobile SDK collects the user's credentials and handles strong customer authentication in order to authorise the payment.
- Once the authorisation is complete, the user is redirected to your return URI. You can use our payment result screen to confirm the result to your user.
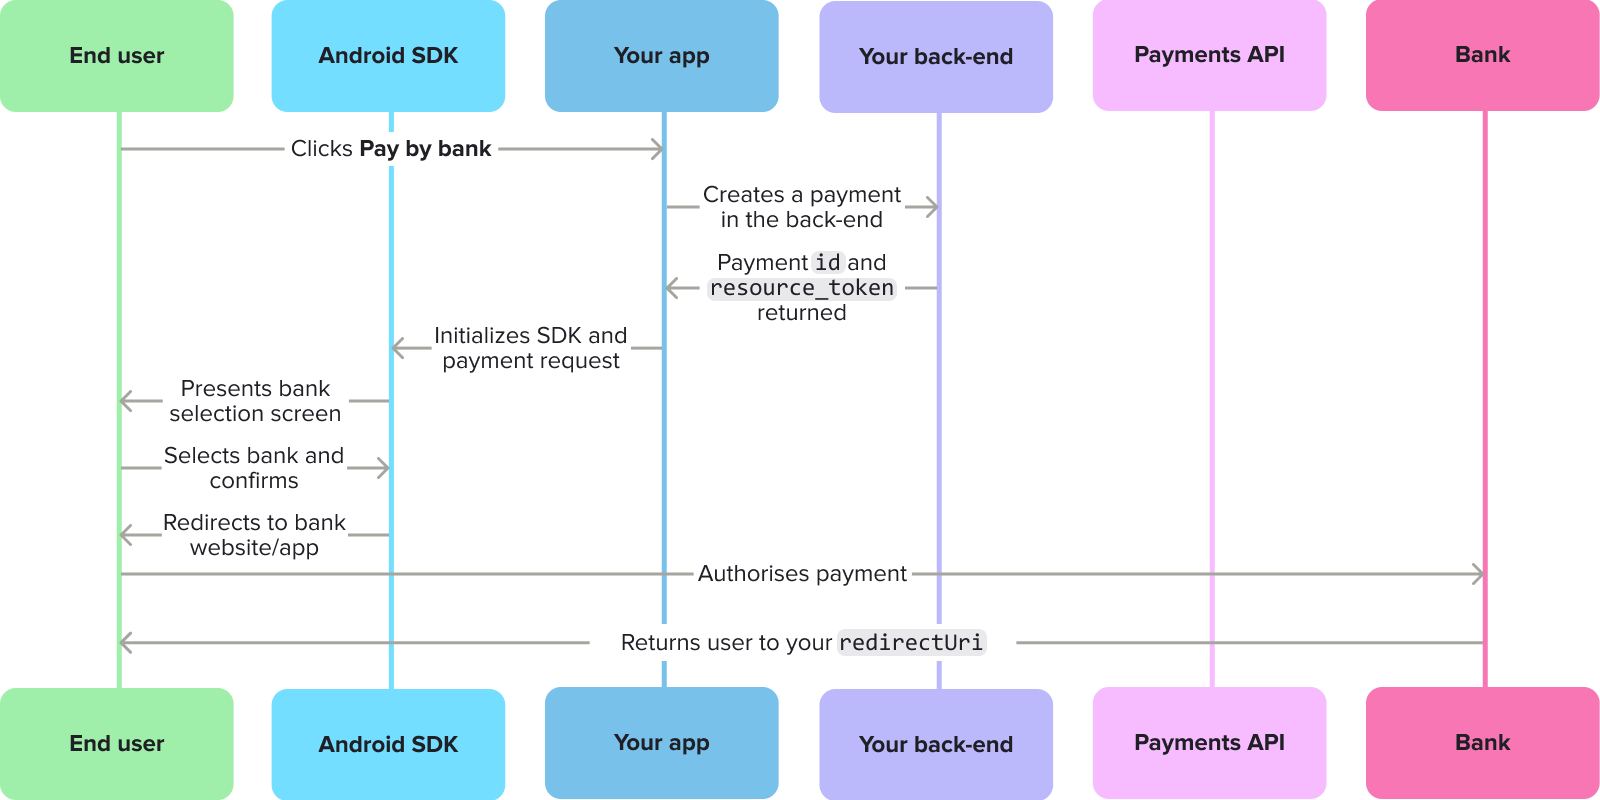
The payment journey with an Android SDK integration.
Mandate authorisation flow
When a user is authorising a mandate through the Android SDK, the user interface includes options for them to:
- Learn more about how mandates work and what data is shared.
- The constraints that apply to the mandate, such as its duration, and the payment limits.
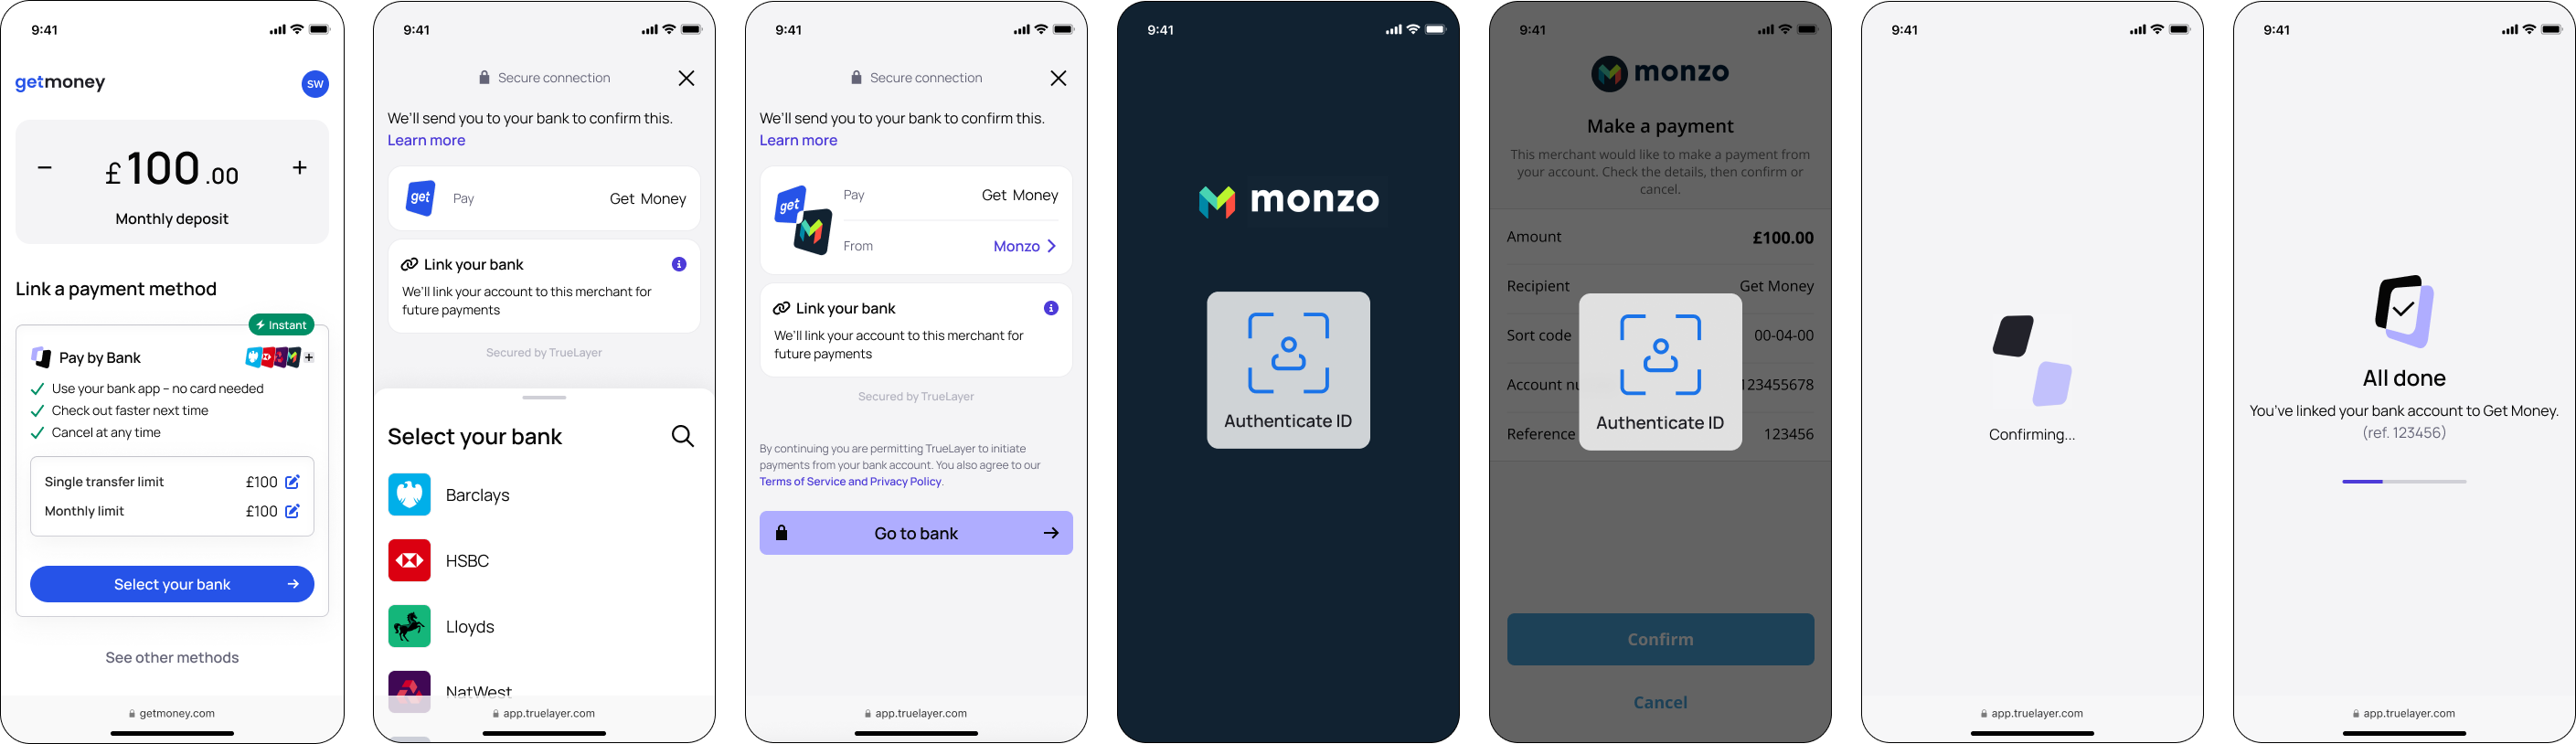
An example of the mandate authorisation flow.
AIS and PIS combined authorisation flow
To make the user experience simpler, you can give your user the option of creating an additional Data connection when they consent to a payment. This flow appears for some German banks when your user would need to input an IBAN at the authorisation stage.
When your user logs into their bank, a screen displays with a list of IBANs associated with their credentials. They can then select the IBAN that they want to pay with, without having to input it manually.
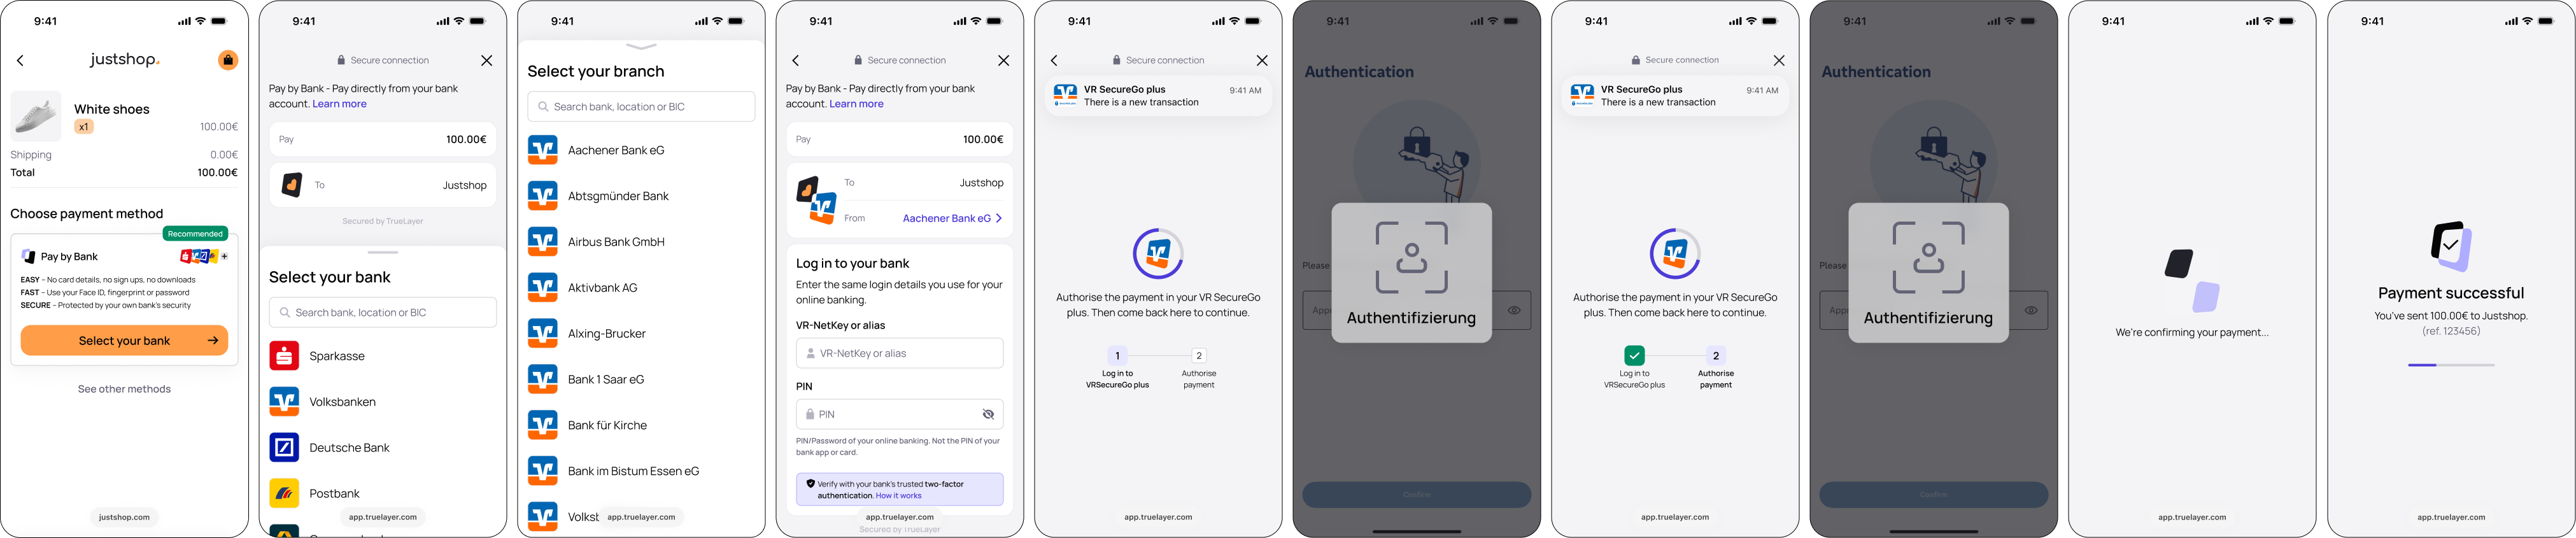
An example of the AIS + PIS flow on Android.
These screens are usable starting with SDK version 3.9.0. If you are upgrading from a version of the SDK before 3.8, you will need to migrate to the newest version. For more about updating your SDK version, see our 3.x.x migration guide and Android SDK release history.
Payments with Android SDK
There are four steps to configuring the Android SDK:
1. Install the SDK
Before you add the SDK to your project, ensure your build.gradle configuration is configured to support minSdk 24 (Android 7.0) or higher, and configure the packagingOptions below:
android {
    defaultConfig {
        applicationId "com.example.myapp"
        minSdk 24 // Sdk 24 or higher supported
    }


    packagingOptions {
        resources {
            pickFirsts += ['META-INF/LICENSE-MIT']
        }
    }
}
To add the SDK to your project, include the TrueLayer Payments SDK in your dependencies (you can find the latest version on our GitHub page):
// Add to your projects `build.gradle`.
implementation "com.truelayer.payments:ui:4.1.6"
If you plan to support Android versions below 8.0, then you need to make sure your project has desugaring enabled. This is important because without desugaring, in specific scenarios, the SDK may crash on devices running Android API versions below 26.
The following code example shows how to enable desugaring in your project.
android {
    // this part will enable core library desugaing
    compileOptions {
        coreLibraryDesugaringEnabled true
    }
    // this part will remove excess LICENSE-MIT files
    packagingOptions {
        resources {
            pickFirsts += [‘META-INF/LICENSE-MIT’]
        }
    }
}
dependencies {
    // Add to your projects `build.gradle`.
    // We are currently using following version of desuga libraries
    coreLibraryDesugaring “com.android.tools:desugar_jdk_libs:2.1.5”
}
2. Initialise the SDK
To use the SDK, you have to initialise it first before invoking any other SDK method.
This is an example of how to initialise the SDK:
import com.truelayer.payments.core.domain.configuration.Environment
import com.truelayer.payments.core.domain.configuration.HttpConnectionConfiguration
import com.truelayer.payments.core.domain.configuration.HttpLoggingLevel
import com.truelayer.payments.ui.TrueLayerUI

// Initialize the SDK with your application context.
TrueLayerUI.init(context = applicationContext) {
    // optionally choose which environment you want to use: PRODUCTION or SANDBOX
    environment = Environment.PRODUCTION
    // Make your own custom http configuration, stating custom timeout and http request logging level
    httpConnection = HttpConnectionConfiguration(
        httpDebugLoggingLevel = HttpLoggingLevel.None
    )
}
Initialise with AppStartup
If you are using AppStartup for your integration, you need to also add WorkManagerInitializer to your dependencies:
import androidx.work.WorkManagerInitializer
(...)
override fun dependencies(): List<Class<out Initializer<*>>> {
    return listOf(WorkManagerInitializer::class.java)
}
3. Process the payment
Depending on your requirements, you can integrate the Android SDK into your payment process with either AndroidX Activity, the older Android Activity or with Jetpack Compose.
Whichever approach you use, you need to provide the id and the resourceToken obtained from the backend at payment creation. Pass the id and resourceToken to the SDK via PaymentContext.
The following kdoc explains all the available parameters:
/**
 * ProcessorContext to identify payment to be processed
 * [Payment API](https://docs.truelayer.com/)
 *
 * @property id payment identifier obtained from the
 * create payment API [create payment API](https://docs.truelayer.com/reference/create-payment)
 * @property resourceToken resource token obtained from
 * the create payment API [create payment API](https://docs.truelayer.com/reference/create-payment)
 * @property redirectUri uri that will be invoked once payment authorization is completed
 */
@Parcelize
sealed class ProcessorContext : Parcelable {
    abstract val id: String
    abstract val resourceToken: String
    abstract val redirectUri: String

    /**
     * PaymentContext to identify payment to be processed
     * [Payments API](https://docs.truelayer.com/docs/create-a-payment)
     *
     * @property id payment identifier obtained from create payment API [create payment API](https://docs.truelayer.com/reference/create-payment)
     * @property resourceToken resource token obtained from create payment API [create payment API](https://docs.truelayer.com/reference/create-payment)
     * @property redirectUri uri that will be invoked once payment authorization is completed
     * @property preferences object containing various preferences that allow to override default SDK
     *                     behaviour in certain aspects.
     */
    @Parcelize
    data class PaymentContext(
        override val id: String,
        override val resourceToken: String,
        override val redirectUri: String,
        val preferences: PaymentPreferences? = null
    ) : ProcessorContext()

    /**
     * Preferences class that allows to set preferences and override default SDK behaviour
     * in certain aspects.
     *
     * @property preferredCountryCode (optional) in case there are available payment providers from
     *                      multiple countries the SDK will try select most appropriate one automatically.
     *                      You may want to override that behaviour.
     *                      By setting the preferredCountryCode (ISO 3166-1 alpha-2, example: "GB" or "FR"),
     *                      the SDK will try first to select preferred country before falling back to the
     *                      auto selection.
     * @property shouldPresentResultScreen (optional) true if the result screen should be presented
     *                      before the final redirect to the merchant app. Default is true.
     * @property waitTimeMillis the total time the result screen will wait to get a final status of the payment
     *                      Default is 3 seconds. Minimum is 2 seconds. Maximum is 10 seconds.
     */
    @Parcelize
    data class PaymentPreferences(
        val preferredCountryCode: String? = null,
        val shouldPresentResultScreen: Boolean = true,
        val waitTimeMillis: Long = 3_000
    ) : Parcelable
}
AndroidX Activity integration
This example shows how to process a payment with an AndroidX Activity integration:
import android.widget.Toast
import com.truelayer.payments.ui.screens.processor.ProcessorContext.PaymentContext
import com.truelayer.payments.ui.screens.processor.ProcessorActivityContract
import com.truelayer.payments.ui.screens.processor.ProcessorResult

// Register for the end result.
val contract = ProcessorActivityContract()
val processorResult = registerForActivityResult(contract) {
    val text = when (it) {
        is ProcessorResult.Failure -> {
            "Failure ${it.reason}"
        }
        is ProcessorResult.Successful -> {
            "Successful ${it.step}"
        }
    }
    // present the final result
    Toast.makeText(this, text, Toast.LENGTH_LONG).show()
}

// Obtain your payment context from your backend
val paymentContext = PaymentContext(
    id =  "your-payment-identifier",
    resourceToken = "payment-resource-token",
    redirectUri = "redirect-uri-that-will-be-invoked-when-coming-back-from-bank"
)

// 🚀 Launch the payment flow.
processorResult.launch(paymentContext)
```
Android Activity integration
This example shows how to process a payment with an Android Activity integration:
import android.app.Activity
import android.content.Intent
import android.os.Bundle
import android.widget.Toast
import com.truelayer.payments.core.domain.configuration.Environment
import com.truelayer.payments.core.domain.configuration.HttpConnectionConfiguration
import com.truelayer.payments.core.domain.configuration.HttpLoggingLevel
import com.truelayer.payments.ui.TrueLayerUI
import com.truelayer.payments.ui.screens.processor.ProcessorContext.PaymentContext
import com.truelayer.payments.ui.screens.processor.ProcessorActivityContract
import com.truelayer.payments.ui.screens.processor.ProcessorResult

class ActivityIntegration : Activity() {
    override fun onCreate(savedInstanceState: Bundle?) {
        super.onCreate(savedInstanceState)

        // Initialise the payments configuration
        TrueLayerUI.init(context = applicationContext) {
            environment = Environment.PRODUCTION
            httpConnection = HttpConnectionConfiguration(
                timeoutMs = 35000,
                httpDebugLoggingLevel = HttpLoggingLevel.None
            )
        }

        // Obtain your payment context from your backend
        val paymentContext = PaymentContext(
            id =  "your-payment-identifier",
            resourceToken = "payment-resource-token",
            redirectUri = "redirect-uri-that-will-be-invoked-when-coming-back-from-bank"
        )
        // Create an intent to launch the SDK
        val intent = ProcessorActivityContract().createIntent(this, paymentContext)
        // 🚀 Launch the SDK
        startActivityForResult(intent, 0)
    }

    override fun onActivityResult(requestCode: Int, resultCode: Int, data: Intent?) {
        super.onActivityResult(requestCode, resultCode, data)
        // Act on the SDK result
        val text = when (val result = ProcessorResult.unwrapResult(data)) {
            is ProcessorResult.Failure -> "Failure ${result.reason}"
            is ProcessorResult.Successful -> "Successful ${result.step}"
            null -> "Activity result failed."
        }
        Toast.makeText(this, text, Toast.LENGTH_LONG).show()
    }
}
Jetpack Compose integration
This example shows how to process a payment with a Jetpack Compose integration:
import com.truelayer.payments.ui.screens.processor.Processor
import com.truelayer.payments.ui.screens.processor.ProcessorContext.PaymentContext

// Obtain your payment context from your backend
val paymentContext = PaymentContext(
    id =  "your-payment-identifier",
    resourceToken = "payment-resource-token",
    redirectUri = "redirect-uri-that-will-be-invoked-when-coming-back-from-bank"
)

setContent {
    Processor(
        context = paymentContext,
        onSuccess = { successStep ->
            // action on success
        },
        onFailure = { failureReason ->
            // action on failure
        },
    )
}
Contact us to enable this feature.
4. Handle redirects and display the payment result
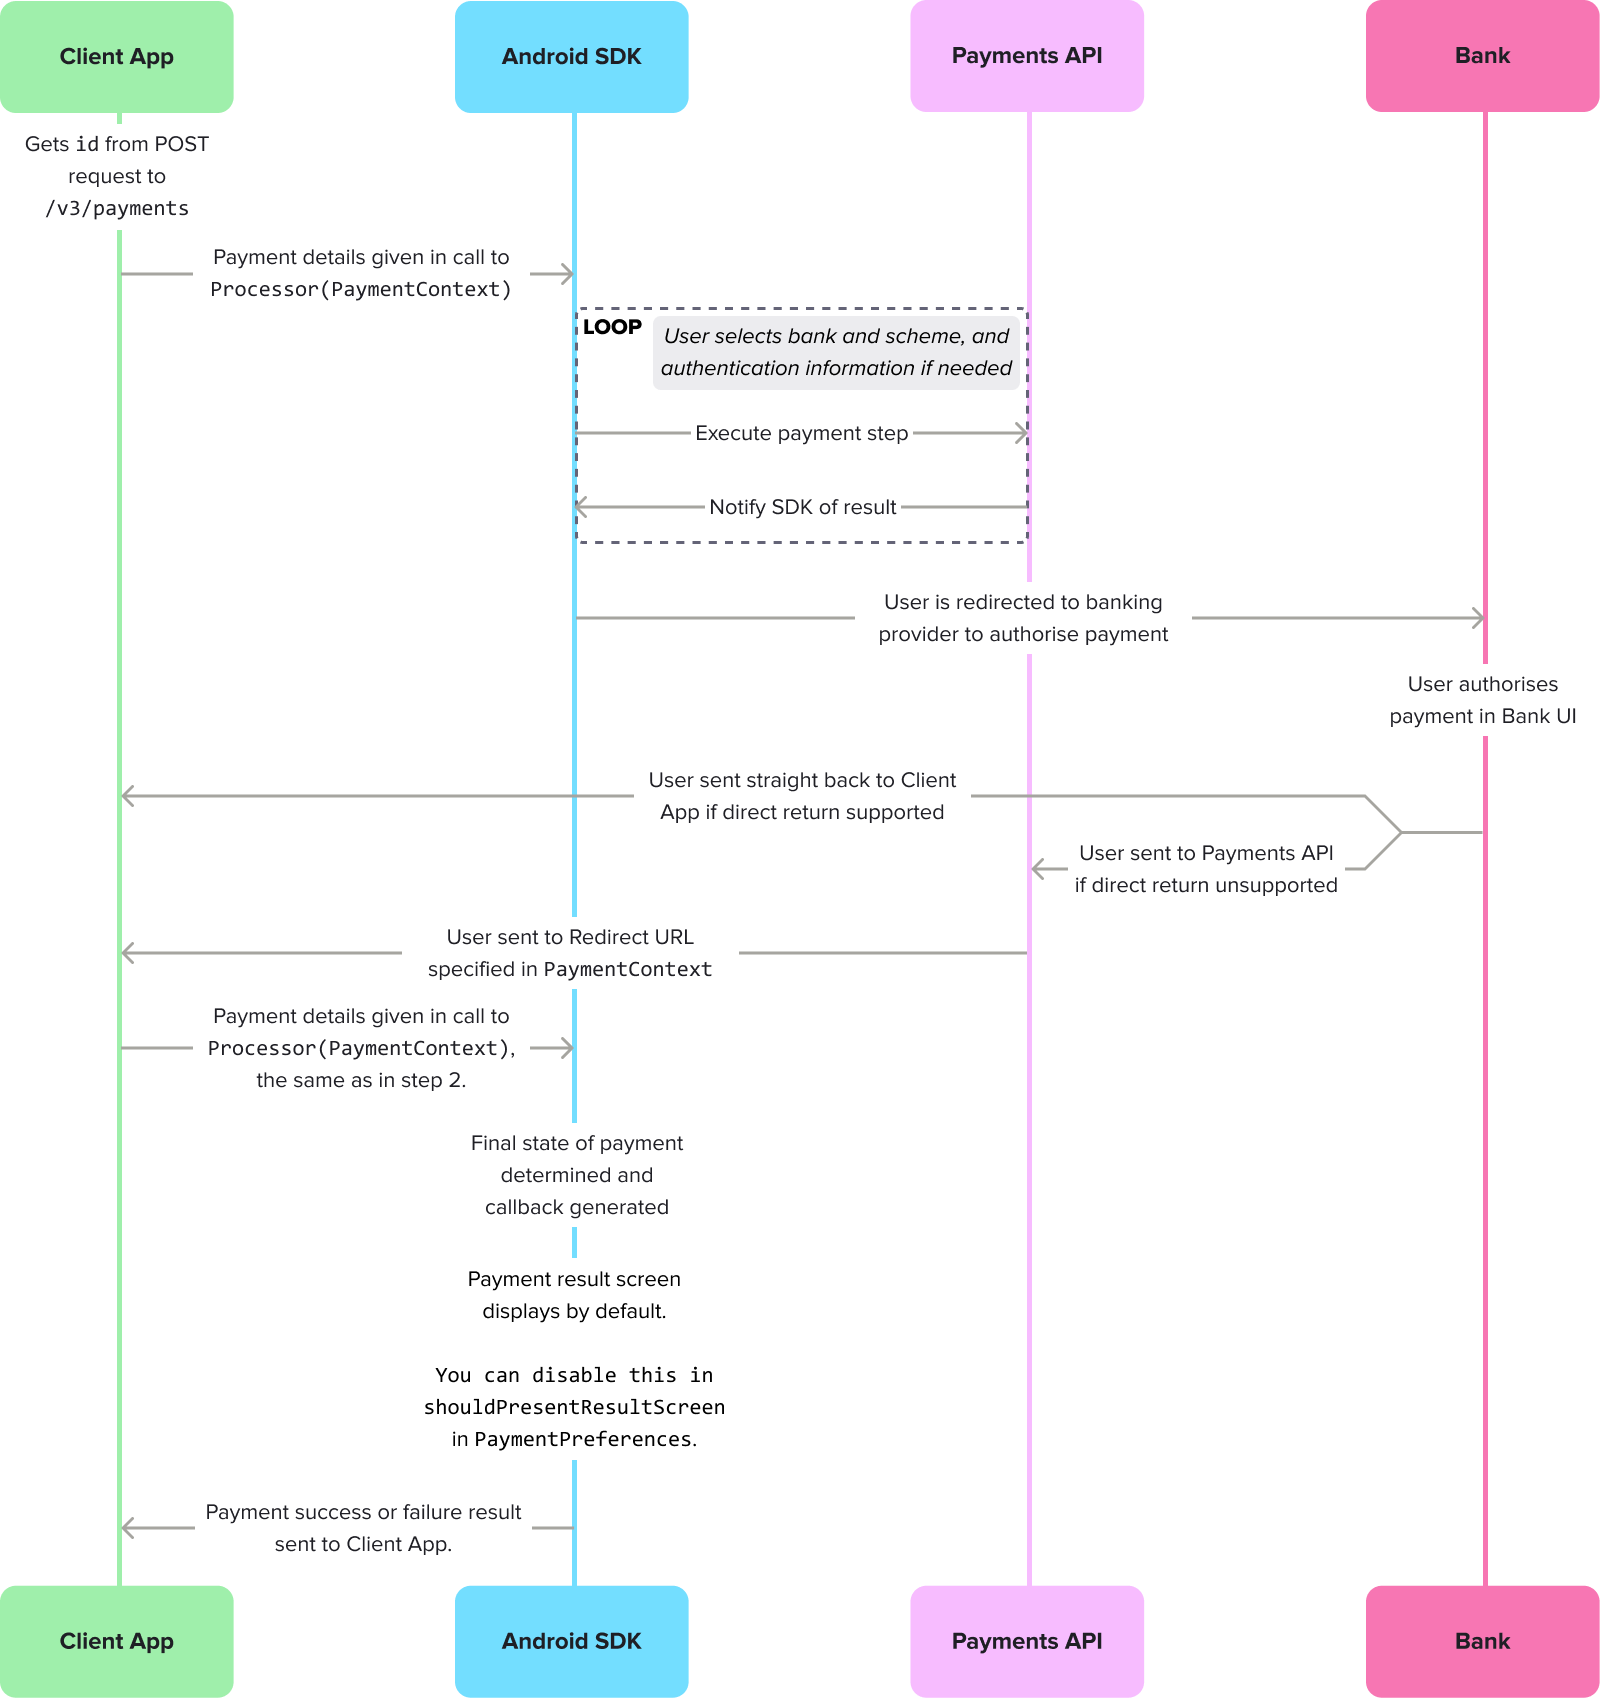
The flow for the authorisation through the Android SDK where the user is sent to their bank to authorise the payment, then redirected to the Client App.
Once the redirects are complete, you receive a success or error callback, which renders in the payment result screen.
Handle redirects from the provider
At the end of a redirect flow the bank app will relaunch your app with the return URI you provided in Console.
In your activity that launches when a deep link is triggered, fetch the redirect parameters with the method below.
val params = intent.data.extractTrueLayerRedirectParams()This must include the payment_id. For more information on handling deep links, follow the documentation here.
Whenever you are redirected to your app, you should reinvoke the SDK, until you receive a success or error callback.
By default the SDK offers a payment result screen, which displays the result of the payment and advises the user on what to do in case of a failed payment. If you disable the payment result screen, you can use the success or error callback to render a screen for your user when they return to your app.
Success callbacks
A success result means that the SDK has completed its role in initiating the payment. However, it doesn't necessarily mean that the payment itself is complete.
The table below shows all the possible responses:
| Response | Description |
|---|---|
Redirect | The user was redirected to their provider to authorise the payment. [Removed in 3.8.0] |
Wait | The SDK flow is complete, but a decoupled authorisation action is still pending with the user and/or their provider. |
Authorized | The user has authorised the payment with their provider. |
Successful | The bank has confirmed that they have accepted the payment request, and they intend to execute it. |
Settled | The payment has reached its destination and the money is in the payee's account. |
ResultShown | The result that was displayed to the user on the payment result screen. |
Error callbacks
A payment can fail for a variety of reasons. You can use the error callback to figure out why a payment failed and whether you can resolve it. The error callbacks are shared between payments and mandates.
Expand to see all payment failure callbacks
| Payment result | Description |
|---|---|
NoInternet | There was a problem connecting to the internet. This usually happens when the user has no internet connection. This can also be caused by a network configuration, if no route to TrueLayer services can be established. |
UserAborted | The user purposefully ended the payment process. |
UserAbortedFailedToNotifyBackend | The user did not continue with the payment but the application failed to notify the backend, or the backend responded with an error. |
CommunicationIssue | Communication with the backend has failed. It may be an invalid payment token, or just the payment service responding in an unexpected manner. |
ConnectionSecurityIssue | A secure connection to payment services could not be established. |
PaymentFailed | The payment is in the failed state. A recovery from this state is not possible. |
WaitAbandoned | The user purposefully abandoned the payment flow while the flow was awaiting authorisation from the bank. The authorisation from the bank may or may not depend on a user action, so the payment may still go through. |
WaitTokenExpired | The authorisation waiting time was so long that the resource token has expired. We are no longer able to query the payment status. |
ProcessorContextNotAvailable | A technical failure. It was not possible to read the ProcessorContext in which you set the payment/mandate id and resource_token. If you see this error, check that you're following the steps in this guide correctly, or raise a support ticket with us if you need further help. |
Unknown | The SDK was unable to identify a reason for the failure. |
ResultShown | The result that was displayed to the user on the payment result screen. |
Get the payment status
As a best practice, we recommend that you obtain the payment status from your backend through webhook notifications.
However, the SDK also enables you to fetch the current status of a payment.
val outcome = TrueLayerUI.getPaymentStatus("your-payment-identifier", "payment-resource-token")For more details on these statuses, see the API reference page on the /v3/payments/{id} endpoint.
Display the payment result screen
The payment result screen is enabled by default. To display it to your user after the payment is authorised (or fails) you must relaunch the SDK using the same PaymentContext you used when you first processed the payment.
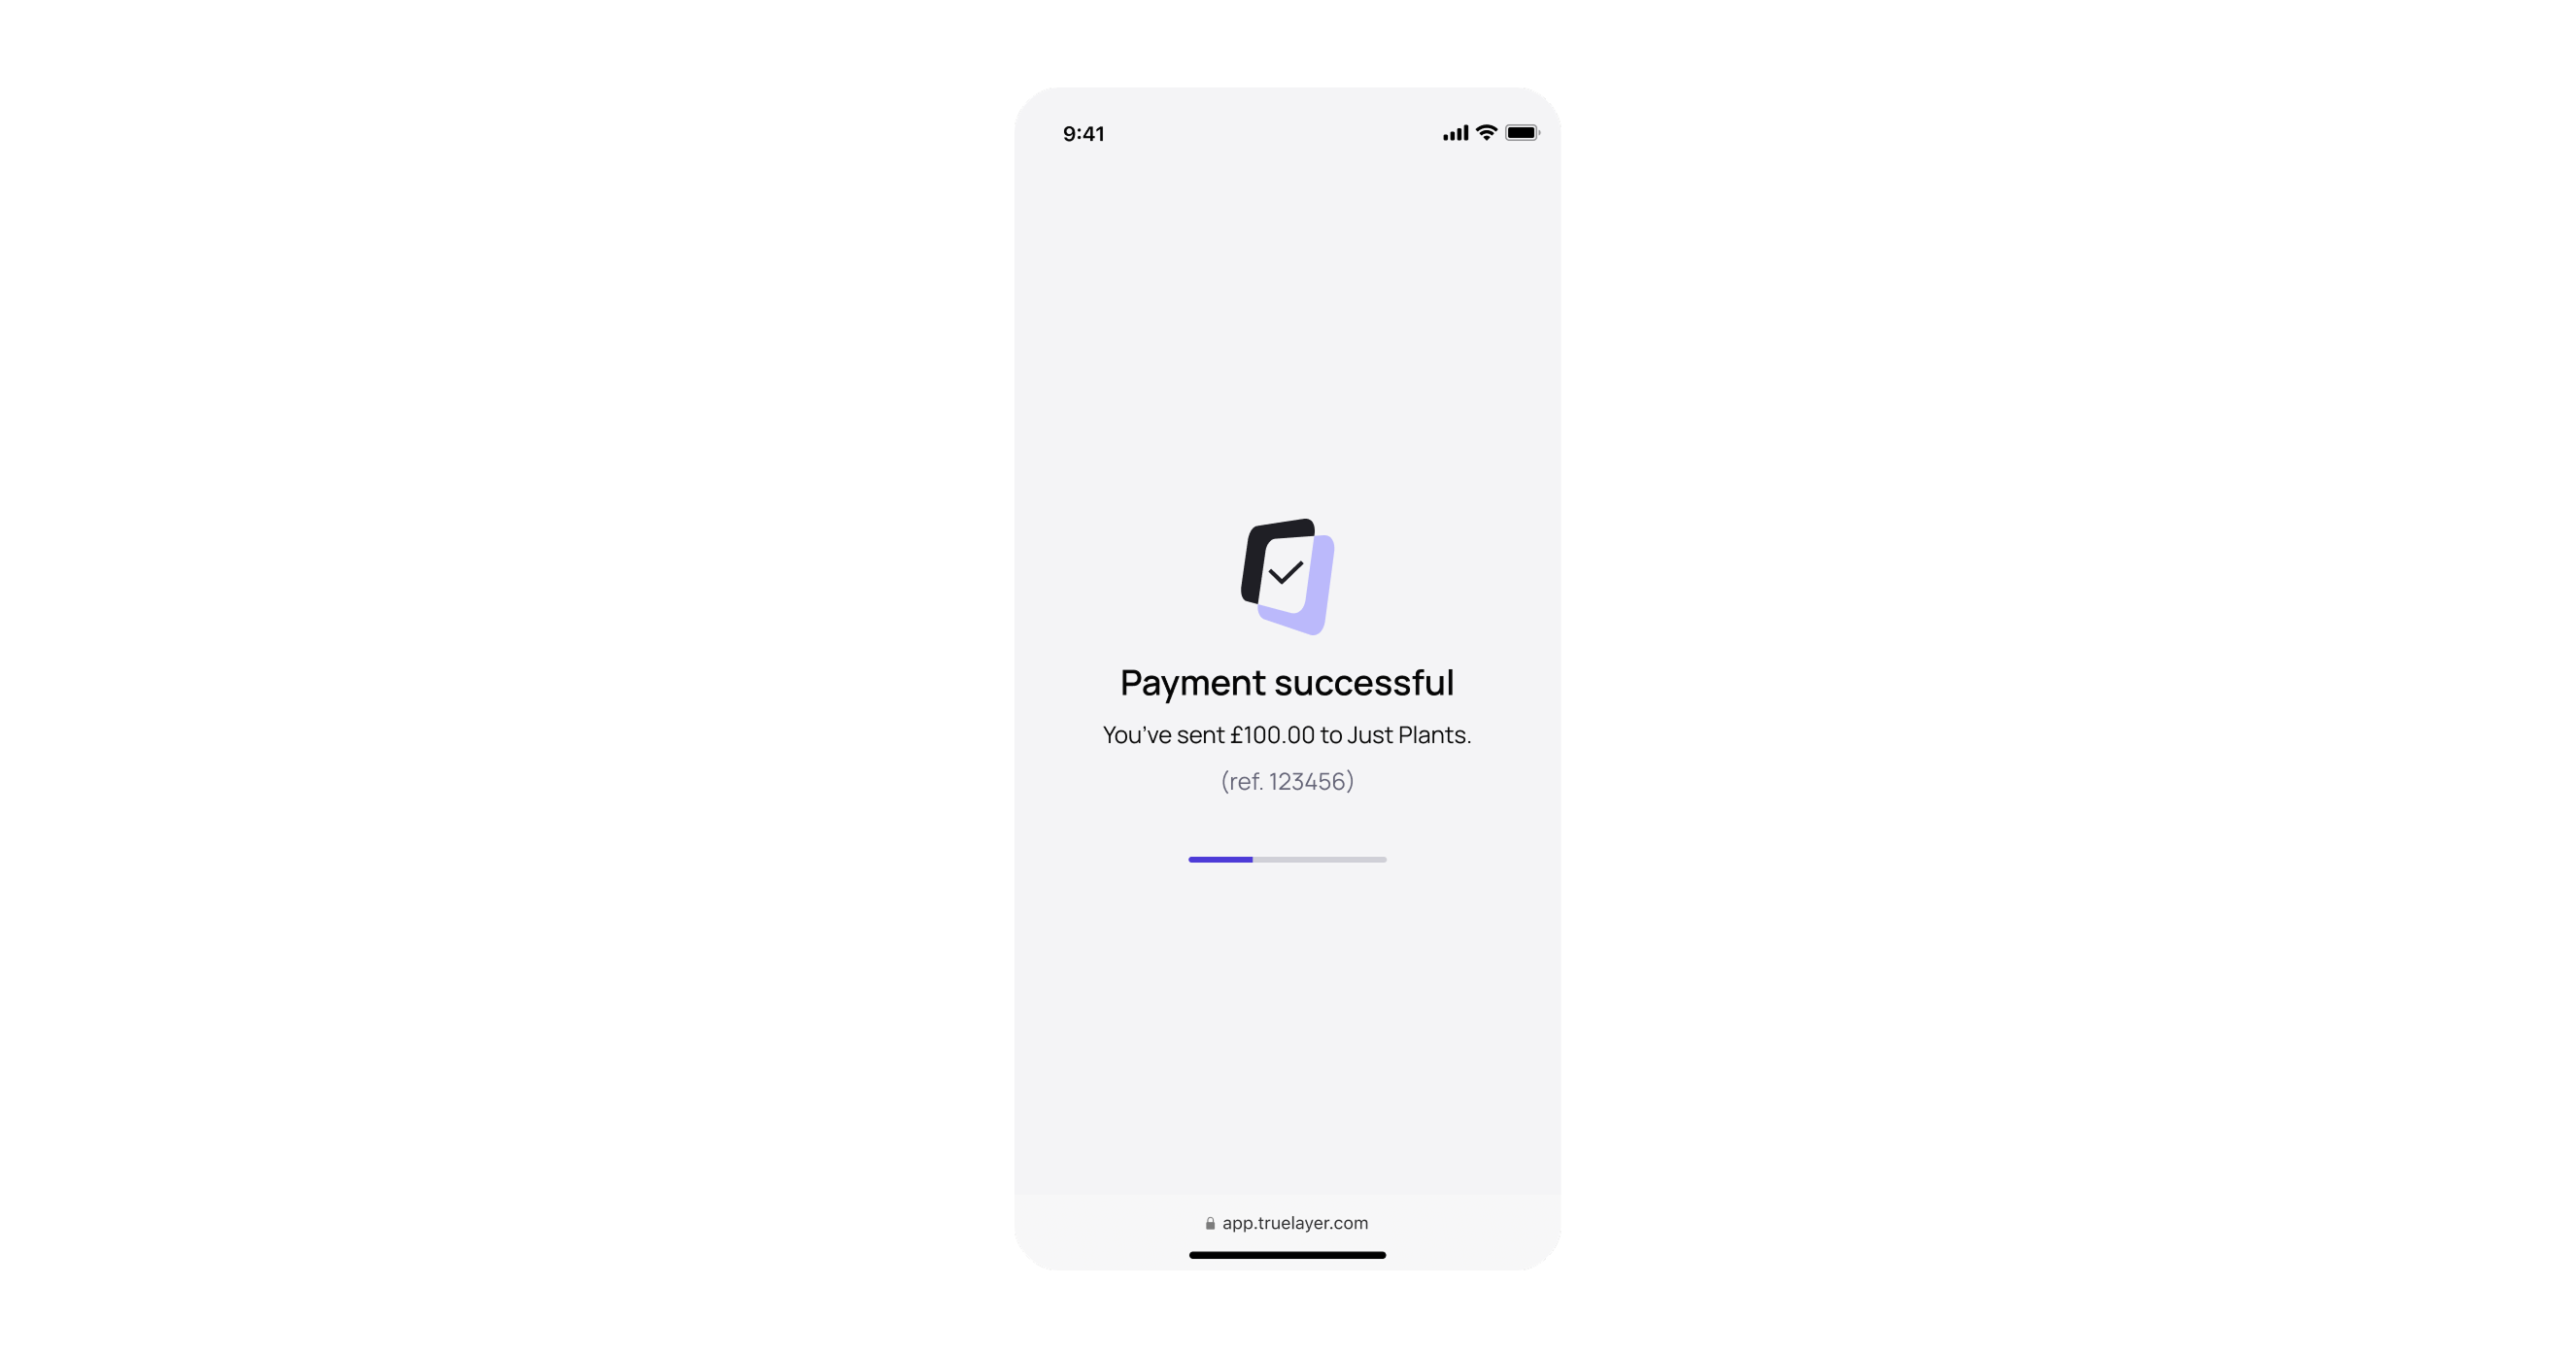
An example of a payment result screen on successful payment.
Possible payment results and callbacks
When your user sees the payment result screen, you receive a ResultShown callback. This applies for both successful and failed payments, and contains the following properties, which explain the result the user saw:
List of payment result callbacks
ResultShown property | Description |
|---|---|
None | No result screen was shown because it's either been opted out by the client or the user has been redirected. |
Initiated | The payment did not reach a final state and the user was shown the "Payment in progress" screen. |
Success | The payment was completed successfully. |
InsufficientFunds | The payment failed due to insufficient funds. |
PaymentLimitExceeded | The payment failed due to exceeding the payment limit. |
UserCanceledAtProvider | The payment failed due to the user cancelling at the provider. |
AuthorizationFailed | The payment failed due to authorization failure. |
Expired | The payment failed due to expiring. |
InvalidAccountDetails | The payment failed due to the invalid account details. |
InvalidGenericWithoutRetry | The payment failed and retry is not possible. |
Failed | The payment failed to be set up. |
How to disable the payment result screen
To disable the payment result screen, ensure you provide a value of false for shouldPresentResultScreen within PaymentPreferences when you process the payment.
Mandates with Android
The Android SDK enables your users to authorise mandates that you've made through the /v3/mandates endpoint.
The process for authorising mandates is very similar to the one for authorising payments. However, if you want to authorise payments with the Android SDK, you should check our guide for payments.
Before you startRegister a return URI in Console. Go to Console > Settings > Allowed redirect URIs to do this. Your user is redirected back to your redirect URL, typically your website or application, at the end of the mandate authorisation journey.
You also need an integration that can create a mandate, and get a mandate
id, to start the Android SDK. Learn more about how to create a mandate, and authenticate, and sign your requests.There are four steps to configuring the Android SDK with the Payments API v3:
1. Install the SDK
Before you add the SDK to your project, ensure your build.gradle configuration is configured to support minSdk 24 (Android 7.0) or higher, and configure the packagingOptions below:
android {
    defaultConfig {
        applicationId "com.example.myapp"
        minSdk 24 // Sdk 24 or higher supported
    }


    packagingOptions {
        resources {
            pickFirsts += ['META-INF/LICENSE-MIT']
        }
    }
}
To add the SDK to your project, include the TrueLayer Payments SDK in your dependencies (you can find the latest version on our GitHub page):
// Add to your projects `build.gradle`.
implementation "com.truelayer.payments:ui:4.1.6"
If you plan to support Android versions below 8.0, then you need to make sure your project has desugaring enabled. This is important because without desugaring, in specific scenarios, the SDK may crash on devices running Android API versions below 26.
The following code example shows how to enable desugaring in your project.
android {
    // this part will enable core library desugaing
    compileOptions {
        coreLibraryDesugaringEnabled true
    }
    // this part will remove excess LICENSE-MIT files
    packagingOptions {
        resources {
            pickFirsts += [‘META-INF/LICENSE-MIT’]
        }
    }
}
dependencies {
    // Add to your projects `build.gradle`.
    // We are currently using following version of desuga libraries
    coreLibraryDesugaring “com.android.tools:desugar_jdk_libs:2.1.5”
}
2. Initialise the SDK
To use the SDK, you have to initialise it first before invoking any other SDK method.
This is an example of how to initialise the SDK:
import com.truelayer.payments.core.domain.configuration.Environment
import com.truelayer.payments.core.domain.configuration.HttpConnectionConfiguration
import com.truelayer.payments.core.domain.configuration.HttpLoggingLevel
import com.truelayer.payments.ui.TrueLayerUI

// Initialize the SDK with your application context.
TrueLayerUI.init(context = applicationContext) {
    // optionally choose which environment you want to use: PRODUCTION or SANDBOX
    environment = Environment.PRODUCTION
    // Make your own custom http configuration, stating custom timeout and http request logging level
    httpConnection = HttpConnectionConfiguration(
        httpDebugLoggingLevel = HttpLoggingLevel.None
    )
}
Initialise with AppStartup
If you are using AppStartup for your integration, you need to also add WorkManagerInitializer to your dependencies:
import androidx.work.WorkManagerInitializer
(...)
override fun dependencies(): List<Class<out Initializer<*>>> {
    return listOf(WorkManagerInitializer::class.java)
}
3. Process the mandate
Depending on your requirements, you can integrate the Android SDK into your mandate process with either AndroidX Activity, the older Android Activity or with Jetpack Compose.
Whichever approach you use, you need to provide the id and the resourceToken obtained from the backend at mandate creation. Pass the id and resourceToken to the SDK via MandateContext.
The following kdoc explains all the available parameters:
/**
 * ProcessorContext to identify mandate to be processed
 * [Payment API](https://docs.truelayer.com/)
 *
 * @property id mandate identifier obtained from the
 * [create mandate API](https://docs.truelayer.com/reference/create-mandate)
 * @property resourceToken resource token obtained from
 * [the create mandate API](https://docs.truelayer.com/reference/create-mandate)
 * @property redirectUri uri that will be invoked once payment authorization is completed
 */
@Parcelize
sealed class ProcessorContext : Parcelable {
    abstract val id: String
    abstract val resourceToken: String
    abstract val redirectUri: String

    /**
     * MandateContext to identify mandate to be processed
     * [Payments API](https://docs.truelayer.com/docs/create-a-payment-mandate)
     *
     * @property id mandate identifier obtained from the
     * [create mandate API](https://docs.truelayer.com/reference/create-mandate)
     * @property resourceToken resource token obtained from
     * the [create mandate API](https://docs.truelayer.com/reference/create-mandate)
     * @property redirectUri uri that will be invoked once payment authorization is completed
     * @property preferences object containing various preferences that allow to override default SDK
     * behaviour in certain aspects.
     */
    @Parcelize
    data class MandateContext(
        override val id: String,
        override val resourceToken: String,
        override val redirectUri: String,
        val preferences: MandatePreferences? = null
    ) : ProcessorContext()

    /**
     * Preferences class that allows to set preferences and override default SDK behaviour
     * in certain aspects.
     *
     * @property preferredCountryCode (optional) in case there are available mandate providers from
     *                      multiple countries the SDK will try select most appropriate one automatically.
     *                      You may want to override that behaviour.
     *                      By setting the preferredCountryCode (ISO 3166-1 alpha-2, example: "GB" or "FR"),
     *                      the SDK will try first to select preferred country before falling back to the
     *                      auto selection.
     * @property shouldPresentResultScreen (optional) true if the result screen should be presented
     *                      before the final redirect to the merchant app. Default is true.
     * @property waitTimeMillis the total time the result screen will wait to get a final status of the payment
     *                      Default is 3 seconds. Minimum is 2 seconds. Maximum is 10 seconds.
     */
    @Parcelize
    data class MandatePreferences(
        val preferredCountryCode: String? = null,
        val shouldPresentResultScreen: Boolean = true,
        val waitTimeMillis: Long = 3_000
    ) : Parcelable
}
AndroidX Activity integration
This example shows how to process a mandate with an AndroidX Activity integration:
import android.widget.Toast
import com.truelayer.payments.ui.screens.processor.ProcessorContext.MandateContext
import com.truelayer.payments.ui.screens.processor.ProcessorActivityContract
import com.truelayer.payments.ui.screens.processor.ProcessorResult

// Register for the end result.
val contract = ProcessorActivityContract()
val processorResult = registerForActivityResult(contract) {
    val text = when (it) {
        is ProcessorResult.Failure -> {
            "Failure ${it.reason}"
        }
        is ProcessorResult.Successful -> {
            "Successful ${it.step}"
        }
    }
    // present the final result
    Toast.makeText(this, text, Toast.LENGTH_LONG).show()
}

// Obtain your mandate context from your backend
val mandateContext = MandateContext(
    id =  "your-mandate-identifier",
    resourceToken = "mandate-resource-token",
    redirectUri = "redirect-uri-that-will-be-invoked-when-coming-back-from-bank"
)

// 🚀 Launch the mandate flow.
processorResult.launch(mandateContext)
Android Activity integration
This example shows how to process a mandate with an Android Activity integration:
import android.app.Activity
import android.content.Intent
import android.os.Bundle
import android.widget.Toast
import com.truelayer.payments.core.domain.configuration.Environment
import com.truelayer.payments.core.domain.configuration.HttpConnectionConfiguration
import com.truelayer.payments.core.domain.configuration.HttpLoggingLevel
import com.truelayer.payments.ui.TrueLayerUI
import com.truelayer.payments.ui.screens.processor.ProcessorContext.MandateContext
import com.truelayer.payments.ui.screens.processor.ProcessorActivityContract
import com.truelayer.payments.ui.screens.processor.ProcessorResult

class ActivityIntegration : Activity() {
    override fun onCreate(savedInstanceState: Bundle?) {
        super.onCreate(savedInstanceState)

        // Initialise the mandate's configuration
        TrueLayerUI.init(context = applicationContext) {
            environment = Environment.PRODUCTION
            httpConnection = HttpConnectionConfiguration(
                timeoutMs = 35000,
                httpDebugLoggingLevel = HttpLoggingLevel.None
            )
        }

        // Obtain your mandate context from your backend
        val mandateContext = MandateContext(
            id =  "your-mandate-identifier",
            resourceToken = "mandate-resource-token",
            redirectUri = "redirect-uri-that-will-be-invoked-when-coming-back-from-bank"
        )
        // Create an intent to launch the SDK
        val intent = ProcessorActivityContract().createIntent(this, mandateContext)
        // 🚀 Launch the SDK
        startActivityForResult(intent, 0)
    }

    override fun onActivityResult(requestCode: Int, resultCode: Int, data: Intent?) {
        super.onActivityResult(requestCode, resultCode, data)
        // Act on the SDK result
        val text = when (val result = ProcessorResult.unwrapResult(data)) {
            is ProcessorResult.Failure -> "Failure ${result.reason}"
            is ProcessorResult.Successful -> "Successful ${result.step}"
            null -> "Activity result failed."
        }
        Toast.makeText(this, text, Toast.LENGTH_LONG).show()
    }
}
Jetpack Compose integration
This example shows how to process a mandate with a Jetpack Compose integration:
import com.truelayer.payments.ui.screens.processor.Processor
import com.truelayer.payments.ui.screens.processor.ProcessorContext.MandateContext

// Obtain your mandate context from your backend
val mandateContext = MandateContext(
    id =  "your-mandate-identifier",
    resourceToken = "mandate-resource-token",
    redirectUri = "redirect-uri-that-will-be-invoked-when-coming-back-from-bank"
)

setContent {
    Processor(
        context = mandateContext,
        onSuccess = { successStep ->
            // action on success
        },
        onFailure = { failureReason ->
            // action on failure
        },
    )
}
4. Handle redirects and display the mandate result
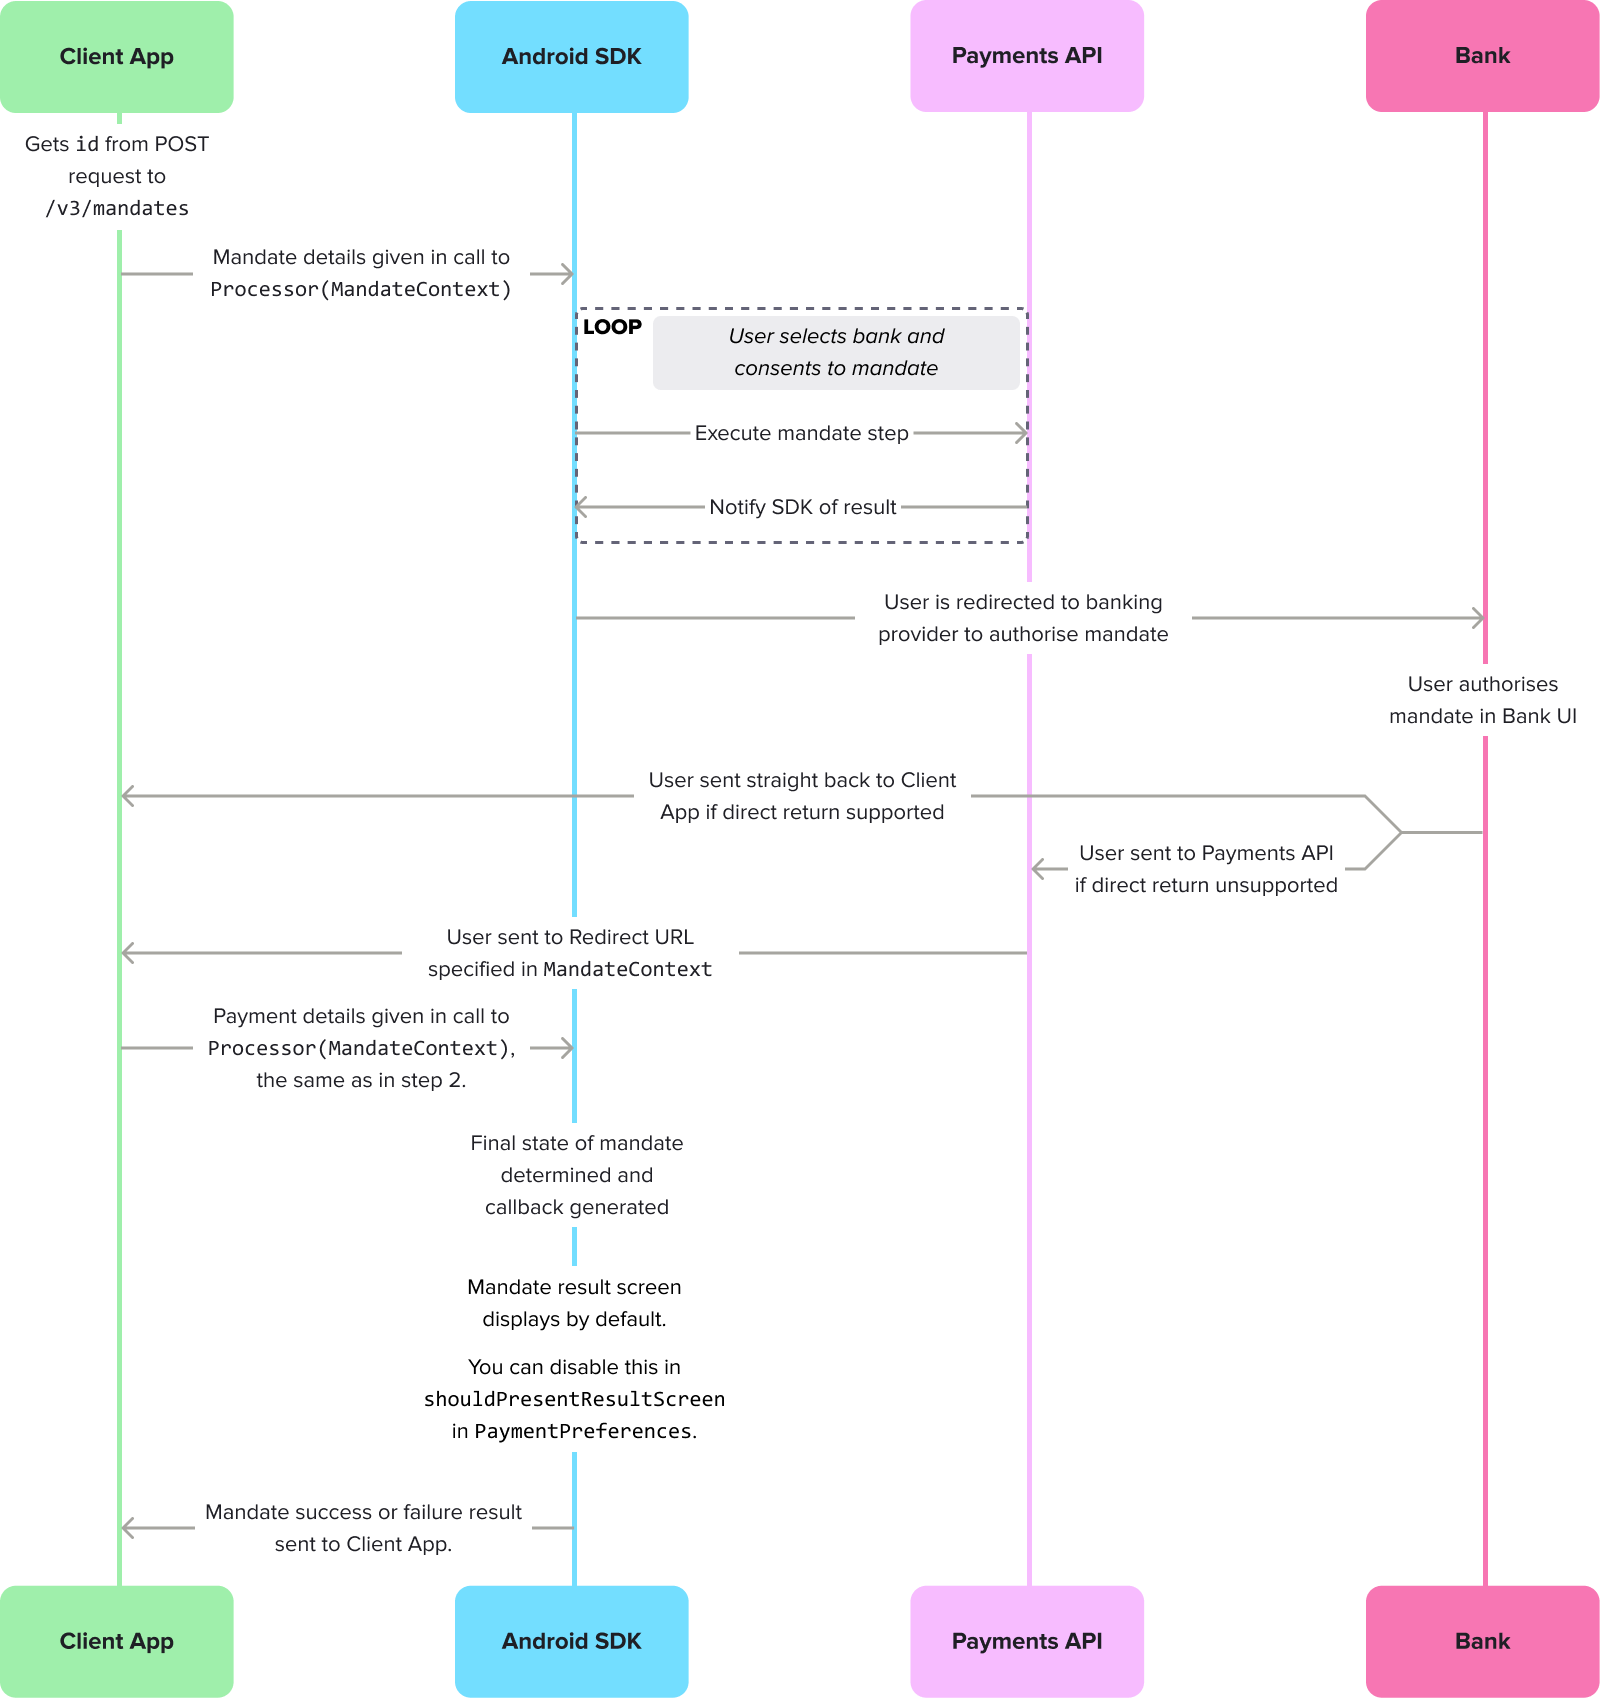
The flow for authorisation through the Android SDK where the user is sent to their bank to authorise the mandate, then redirected to the Client App.
Once the redirects are complete, you receive a success or error callback, which renders in the mandate result screen.
Handle redirects from the provider
At the end of a redirect flow the bank app will relaunch your app with the return URI you provided in Console.
In your activity that launches when a deep link is triggered, fetch the redirect parameters with the method below.
val params = intent.data.extractTrueLayerRedirectParams()This must include the mandate_id. For more information on handling deep links, follow the documentation here.
Whenever you are redirected to your app, you should reinvoke the SDK, until you receive a success or error callback.
By default the SDK offers a mandate result screen, which displays the result of the mandate and advises the user on what to do in case of a failed mandate. If you disable the mandate result screen, you can use the success or error callback to render a screen for your user when they return to your app.
Success callbacks
A success result means that the SDK has completed its role in initiating the mandate. However, it doesn't necessarily mean that the mandate itself is authorised and complete.
The table below shows all the possible responses:
| Response | Description |
|---|---|
Redirect | The user was redirected to their provider to authorise the payment. |
Wait | The SDK flow is complete, but a decoupled authorisation action is still pending with the user and/or their provider. |
Authorized | The user has authorised the payment with their provider. |
Successful | The bank has confirmed that they have accepted the payment request, and they intend to execute it. |
Settled | The payment has reached its destination and the money is in the payee's account. |
ResultShown | The result that was displayed to the user on the mandate result screen. |
Error callbacks
A mandate can fail for a variety of reasons. You can use the error callback to figure out why a mandate failed and whether you can resolve it. The error callbacks are shared between payments and mandates.
Expand to see all mandate failure callbacks
| Payment result | Description |
|---|---|
NoInternet | There was a problem connecting to the internet. This usually happens when the user has no internet connection. This can also be caused by a network configuration, if no route to TrueLayer services can be established. |
UserAborted | The user purposefully ended the payment process. |
UserAbortedFailedToNotifyBackend | The user did not continue with the payment but the application failed to notify the backend, or the backend responded with an error. |
CommunicationIssue | Communication with the backend has failed. It may be an invalid payment token, or just the payment service responding in an unexpected manner. |
ConnectionSecurityIssue | A secure connection to payment services could not be established. |
PaymentFailed | The mandate is in the failed state. A recovery from this state is not possible. |
WaitAbandoned | The user purposefully abandoned the payment flow while the flow was awaiting authorisation from the bank. The authorisation from the bank may or may not depend on a user action, so the payment may still go through. |
WaitTokenExpired | The authorisation waiting time was so long that the resource token has expired. We are no longer able to query the payment status. |
ProcessorContextNotAvailable | A technical failure. It was not possible to read the ProcessorContext in which you set the payment/mandate id and resource_token. If you see this error, check that you're following the steps in this guide correctly, or raise a support ticket with us if you need further help. |
Unknown | The SDK was unable to identify a reason for the failure. |
ResultShown | The result that was displayed to the user on the mandate result screen. |
Get the mandate status
As a best practice, we recommend that you obtain the mandate status from your backend through webhook notifications.
However, the SDK also enables you to fetch the current status of a mandate.
val outcome = TrueLayerUI.getMandateStatus("your-mandate-identifier", "mandate-resource-token")For more details on these statuses, see the API reference page for the /v3/mandate/{id} endpoint.
Display the mandate result screen
The mandate result screen is enabled by default. To display it to your user after the mandate is authorised (or fails) you must relaunch the SDK using the same MandateContext you used when you first processed the mandate.
Possible mandate results and callbacks
When your user sees the mandate result screen, you receive a ResultShown callback. This applies for both successful and failed mandates, and contains the following properties, which explain the result the user saw:
List of mandate result callbacks
ResultShown property | Description |
|---|---|
None | No result screen was shown because it's either been opted out by the client or the user has been redirected. |
Initiated | The payment did not reach a final state and the user was shown the "Payment in progress" screen. |
Success | The payment was completed successfully. |
UserCanceledAtProvider | The payment failed due to the user cancelling at the provider. |
AuthorizationFailed | The payment failed due to authorization failure. |
Expired | The payment failed due to expiring. |
InvalidAccountDetails | The payment failed due to the invalid account details. |
InvalidGenericWithoutRetry | The payment failed and retry is not possible. |
Failed | The payment failed to be set up. |
How to disable the mandate result screen
To disable the mandate result screen, provide a value of false for shouldPresentResultScreen within MandatePreferences when you process the payment.
Updated 30 days ago