Quickstart: Make a test payment
Learn how to prepare for and make a payment quickly in our sandbox environment.
In this guide, you'll create a free UK merchant account and complete your first test payment with the Payments API v3. You will initiate a payment and authorise it as if you were an end user. (For this example payment, you will use the hosted payment UI for authorisation.)
To follow the guide, you will need to install Insomnia and download our collection of API requests.
Interested in EU payments?In this guide, you'll make a test payment in GBP, with a UK merchant account in sandbox. Payments in Europe are very similar, but sometimes need extra considerations. Learn more about these in our documentation about single payments and payment configuration.
Quickstart overview
There are three steps you need to complete in this quickstart guide to make a test payment:
- Prepare keys and install Insomnia: Generate signing keys and install the Insomnia application for this guide.
- Configure Insomnia: Install our Insomnia plugin and set up associated parameters.
- Create and authorise a payment: Create a payment and authorise it with our mock bank.
1. Prepare keys and install Insomnia
1. Prepare keys and Insomnia
2.Configure Insomnia
3. Create and authorise a payment
The Payments API v3 authenticates requests using request signing as well as a bearer access_token for additional security. All requests must be signed using public and private keys. As such, we recommend using Insomnia to start testing our API, as the TrueLayer Insomnia plugin simplifies the request signing process.
1.1. Generate keys
To use the Payments API v3, you need public and private keys. You can generate these however you want, but we recommend OpenSSL on Windows or LibreSSL on macOS or Linux. These methods are usually available on these operating systems by default.
If you don't have either OpenSSL or LibreSSL installed on your device, go to their website to install the latest version.
To generate your private key, run the following command in your terminal.
openssl ecparam -genkey -name secp521r1 -noout -out ec512-private-key.pemThen, to generate your public key, run this command in your terminal.
openssl ec -in ec512-private-key.pem -pubout -out ec512-public-key.pemThe keys you generate save to your current directory. To find out where this is, input "pwd" on Mac or "cd" on Windows into your terminal, and hit Enter.
1.2. Create a Console account
If you don't already have one, you need a Console account to upload your keys and access your API credentials.
- Go to Console and click Sign up to create an account.
- Click the link you receive by email to verify your registration.
A form displays. - In the form, provide some personal and company information and set your marketing preferences.
A dialog displays. - In the dialog, set an application name (you can't change this later).
A page displays confirming your new Application name, Client ID, and Client secret. - Download or make a note of your client secret, then click Get started.
You have now created a Console account and are signed in.
1.3. Upload your public key
- Ensure that you’re signed into Console.
- Visit the Overview tab for the application you want to test with.
- Ensure that you are in the sandbox environment using the toggle in the top-right corner.
- Inside the Getting started with Payments? banner, click Get started.
- In the dialog that opens, click and select or drag and drop your public key.
- Once the key has been uploaded successfully, click Go to your application.
1.4. Create a merchant account
- More tabs will now be available to you. Click Merchant Accounts.
- Click the Get started button.
- Select a currency and enter a merchant account holder name.
- Select Create merchant account.
1.5. Install Insomnia
Download and install Insomnia (for example, from the official website download page).
1.6. Import the TrueLayer Insomnia collection
Once Insomnia is installed, download the TrueLayer collection from this link by clicking Run Payments API v3.
Alternatively, you can download the collection as a file from Github here. To import this file in Insomnia:
- Open a project.
- Click Create in the top-right corner and select Import from > File.
- Select the collection file you downloaded from Github.
- Click Scan.
A preview of the Insomnia resources displays. - Click Import.
2. Configure Insomnia
1. Prepare keys and Insomnia
2.Configure Insomnia
3. Create and authorise a payment
Now that you've installed Insomnia, you can configure it to make a payment.
The TrueLayer Insomnia collection contains a variety of pre-configured requests you can use to test the Payments API v3.
In the TrueLayer Insomnia collection, you must define and add properties to ensure your requests can communicate with your Console account. You also need to ensure you have the TrueLayer Insomnia plugin installed. This simplifies request signing, so you can quickly test requests.
2.1. Set properties in the collection
To add properties, you should edit the Sandbox Environment that the TrueLayer Insomnia collection contains. To do this:
-
Click the environment switcher in the top-left corner.
By default, Sandbox Sample Env is selected.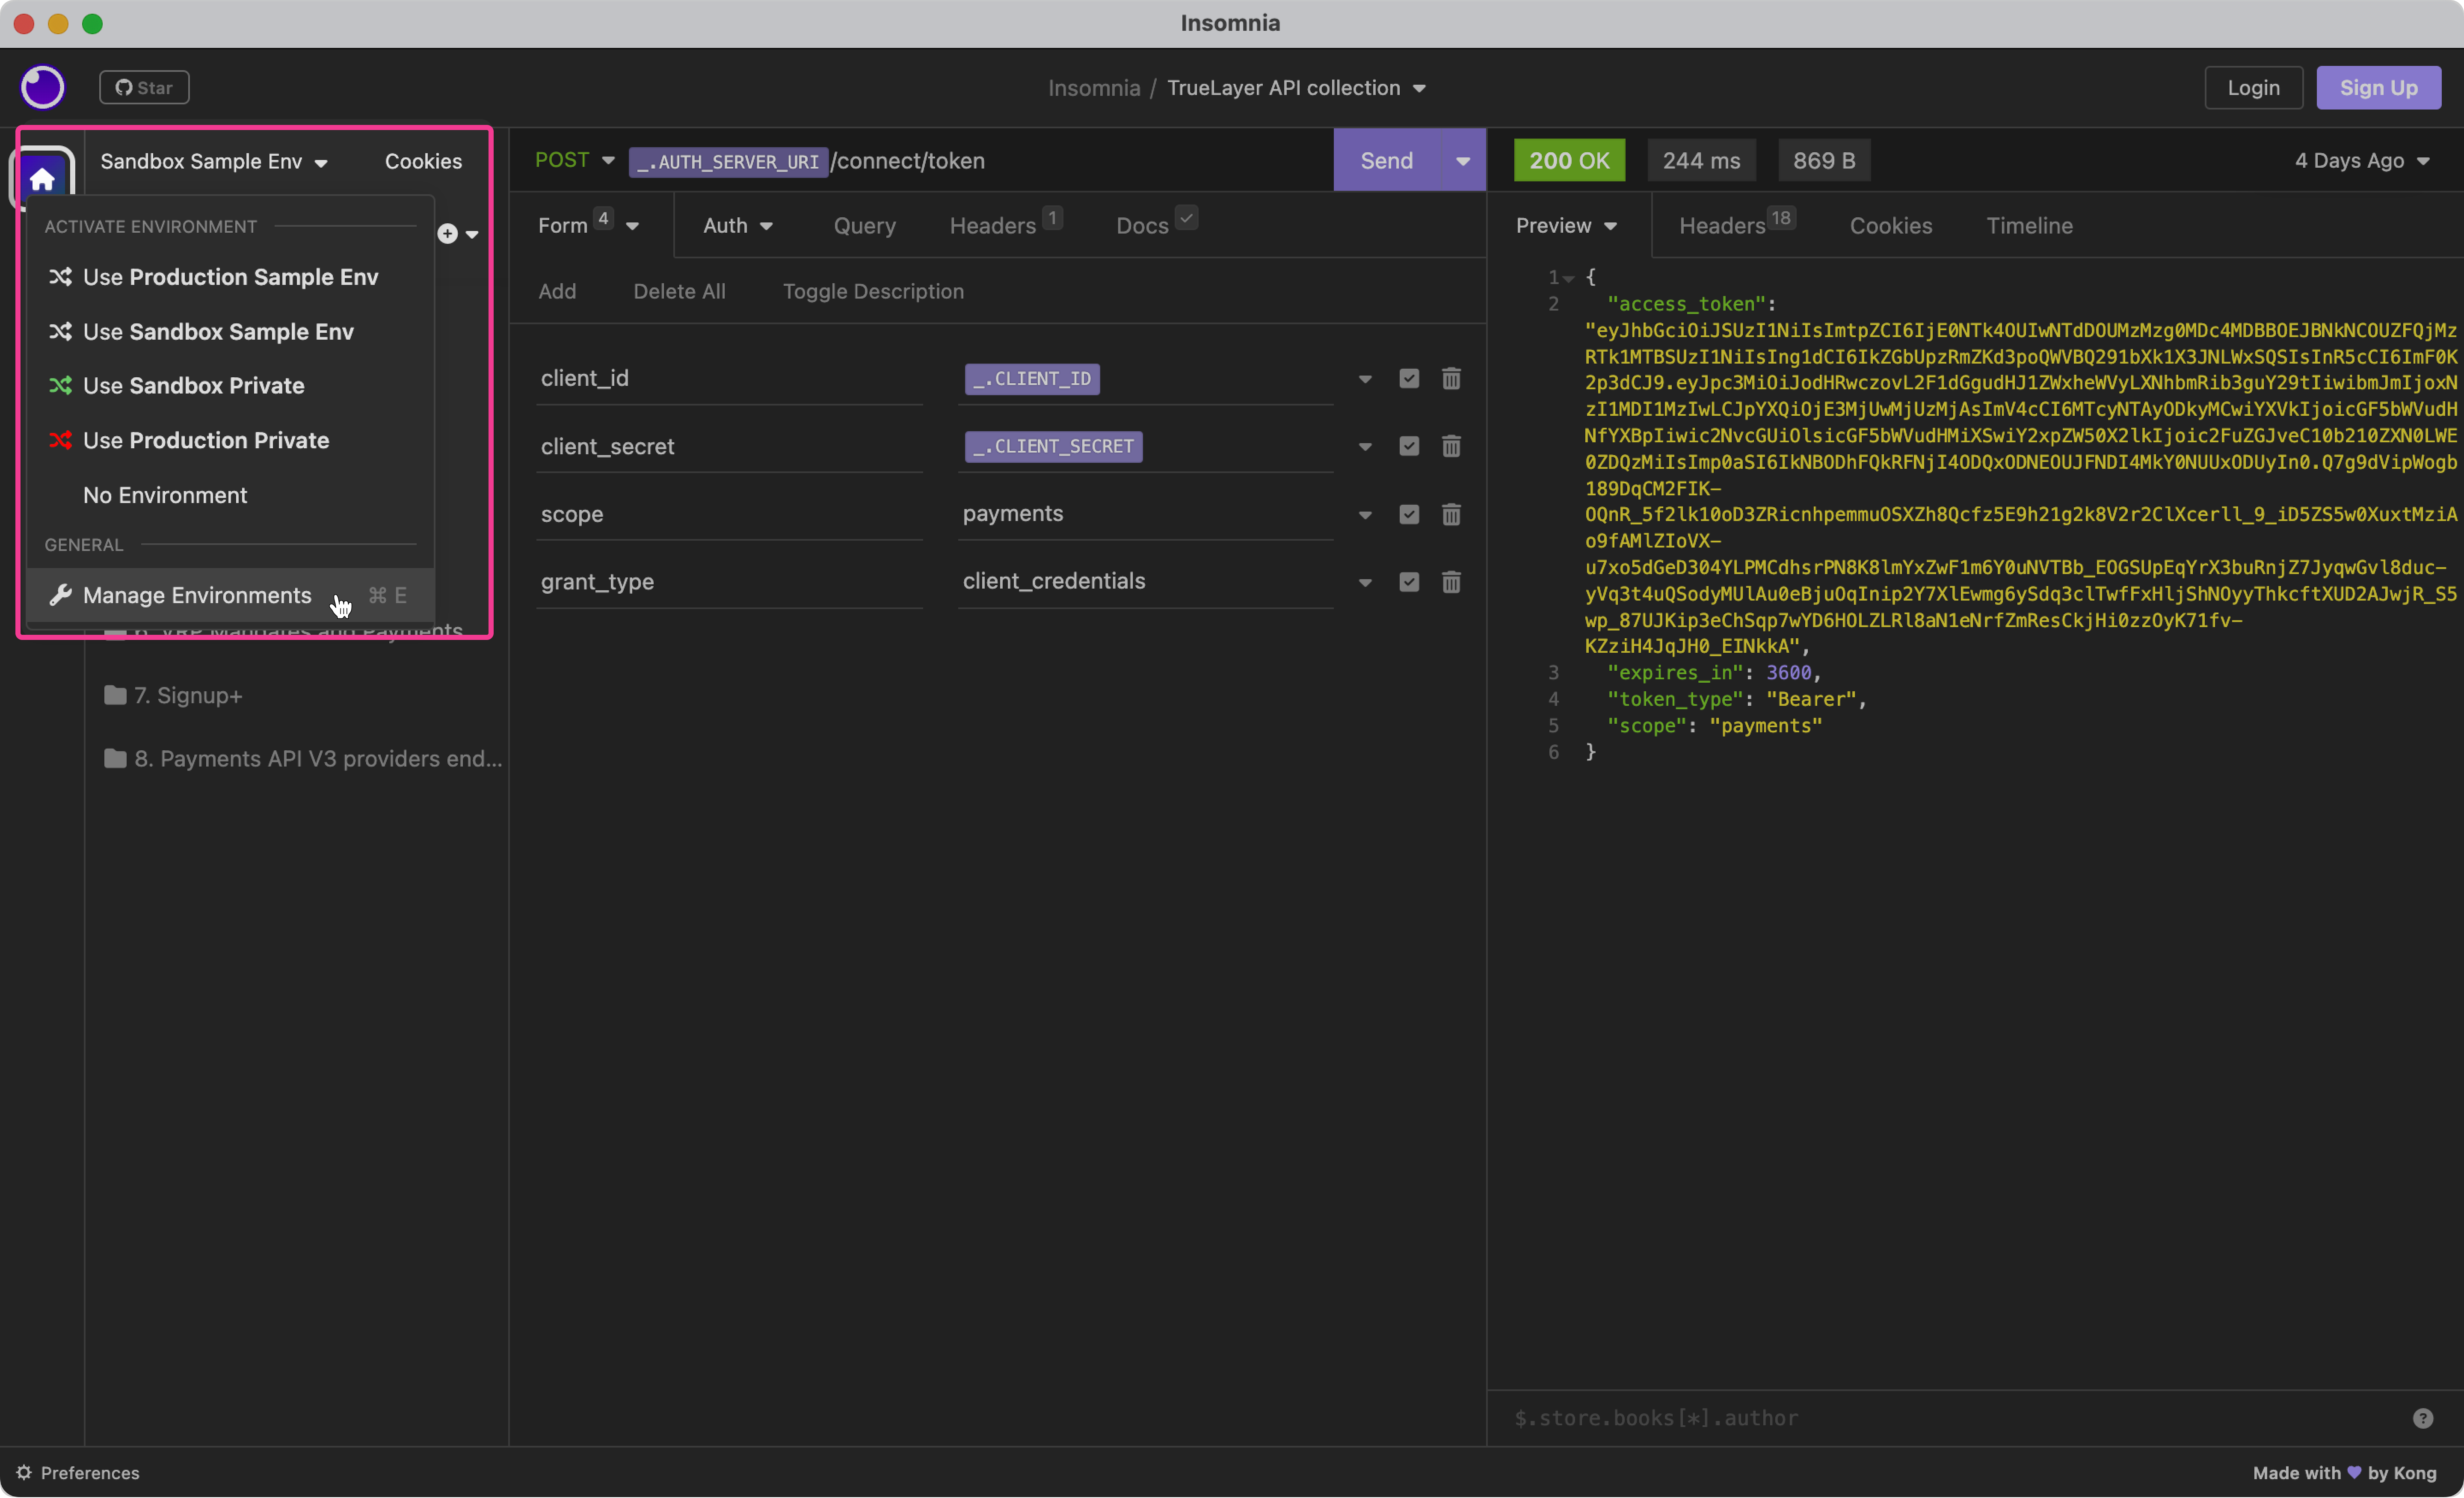
-
Click Manage Environments.
-
The Sandbox Sample Env contains several properties you should provide. These are:
CLIENT_ID: This is the client_id you can find this on the Application settings page in Console.CLIENT_SECRET: You got this when you created your app in Console.CERTIFICATE_ID: You can find this named KID on the Payments settings page in Console.PRIVATE_KEY: You should have generated this key earlier on this page.
You need to replace each line break in your private key with\n. This process is explained below.RETURN_URI: The link that your users (or you, when testing) are redirected to after a successful payment. Ensure this is included in your Redirect URIs on the Application Settings page in Console.
-
After you've updated your properties, click Close to save your changes.
Format your private key
The Insomnia environment uses JSON, which doesn't allow line breaks. So, when you set the value for the PRIVATE_KEY property, you must replace each line break with the newline character \n. To edit the content of your PRIVATE_KEY, you can open the private key file in a text editor.
You can use any method to do this. For example:
- manually editing the private key in a text editor or Insomnia, replacing each line break with
\n. - using a command in terminal to replace each line break with
\n, like this:awk 'NF {sub(/\r/, ""); printf "%s\\n",$0;}' file_location/cert-name.pem
Your PRIVATE_KEY property will look like this after formatting:

An example of a private key with line breaks replaced with \n.
2.2. Install the TrueLayer Insomnia plugin
The TrueLayer Insomnia plugin ensures that your requests are securely signed with your public and private keys.
To install the plugin from within Insomnia:
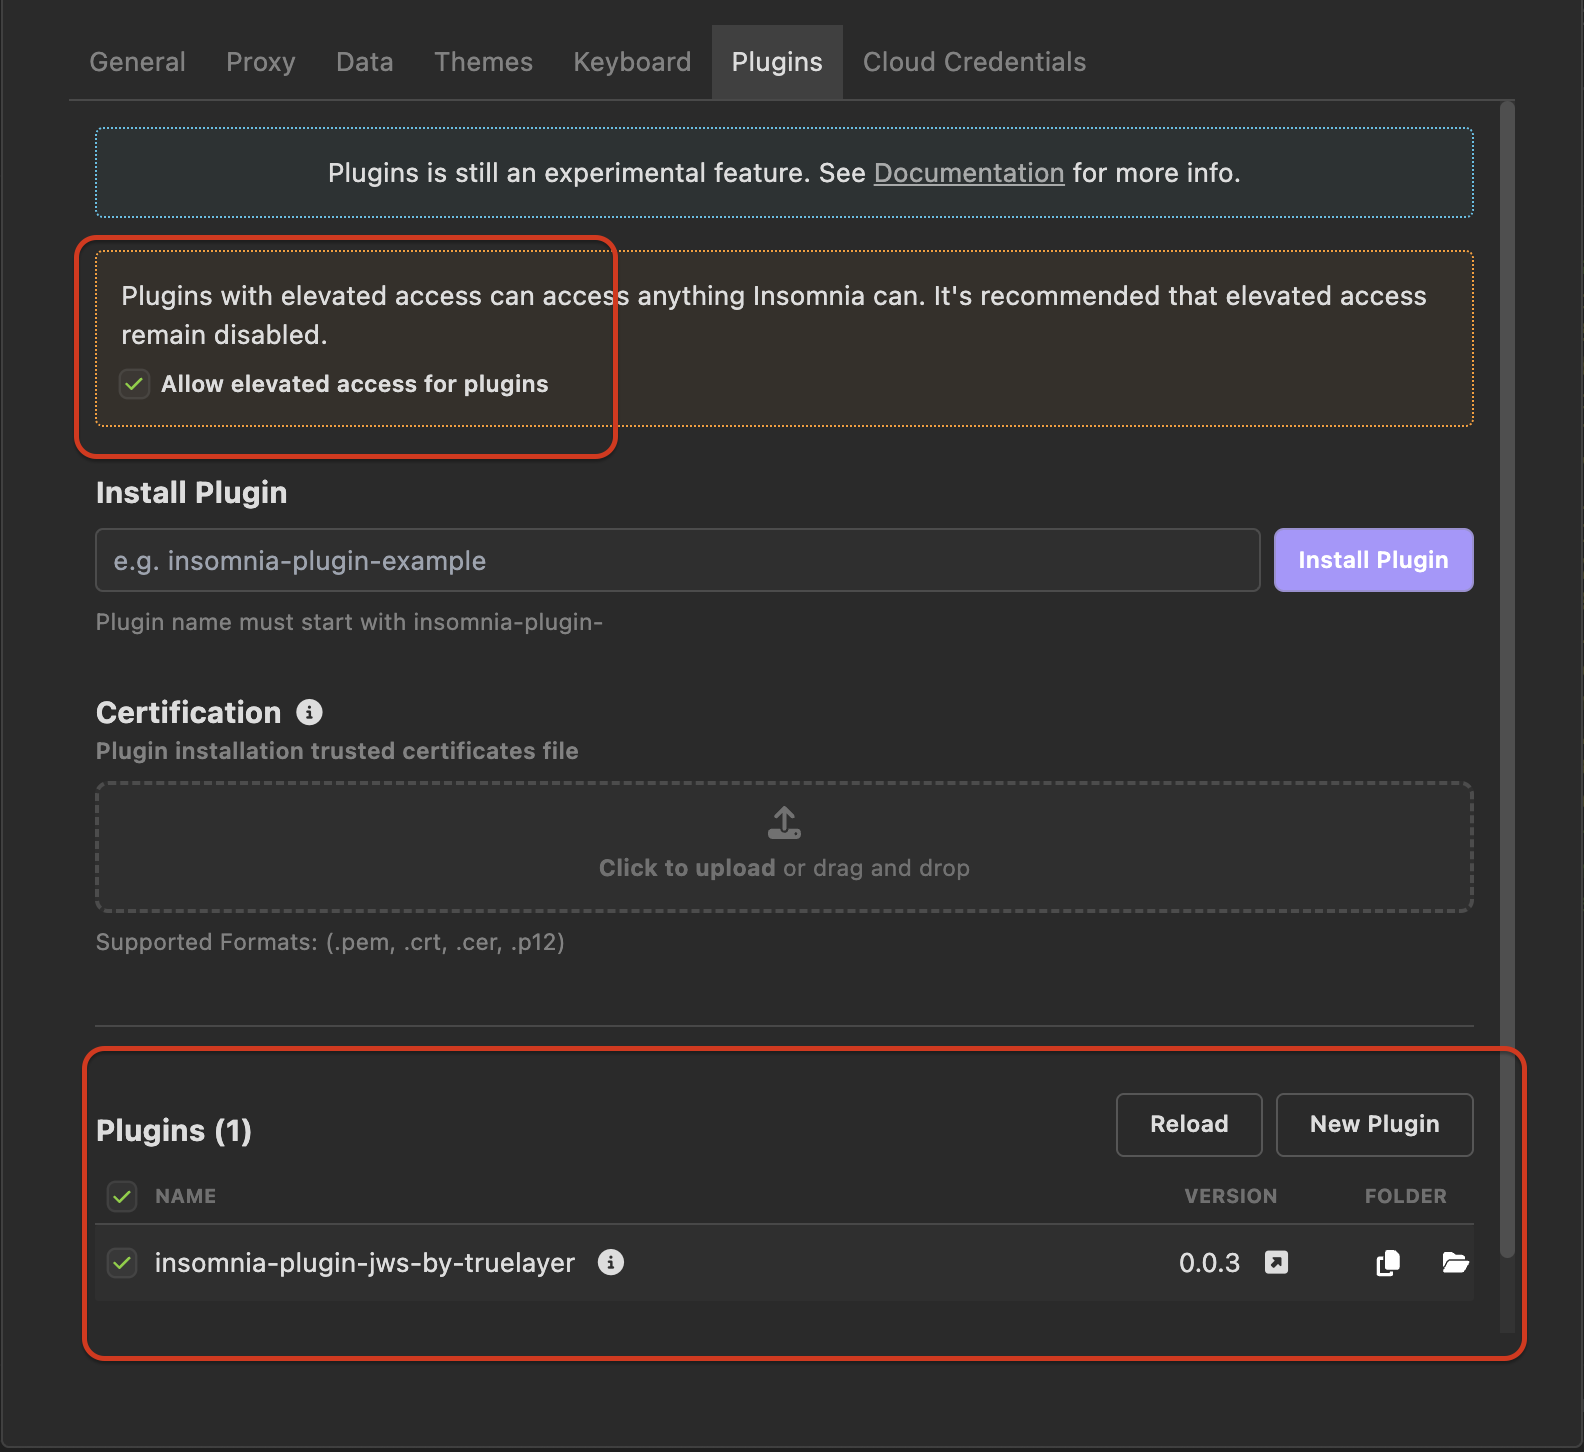
- Open the Insomnia Preferences window by clicking the Preferences button in the bottom-left corner.
- Select the Plugins tab.
- Enter
insomnia-plugin-jws-by-truelayerin the npm-package-name field, then click Install Plugin.
Alternatively, you can download the plugin from the Insomnia Plugin Hub.
Check the 'Allow elevated access for plugins'After installing the TrueLayer Insomnia plugin, make sure to go into "Settings > Plugins" and check the "Allow elevated access for plugins" box.
If you've already installed the plugin before you click the Install Plugin button, an error displays: "Failed to install insomnia-plugin-jws-by-truelayer". Check that the plugin is enabled.
For more information about the plugin, and other installation methods, see our GitHub page.
3. Create and authorise a payment
1. Prepare keys and Insomnia
2.Configure Insomnia
3. Create and authorise a payment
To make a test payment, you need to generate an access token, create a payment, and then create a hosted payment page link based on the payment. Then, you'll play the role of an end user and complete the payment yourself.
3.1. Generate an access token
- Open the 1. Authentication folder in the Insomnia collection.
- Select the 1A. Generate Access Token request.
- Click Send.
If the POST request is successful, it returns a 200 response that contains an access_token. Insomnia saves this token and use it as a Bearer token in future requests.
If your request fails, make sure that you set up your environment properly, and have it selected in the environment selector.
3.2. Retrieve your merchant account details
- Open the 2. Merchant Accounts folder in the Insomnia collection.
- Select the 2A. List Merchant Accounts request.
- Click Send.
If the GET request is successful, it returns a 200 response with an id for both the GBP and EUR accounts, along with other details.
Alternatively, you can get your merchant account ID in the Merchant Account dashboard in Console. Here, you can also check the balance of your account, and see transaction.
Make a note of your GBP merchant account id.
3.3. Create a payment
- Open the 3. Pay-ins folder in the Insomnia collection.
- Open the Pay-in to a merchant account folder.
- Open the Pay-in with hosted payment page folder.
- Select the 3C. Create Payment request.
- Select Send.
- In the Beneficiary Merchant Account ID prompt that displays, enter the GBP merchant account
idyou received from the 2A. List merchant accounts request in the previous section.
If the POST request is successful, it returns a 201 response like this:
{
  "id": "7620aa1d-b188-4941-b85f-8dc9a76c202e",
  "user": {
    "id": "67638fba-8412-4233-b57c-35b9bd0f4542"
  },
  "resource_token": "eyJhbGciOiJSUzUxMiIsImtpZCI6IkRCejExcEFuUGNXVndqaFBNWERuckNyQ0ZrT1p0Y2FqYWtjU21GNmJiVk0iLCJ0eXAiOiJKV1QifQ.eyJhdWQiOiJodHRwczovL2FwaS50cnVlbGF5ZXItc2FuZGJveC5jb20iLCJpc3MiOiJodHRwczovL2FwaS50cnVlbGF5ZXItc2FuZGJveC5jb20vcGF5bWVudHMtZ2F0ZXdheSIsImV4cCI6MTcyNTU0NTI1NywiaWF0IjoxNzI1NTQ0MzU3LCJuYmYiOjE3MjU1NDQzNTcsInNjb3BlIjoicGF5bWVudCIsImNsaWVudF9pZCI6InNhbmRib3gtdG9tdGVzdC1hNGQ0MzIiLCJqdGkiOiI3NjIwYWExZC1iMTg4LTQ5NDEtYjg1Zi04ZGM5YTc2YzIwMmUifQ.An35dBLoMCUmsLJ0NJILm_UPyfFkNW7lhZa38A78SbRjTwr6jbsoLnvvxAornnt9jgE8E3IjxyBwQJwVInOOS2N0zeRqia7eGyVwbQEgJQP0tZ1VibyjzlD738LXgBy_moPrpZsQjbBuqLol5cqo7zvHR9cBnuTEJh995qiMnesu8RE9Dg75-uLBshqzg9beMNTveRt5DhaDJCG1v2g-VzM2Q116oFDaNsMhWwYWrC-vpg-t4JbYP9tht033OWlt7TLG-YG7SNTB5E0WPYD0f6lYNRWhWDP9_uhDLKxDXIlPeHfhZzQWOwvt94JFRS6ldQAn3U1bg6FH_TVKIOQvFg",
  "status": "authorization_required"
}
This table explains the four objects you get in the response:
| Object name | Description |
|---|---|
id | The payment This represents the payment, and you can use it to authorise the payment or get information about it. |
user.id | The You can optionally provide one at payment creation to link multiple payments together. |
resource_token | The You use this to authorise the payment. It expires after 15 minutes. |
status | The status of the payment, which explains which part of the journey it's in. At creation, it has a status of You can track a payment's status with webhooks, the Payments page in Console, or with the GET payment endpoint. You can test the GET payment endpoint with request 3A. Get payment status in Insomnia. |
3.4. Create a hosted payment page link
At this point, you've initiated a payment to your sandbox merchant account. However, it still has a status of authorization_required. You can optionally check this with the 3A. Get payment status request in the Insomnia collection.
However, a payment can't execute and be sent by a bank until it's authorised by a user.
TrueLayer offers a range of payment authorisation user interfaces, which you can integrate so users can authorise payments. For this guide, we'll use the hosted payment page, as it's the quickest and easiest to get an immediate result with.
The hosted payment page is a payment authorisation flow, hosted on TrueLayer's servers. You substitute certain parts of the URL you access this page through to ensure you authorise the right payment.
Use the Insomnia to create a hosted payment page link
To create a hosted payment page automatically based on a payment you've already created with the 3C. Create payment request in Insomnia:
-
Open the 3D. Create HPP request.
-
Select the Query tab.
-
Select the copy to clipboard icon within the URL Preview box.
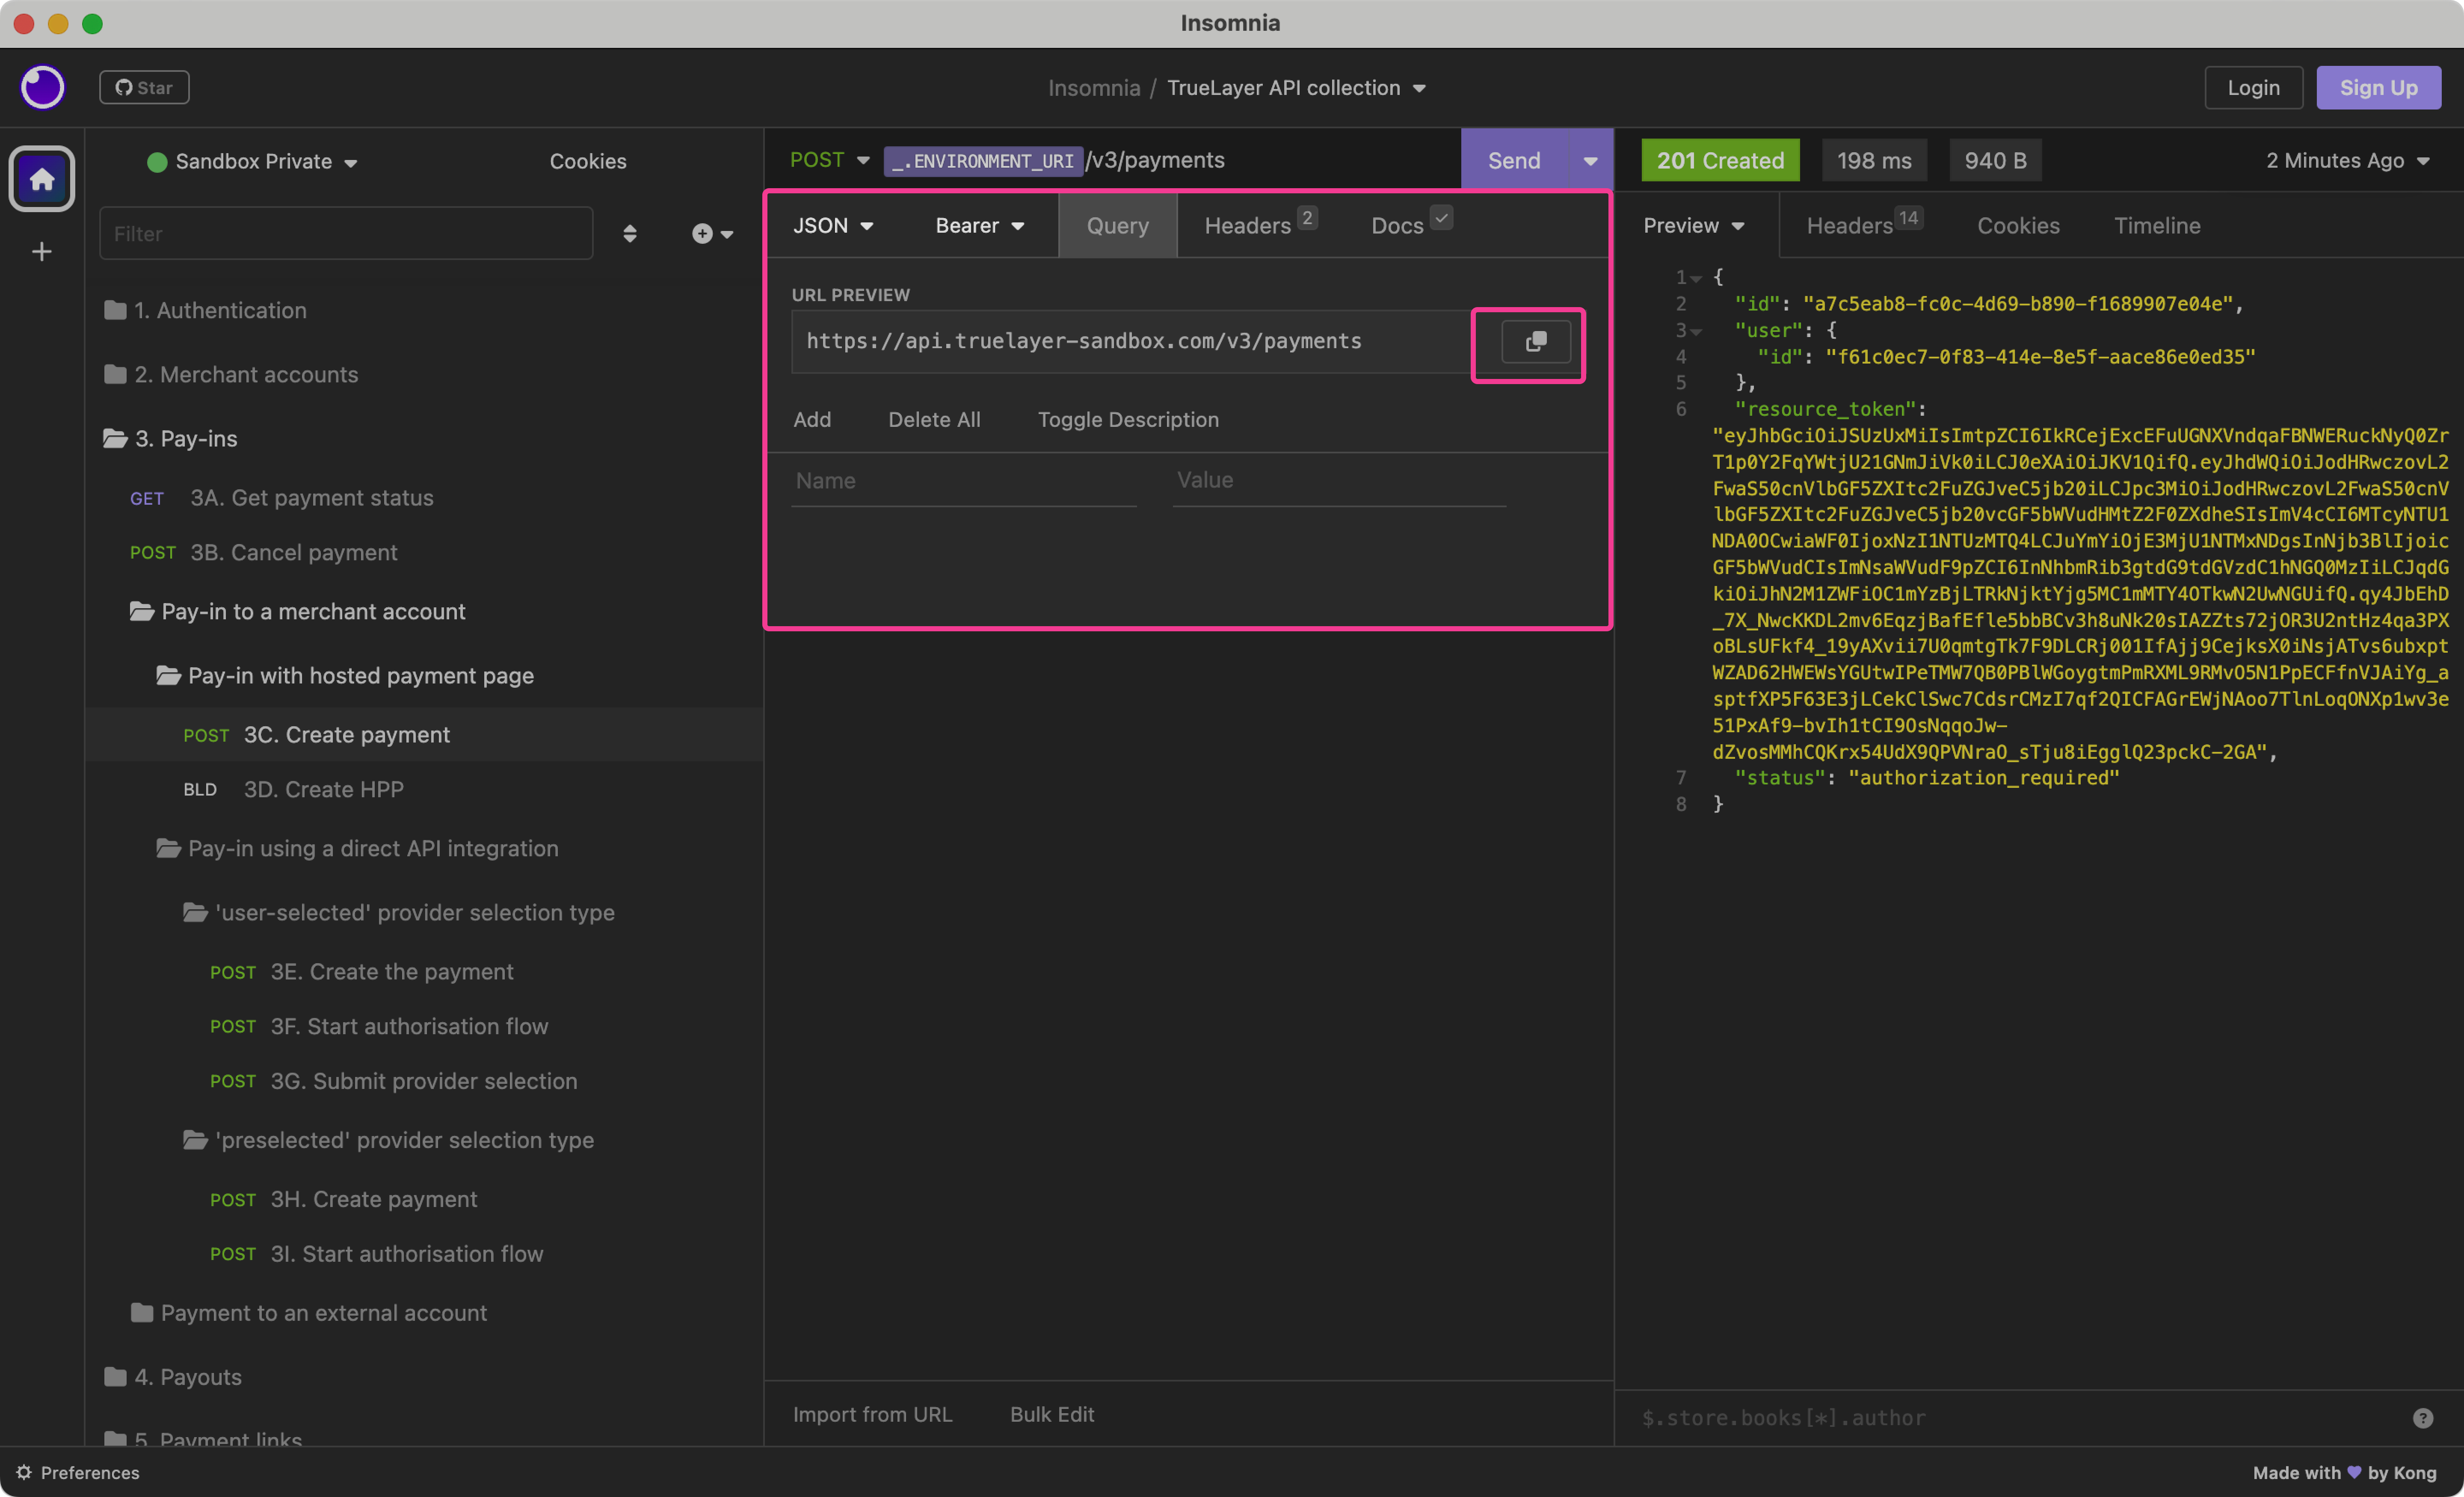
If you completed these steps, you should have a link to use in step 3.5. If the URL preview isn't displaying, ensure that the options that say Response → Body Attribute in the URL above are properly filled.
Create the link manually
To generate the link, substitute the id, resource token, and Redirect URI in the URI below with the id and resource token you generated earlier and your Redirect URI from Console:
https://payment.truelayer-sandbox.com/payments#payment_id={id}&resource_token={resource_token}&return_uri={Redirect URI}The Redirect URI must be one of the Allowed redirect URIs from Console > Settings. This URI determines where the user is taken after the payment. The default URIs are https://console.truelayer.com/redirect-page and http://localhost:3000/callback.
An example of a HPP link
If you've created a HPP link through one of the two methods above, it should look like this. You'll use this link in the next step.

An example of a HPP link with the id, resource_token and Redirect URI substituted.This example is an image, as you should not copy and paste it, as the existing values won't work.
3.5. Authorise the payment
Now that you've created a hosted payment page link, you can access it and complete the payment as a user would. You can do this on either desktop or mobile. In this guide, we complete the flow on desktop.
The authorisation process is a bit different in sandbox compared to a live payment.
For example, a user's name wouldn't be
test_executed. However, the flow does resemble live payment authorisation. Wherever you access the Mock UK Bank website in this flow, you would instead access a bank's app or website instead.
To authorise your payment:
-
Access the hosted payment link you created in the previous step in a browser.
-
The hosted payment page asks you to Choose your bank.
In a UK sandbox payment, there's only one available option. There is also a grey option that highlights how a live bank would display if it's undergoing maintenance.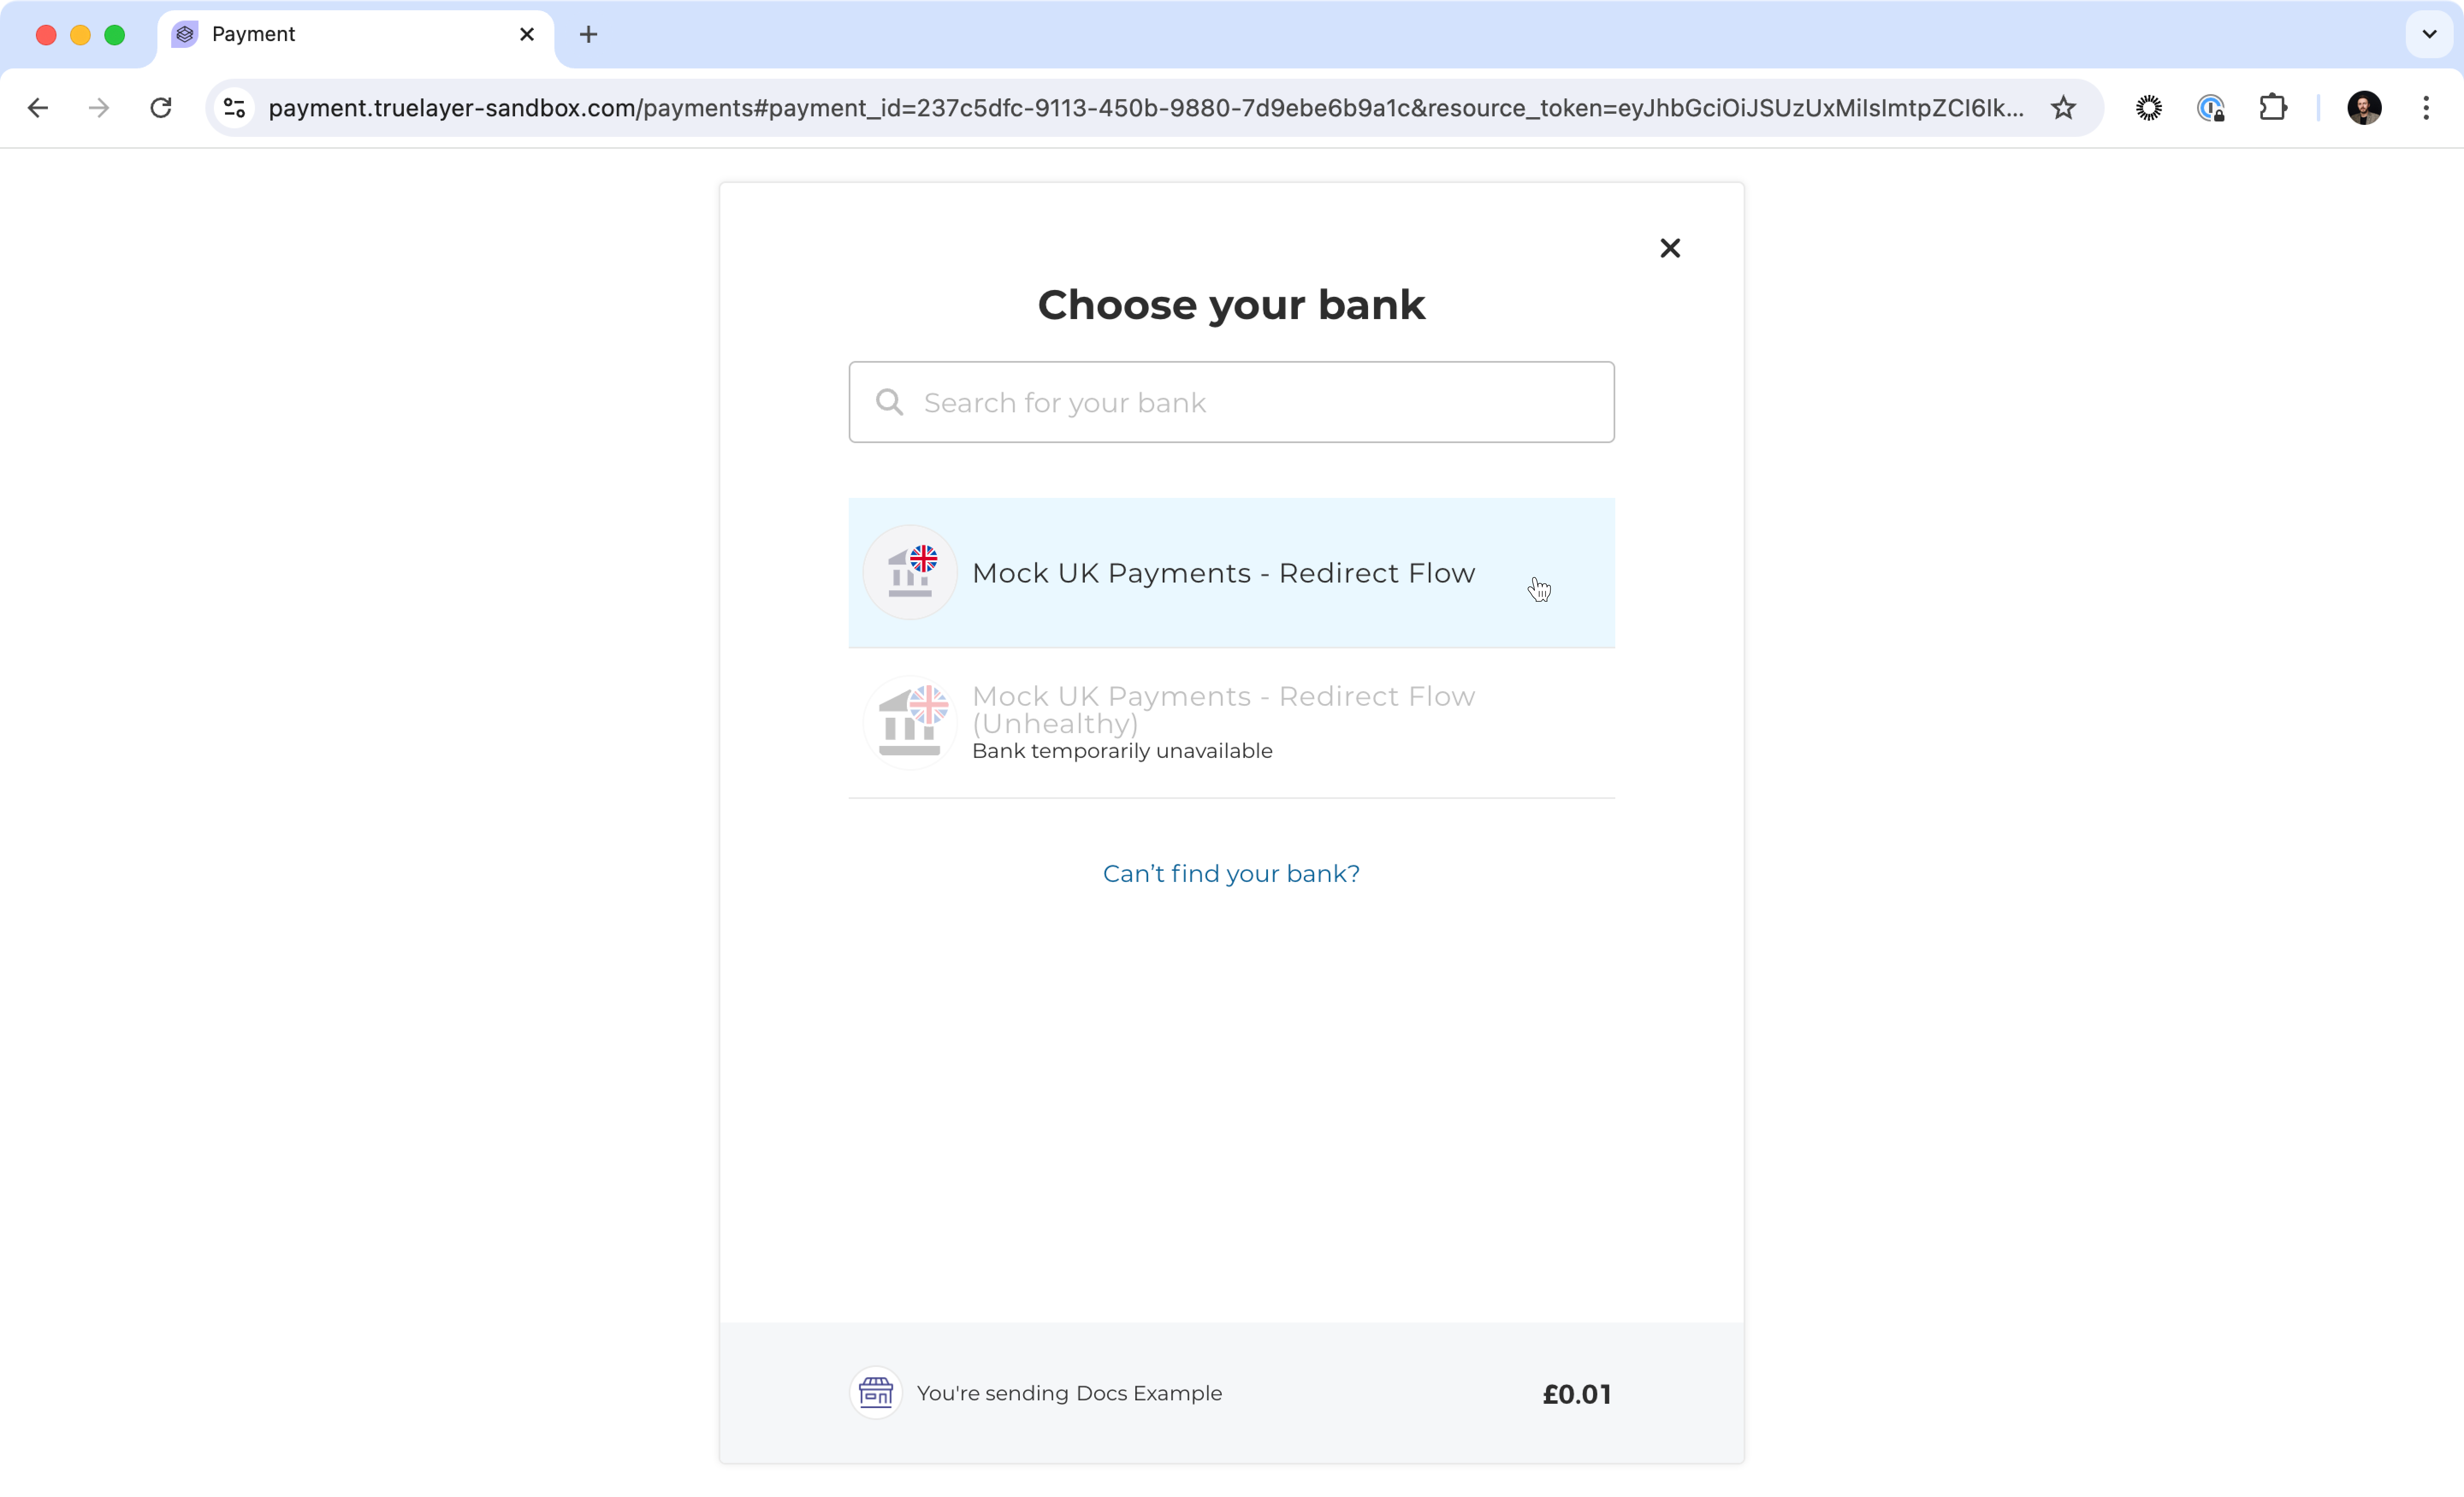
-
Select the Mock UK Payments - Redirect Flow bank.
-
Select Go to bank.
-
Select Or continue on desktop, which opens the Mock UK Bank page.
You can instead scan the QR code on a mobile device, but the process will be different to this guide. -
Enter the username
test_executedand any three digits for the PIN, then select Continue.
There are other options available, which you can test later. Learn more in our sandbox documentation. -
Select an account to pay from (they're not real accounts), then click Continue.
After the page finishes loading, the payment is authorised.
Once the payment is complete, you can check your merchant account in a few ways. The easiest is to look for it on the Payments page in Console. Here you'll see details of the test payment, including the amount, the remitter, the timestamp, and its status. The payment should transition quickly through the executed status to the settled status, depending on what you specified to the mock bank.
When you integrate in the live environment, you should use webhooks to check your payment's progress.
You've now made a payment in sandbox. Congratulations!
You might want to experiment with various other features in the Payments v3 API using Insomnia.
For example, you could:
- Check the Payments API reference to learn about the other requests you can make.
- Check the documentation available for requests within Insomnia collection itself.
- Use the 3A. Get payment status request in the Insomnia collection to see how the status of a payment changes at different steps of a payment, or if the user takes different actions.
- Use the
idof the settled payment to initiate a refund using the 4E. Create a refund request within the Insomnia collection. - Learn more about recurring payments and mandates.
Updated 15 days ago