Data and payments integration
Learn how to integrate Signup+ with the data and payments integration flow.
There are three stages to integrating Signup+ with data and payments:
- Authenticate a user
- Create an access token
- Call the
/accountsendpoint
Environments
Ensure that you use the same environment for all of your requests to TrueLayer APIs.
- If you are in the sandbox environment, your requests should use
truelayer-sandbox.com.- If you are in the live environment, your requests should use
truelayer.com.

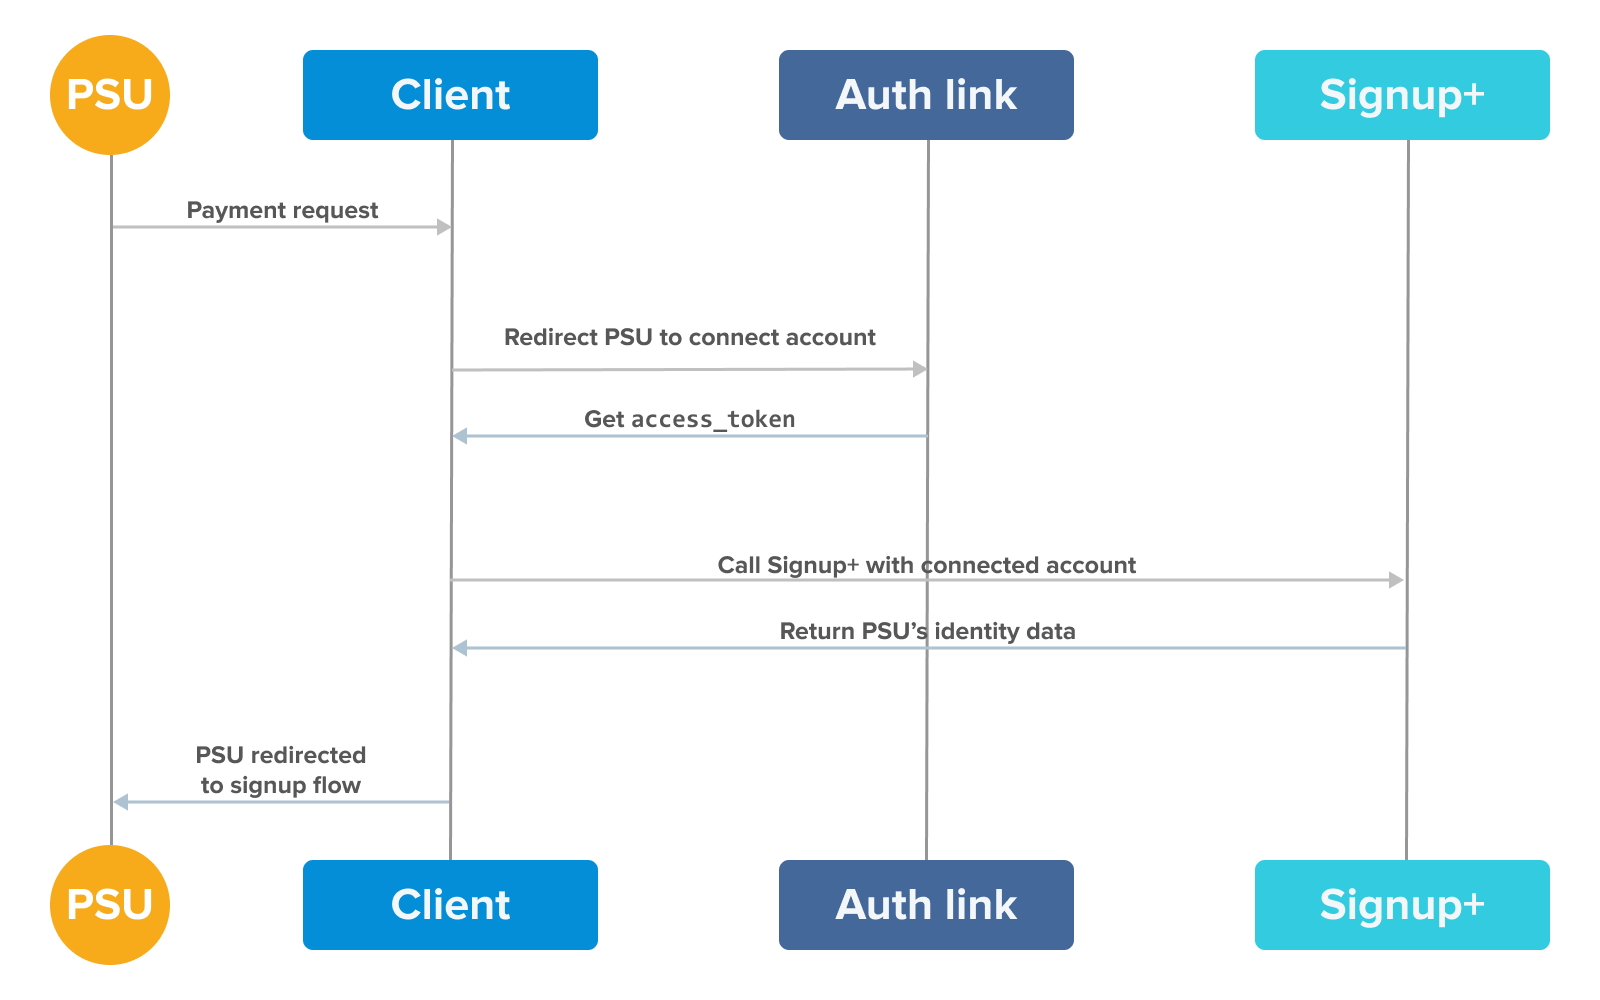
Starting from the PSU, how each step of the data and payments flow is related.
Authenticate a user
Get a user to verify their identity, and allow TrueLayer to access their bank details.
Enable the signupplus scope
signupplus scopeEnsure that your client_id has the signupplus scope enabled. You can enable scopes in Console under Data API > Auth link builder > Product Permissions.
The signupplus scope is available by default in the sandbox environment. To use the scope in the live environment, contact Support.
Generate and send the auth link
- Go to Console > Data API > Auth Link Builder.
- In the Providers tab, select the banks that you want to enable.
- Switch to the Permissions tab to select the permissions that you want to include in the auth link. This must include the
signupplusscope. - Switch to the Redirect tab to choose a Redirect URI to redirect the user to after they authenticate.
Complete authentication
When a user opens your auth link, they have to complete these steps:
- Select their bank.
This step is skipped if the auth link only has one provider enabled. - Consent to the usage of their data.
The user is redirected to their bank. - Enter their bank login details.
If the user authenticates successfully, a code is generated in the backend. Store this code to exchange it for an access token.
Testing authentication
If you're testing the Signup+ API, you can access your auth link yourself. Finish the authentication flow and make a note of the code.
Create an access token
Generate an access token using the POST request below, replacing "your-client-id" and "your-client-secret" with the relevant keys.
export CLIENT_ID="your-client-id"
export CLIENT_SECRET="your-client-secret"
export CALLBACK_URI="your-redirect-uri"
export CODE="your-code"

curl --location --request POST 'https://auth.truelayer.com/connect/token' \
--header 'Content-Type: application/x-www-form-urlencoded' \
--data-urlencode 'grant_type=authorization_code' \
--data-urlencode 'client_id=$CLIENT_ID' \
--data-urlencode 'client_secret=$CLIENT_SECRET' \
--data-urlencode 'redirect_uri=$CALLBACK_URI' \
--data-urlencode 'code=$CODE'
You can also use the Signup+ Postman collection to test API requests, including the request to generate access tokens.
Call the /accounts endpoint
/accounts endpointNow that your user has authenticated and you have an access token, you can use Signup+ to retrieve their data. Depending on whether you're in the sandbox or live environment, configure a request to:
api.truelayer.com/signup-plus/accounts
api.truelayer-sandbox.com/signup-plus/accounts.
Use your access_token as a bearer authorisation header.
A note on multiple accounts
If the user only has one account with the provider they choose, the response contains their personal data.
If they have multiple accounts, the response contains an account_id for each account. Add a query parameter with a specific account_id to return the user data for that account:
api.truelayer.com/signup-plus/accounts?account_id={account_id}
Successful responses look like this:
{
    "title": "Mr",
    "first_name": "Joe",
    "last_name": "Blogs",
    "date_of_birth": "2000-06-20",
    "address": {
        "address_line1": "Flat 1a",
        "address_line2": "Angels Court, Foxtrot Street",
        "city": "Stockport",
        "state": "Edgeley",
        "zip": "SK3 9LQ",
        "country_code": "GB"
    },
    "account_details": {
        "sort_code": "04-01-02",
        "account_number": "41921234",
        "iban": "GB71MONZ04435141923452",
        "provider_id": "ob-monzo"
    }
}
{
    "result": "multiple_accounts_linked",
    "detail": "Multiple valid accounts linked, please resend the request specifying an account_id.",
    "links": {
        "acc-aa360adff0f1574e1": "/acc-aa360adff0f1574e1",
        "acc-8232b085624e6babf": "/acc-8232b085624e6babf",
        "acc-469b2c2bcaea10969": "/acc-469b2c2bcaea10969"
    },
    "accounts": [
        {
            "account_id": "acc-aa360adff0f1574e1",
            "currency": "GBP",
            "account_type": "CURRENT",
            "display_name": "TRANSACTION ACCOUNT 1",
            "account_number": "10000000",
            "sort_code": "01-21-31"
        },
        {
            "account_id": "acc-8232b085624e6babf",
            "currency": "GBP",
            "account_type": "CURRENT",
            "display_name": "TRANSACTION ACCOUNT 2",
            "account_number": "30000000",
            "sort_code": "01-21-31"
        },
        {
            "account_id": "acc-469b2c2bcaea10969",
            "currency": "GBP",
            "account_type": "CURRENT",
            "display_name": "TRANSACTION ACCOUNT 3",
            "account_number": "50000000",
            "sort_code": "01-21-31"
        }
    ]
}
Next Steps
Usually, at this point the user will make a payment. Learn more about integrating with the Payments API v3.
If required, learn how to make payouts or refunds.
Updated 11 months ago
