Migration guide: Payments v1 SIP to v3
Everything you need to migrate from Payments v1 SIP to the Payments API v3.
Welcome to the TrueLayer Payments v3 migration guide.
This document provides information on the TrueLayer Payments v3 APIs and the migration process from the Payments v1 APIs to Payments v3 APIs.
Who this guide is for
This guide is for payments integrations that use a TrueLayer Payments V1 API for payments to an external bank account and not involving using the TrueLayer merchant account.
In order to take advantage of those new features and ensure the best possible experience with our product, we strongly recommend that all users upgrade to this new version as soon as possible.
Payments v3 APIs: introduction
Requirements for v3
When migrating from a previous version, it’s important to acknowledge new requirements and concepts introduced in Payments v3.
- It is now mandatory to sign all POST API requests, including both pay-ins and payouts.
- It is required to include additional user information within payment creation requests.
- Pay-in creation and authorisation are now two distinct concepts and are handled in two separate steps.
Each of those concepts is explained here in more detail.
Signing requests and validation of the received webhooks signature
All Payments API v3 requests must be signed (including both pay-ins/deposits and payouts).
Payments request signing with v3 is explained in more detail in our docs, for both pay-ins and payouts.
See the guide for how to create certificates, upload them to Console and use backend signing libraries to help out with the signing process. We strongly recommend using our signing libraries for easier integration.
We also provide backend signing libraries to verify the Tl-Signature of received webhooks. Check our docs about this.
Additional 'User' object data for Pay-In to an external account
For Pay-In into an external account (for example, directly to your corporate bank account), the required user object information are:
| Hash parameter | Description |
|---|---|
| Unique User ID | A unique identifier for the user. The field is optional. When left empty, represents a new user. A value will be generated by TrueLayer and returned in the response. |
| Name | Required for non-regulated customers. |
| Email address | Required for non-regulated customers (either the email address or phone number is required). |
| Phone number | Required for non-regulated customers (either the email address or phone number is required). |
    "user":
    {
        "id": "f61c0ec7-0f83-414e-8e5f-aace86e0ed35",
        "name": "Jonathan Sandbridge",
        "email": "john@sandbridge.com",
        "phone": "+44123456789"
    }
}
Integration options
TrueLayer offers different integration options for our Payments API v3 to suit your needs.
With Payments v3 pay-ins (deposits made into the merchant account), once the payment is created from the backend, there is a following step that consists in taking the end user to authorise the payment.
Basically, the payment creation is separated from the payment authorisation (that involves user bank selection and payment confirmation).
Coming from a v1 Payments integration, you might be leveraging the TrueLayer payment dialog pages.
Payments v3 also comes with desktop and mobile UX/UI components that can be used out of the box to implement the pay-in user flow for every supported provider and country.
Therefore, for payment authorisation, we usually recommend using our embedded payment page (EPP) or the hosted payment page (HPP) as both will reduce the time and resources required since it is optimised for the best user experience.
Hosted Payment Page
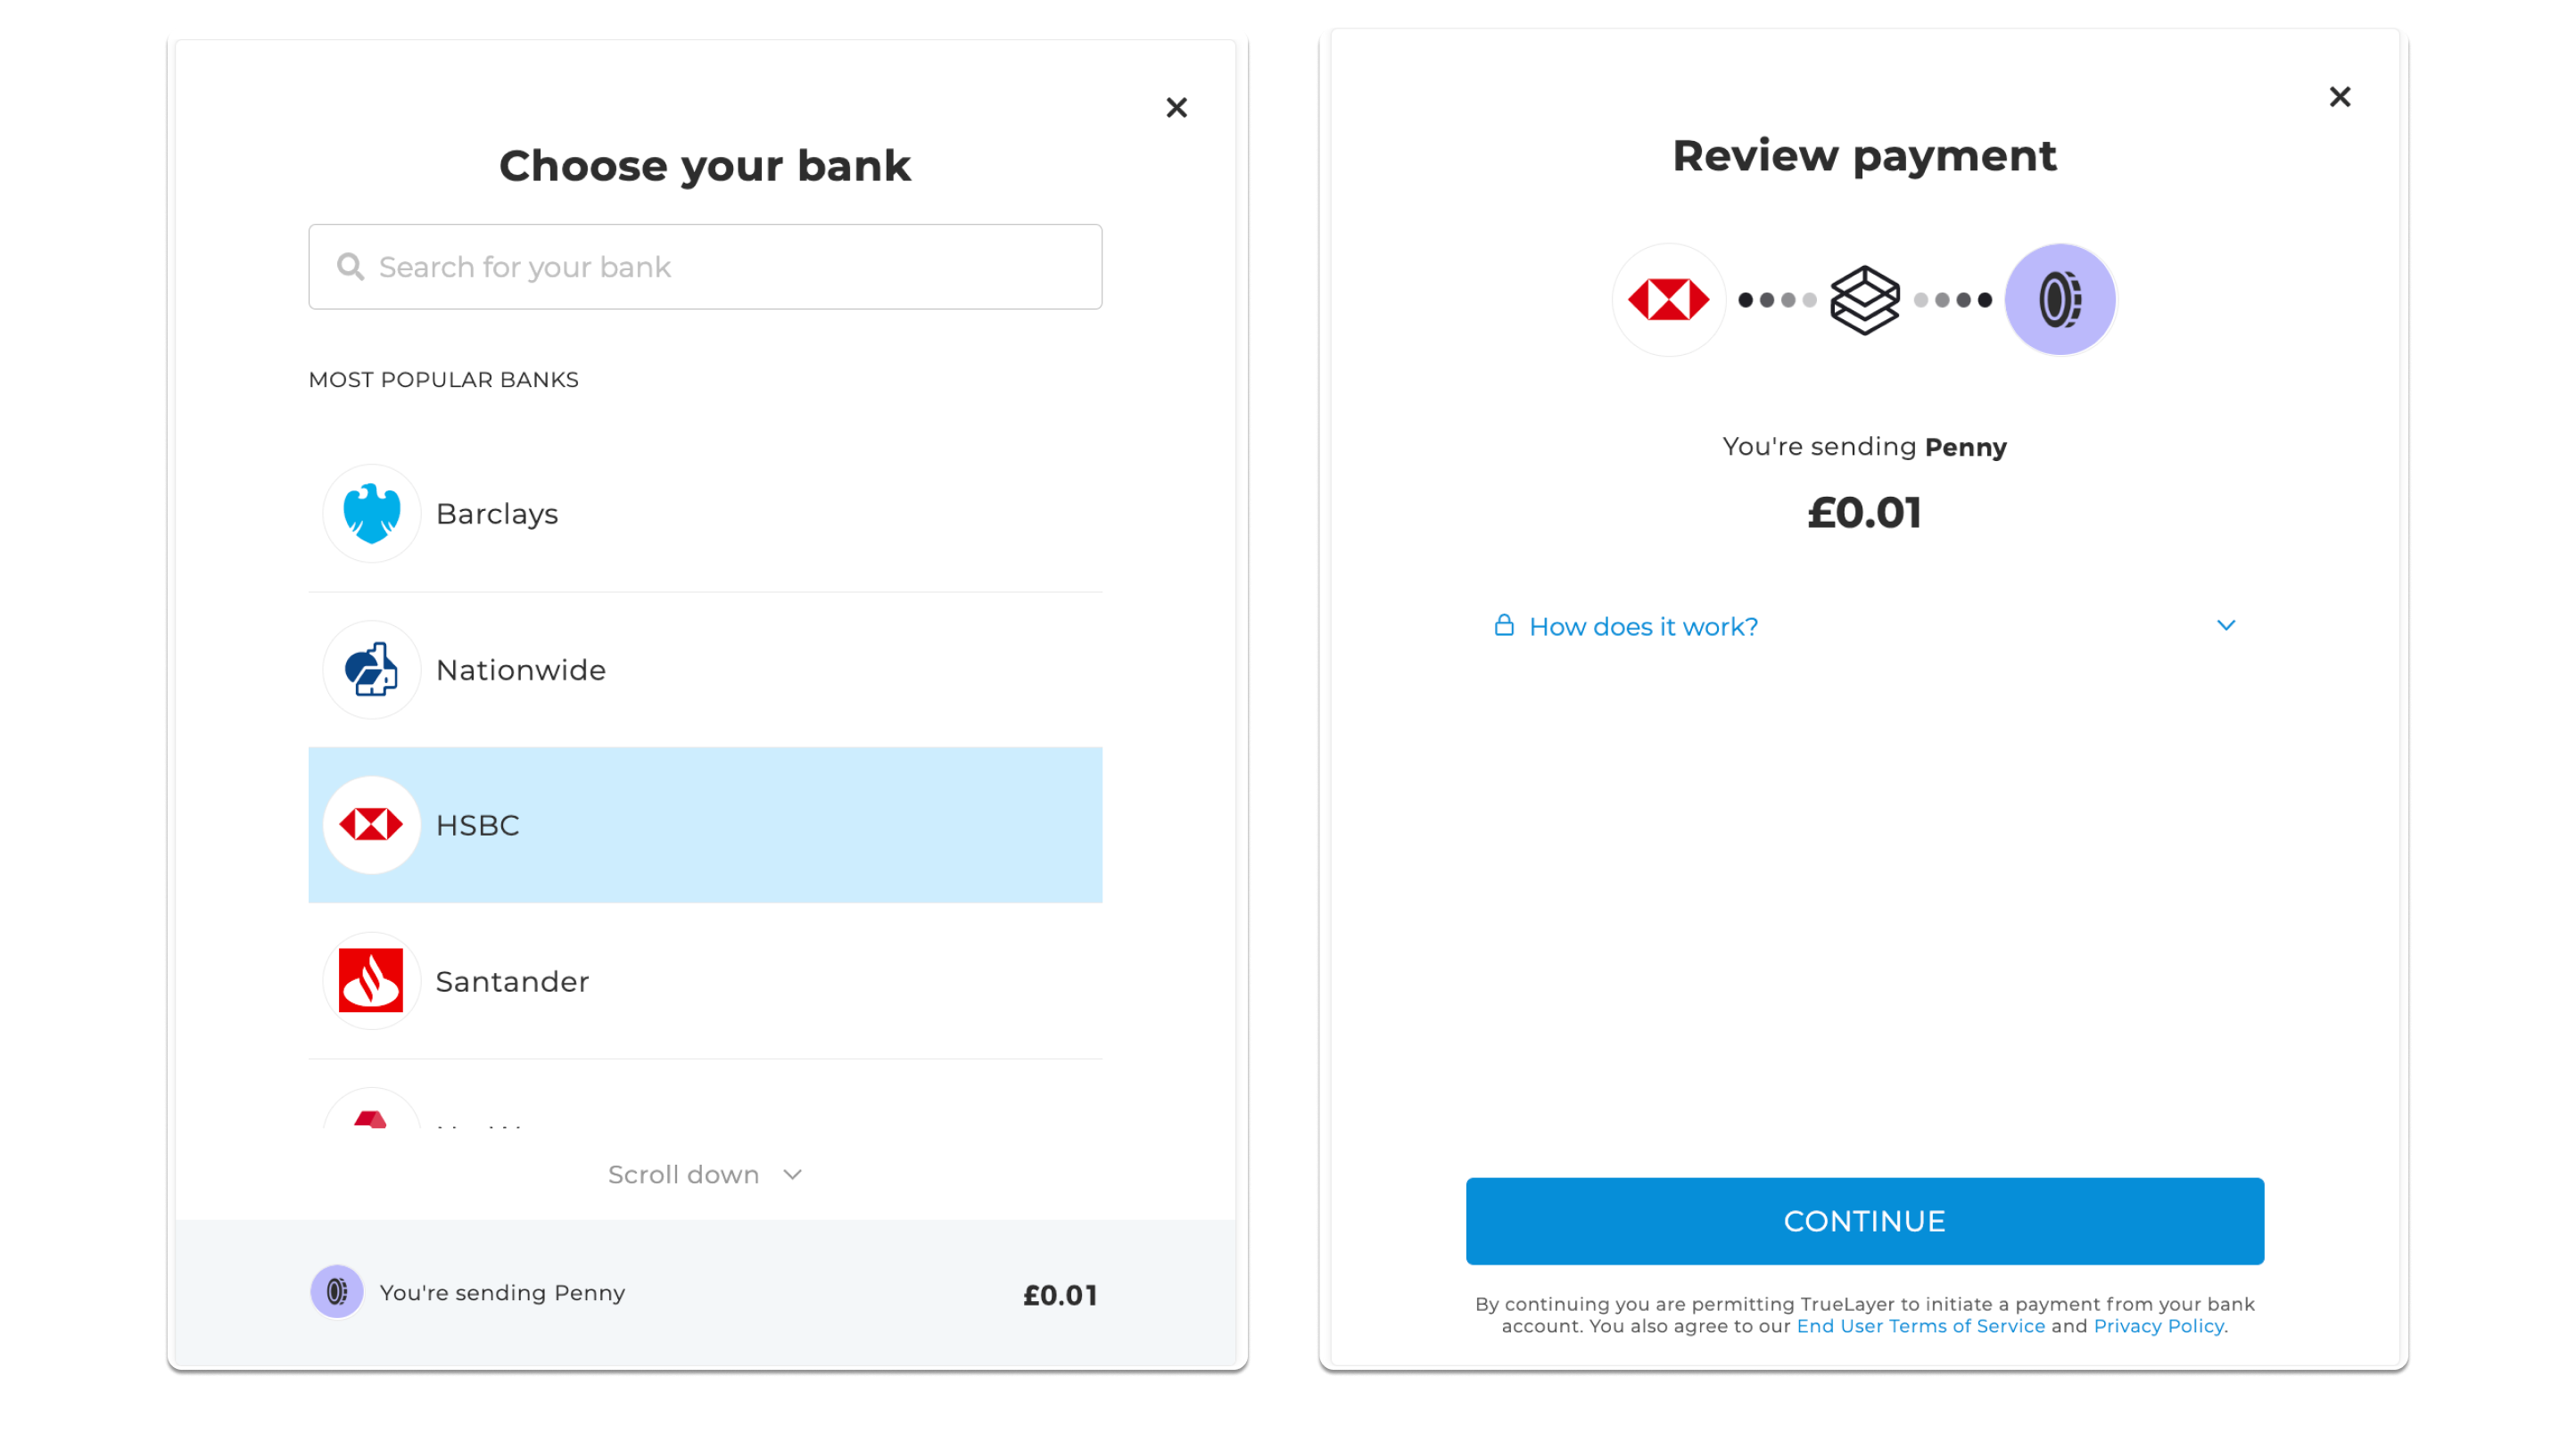
Image showing what the HPP interface looks like. There are two screenshots in the image, one showing the bank selection screen and the other showing the payment confirmation screen.
Learn more about the hosted payment page.
- TrueLayer’s localised hosted browser solution for both mobile and desktop which can be used for the bank selection and payment confirmation page (including QR code handoff option for desktop to mobile app flow).
- This is built to handle the nuance of bank and country requirements across UK & Europe for you. This will increase the speed and efficiency of your country rollout if you are looking into expanding Open Banking payment solutions in Europe. For German banks that have embedded flow approval processes, the HPP, EPP or SDK must be used if you wish to have the coverage of these banks (due to European regulations).
- This can be configured to match the look and feel of your own website or app environment so that the customer journey reflects your brand colours.
Embedded Payment Page (EPP)
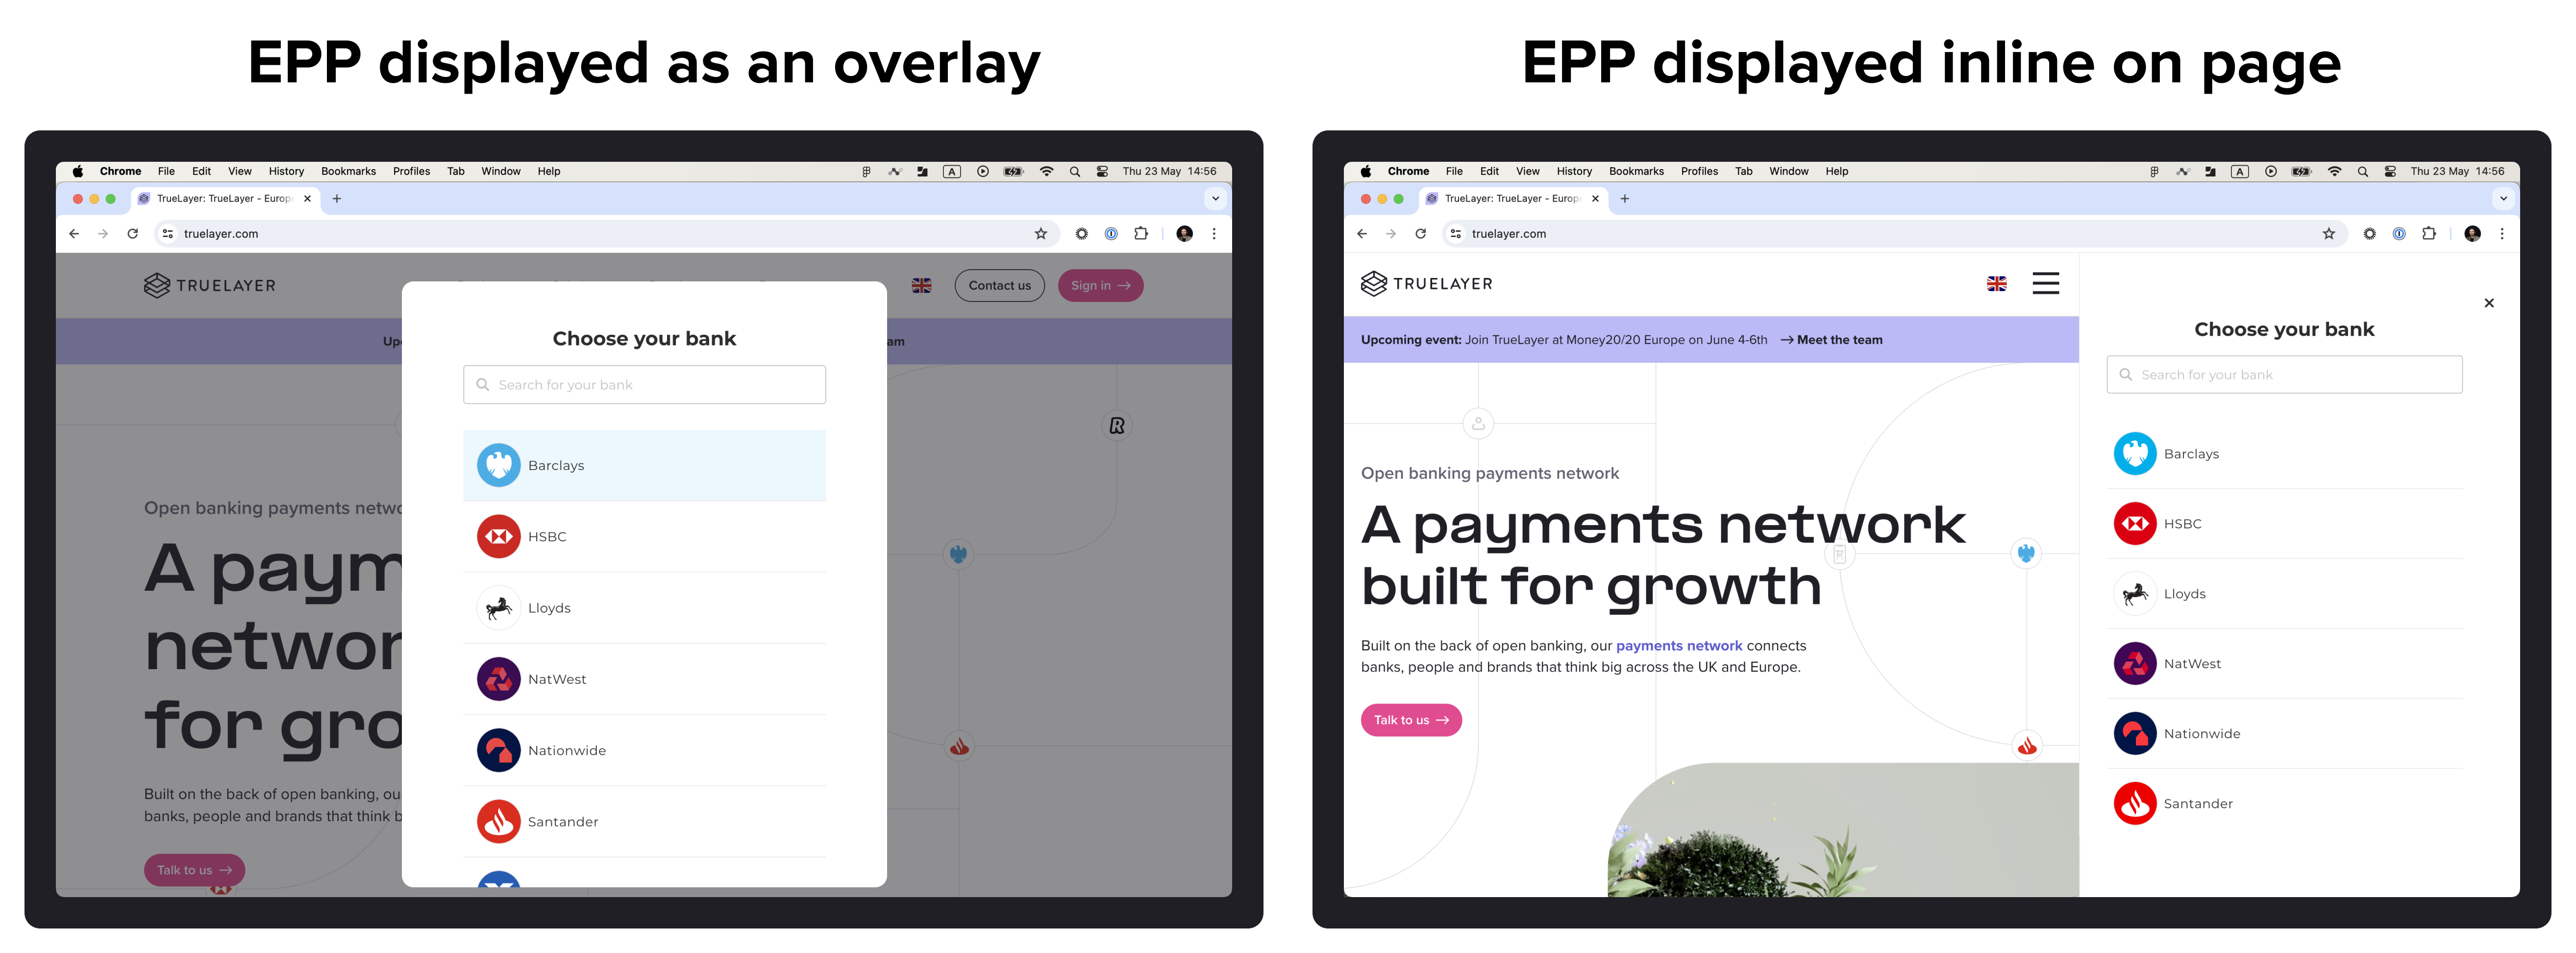
An example of how the EPP can be displayed as either an overlay or an in-line element.
Learn more in our EPP documentation.
- The embedded payment page enables you to quickly and simply add instant bank payments to your website, with a prebuilt user interface that speeds up the integration process.
- The EPP acts as a modal in your web page environment. It offers enhanced customization functionality, QR code authentication and built in localisation covering local languages and authentication flows for a range of European countries.
- This is built to handle the nuance of bank and country requirements across UK & Europe for you. This will increase the speed and efficiency of your country rollout if you are looking into expanding Open Banking payment solutions in Europe. For German banks that have embedded flow approval processes, the HPP, EPP or SDK must be used if you wish to have the coverage of these banks (due to European regulations).
Mobile SDKs for Android, iOS and React Native
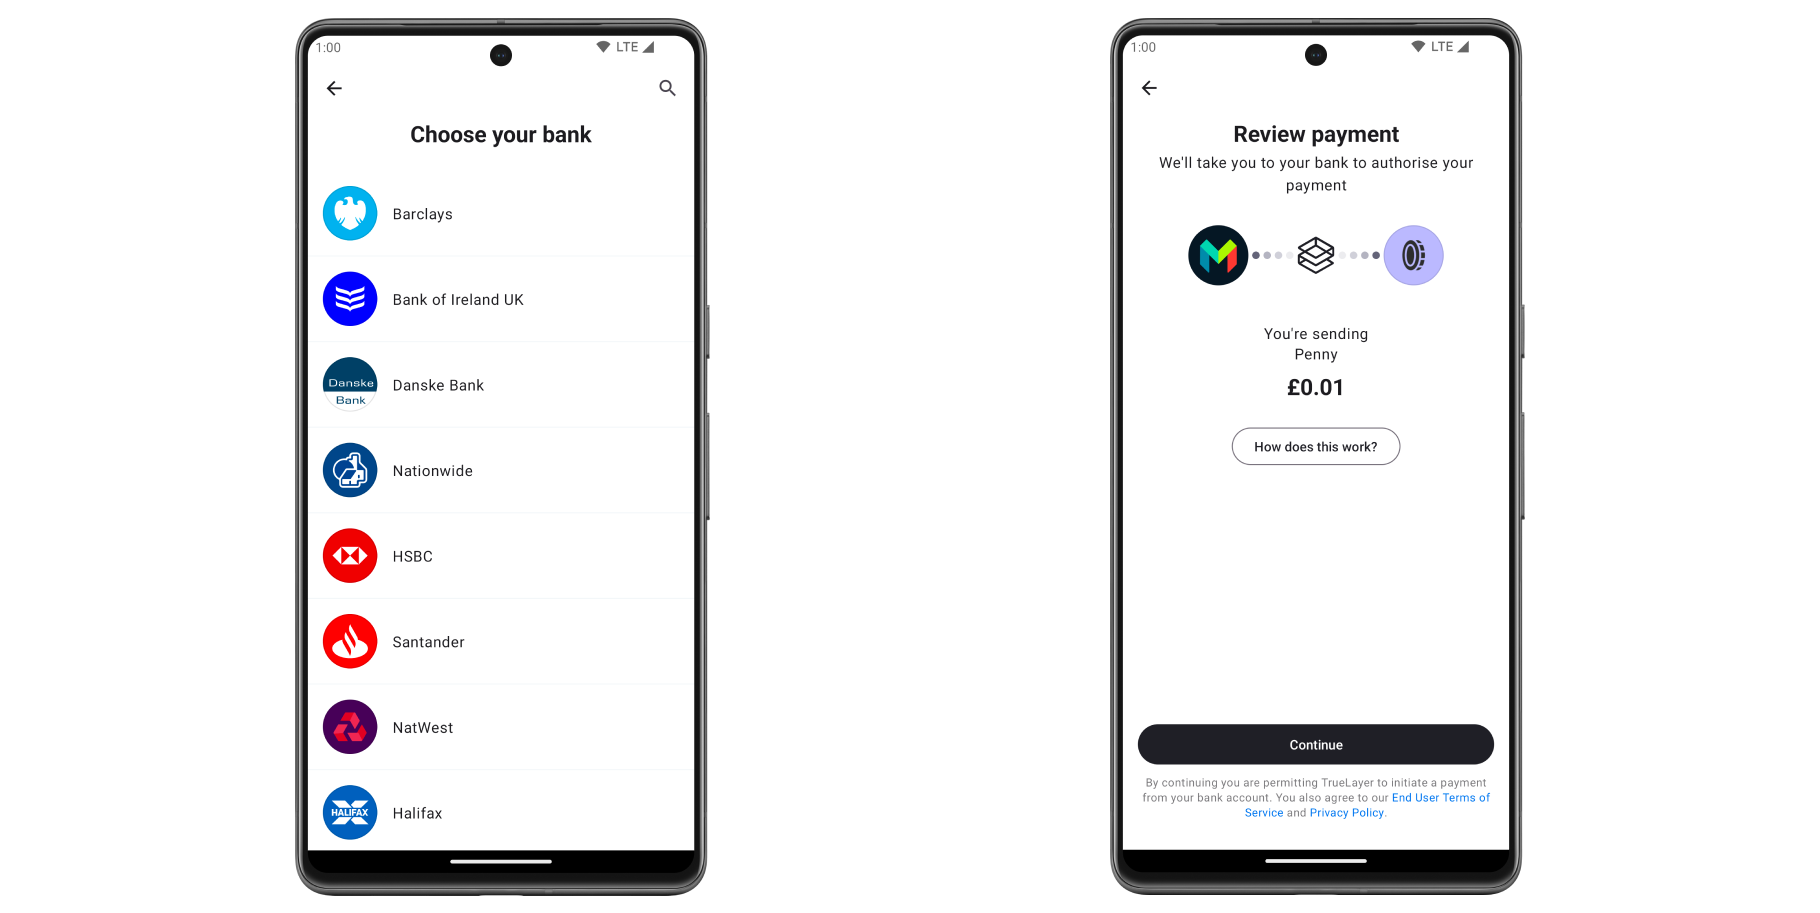
Image of what the native screens look like on an Android device. There are two screenshots in the image, one shows the bank selection screen and the other shows the payment confirmation screen.
Learn more about TrueLayer's mobile SDKs.
- TrueLayer’s mobile SDK solution can be used so that the bank selection and payment confirmation pages are embedded into your mobile app.
- This can be configured to match the look and feel of your own mobile environment.
Direct API integration and keeping your custom white-labelled front end
In case you’ve done a completely white-labeled front-end, you can still handle all the payment authorisation using TrueLayer APIs from the backend and keep your customised flow.
The next section in this guide will cover this case.
Please note that, as mentioned above, if you are going to operate eventually outside of the UK, you could have to handle more complex flows coming from additional bank-specific requirements (like banks with ‘Embedded flows’). In this case we strongly recommend adopting our hosted payment pages or embedded payment pages as those will handle automatically all bank additional flow requirements out of the box.
TrueLayer Console and Payments V3
Console is our back office platform where you can find all the necessary credentials to start using our APIs in both sandbox and live environments. In Console, you can also check payments their statuses and run reports.
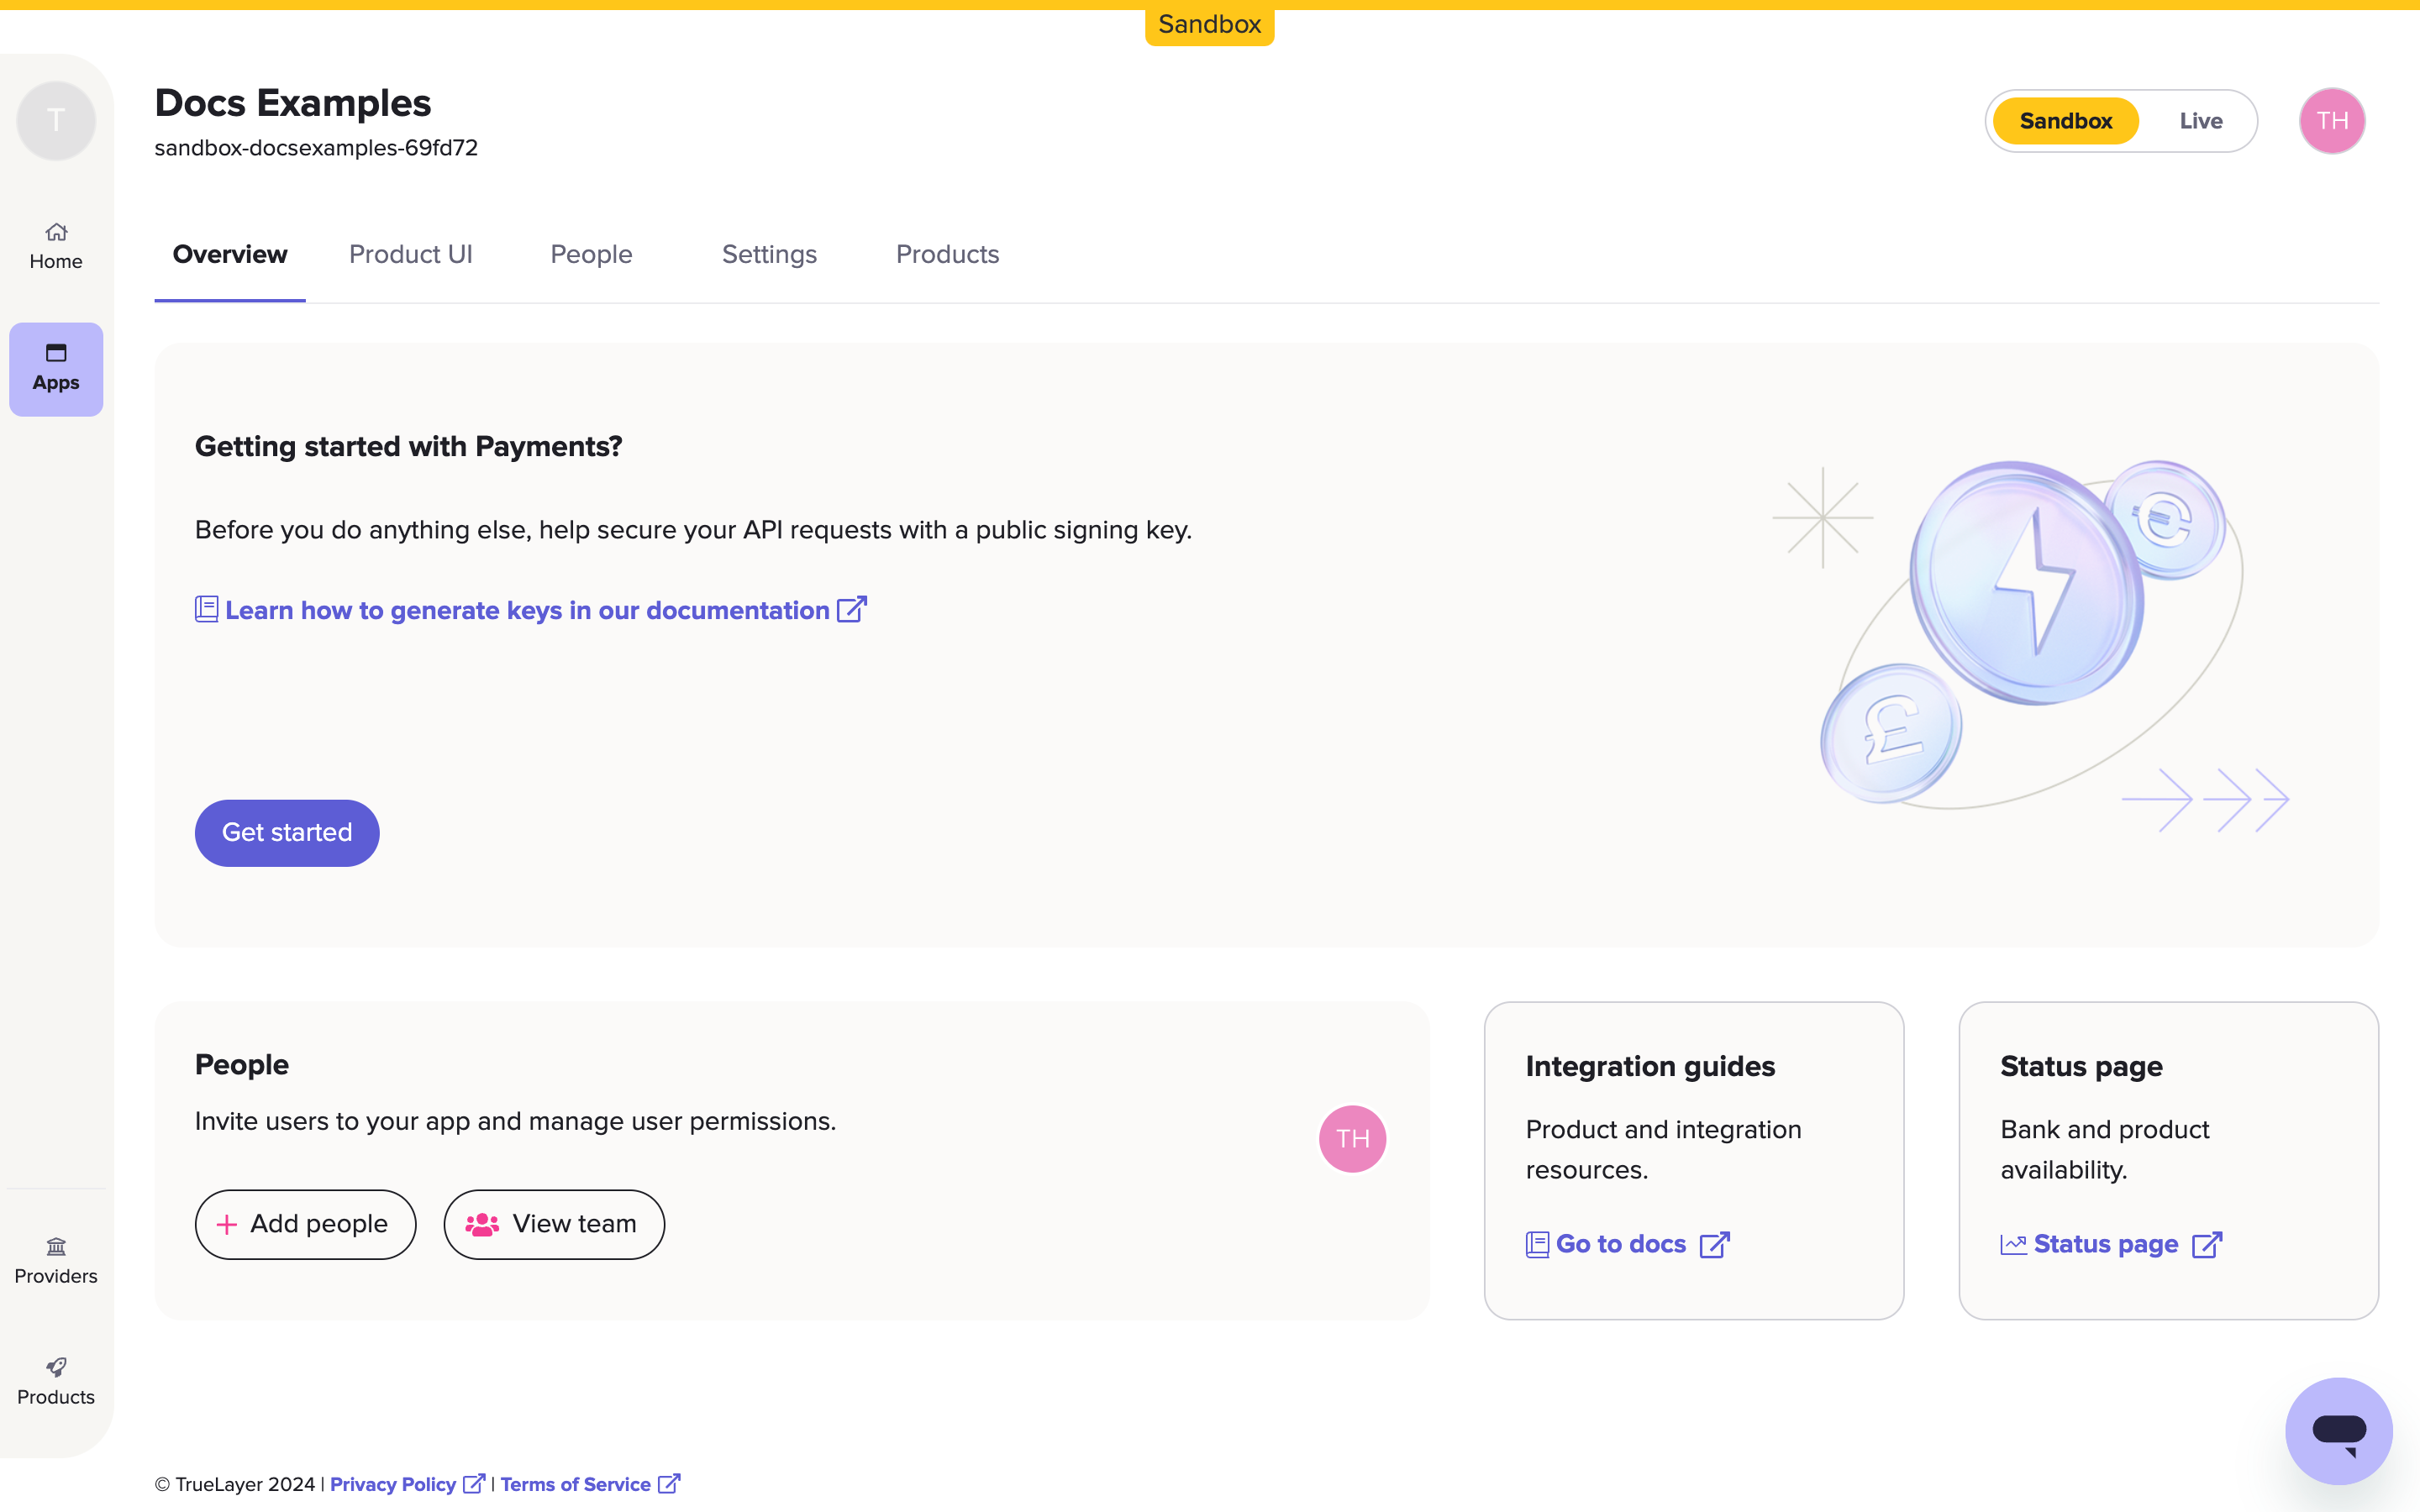
The page you see in Console before you upload your signing key.
When you open an app in Console, the tab menu includes sub-sections for:
- Payments, which displays a table of pay-ins to and payouts from your merchant account, and the ability to issue refunds.
- Settings, such as webhook and redirect URIs, and your client ID and secret.
- Merchant Account information, including available and historical balances.
- UI customisation options for the HPP, EPP, and more.
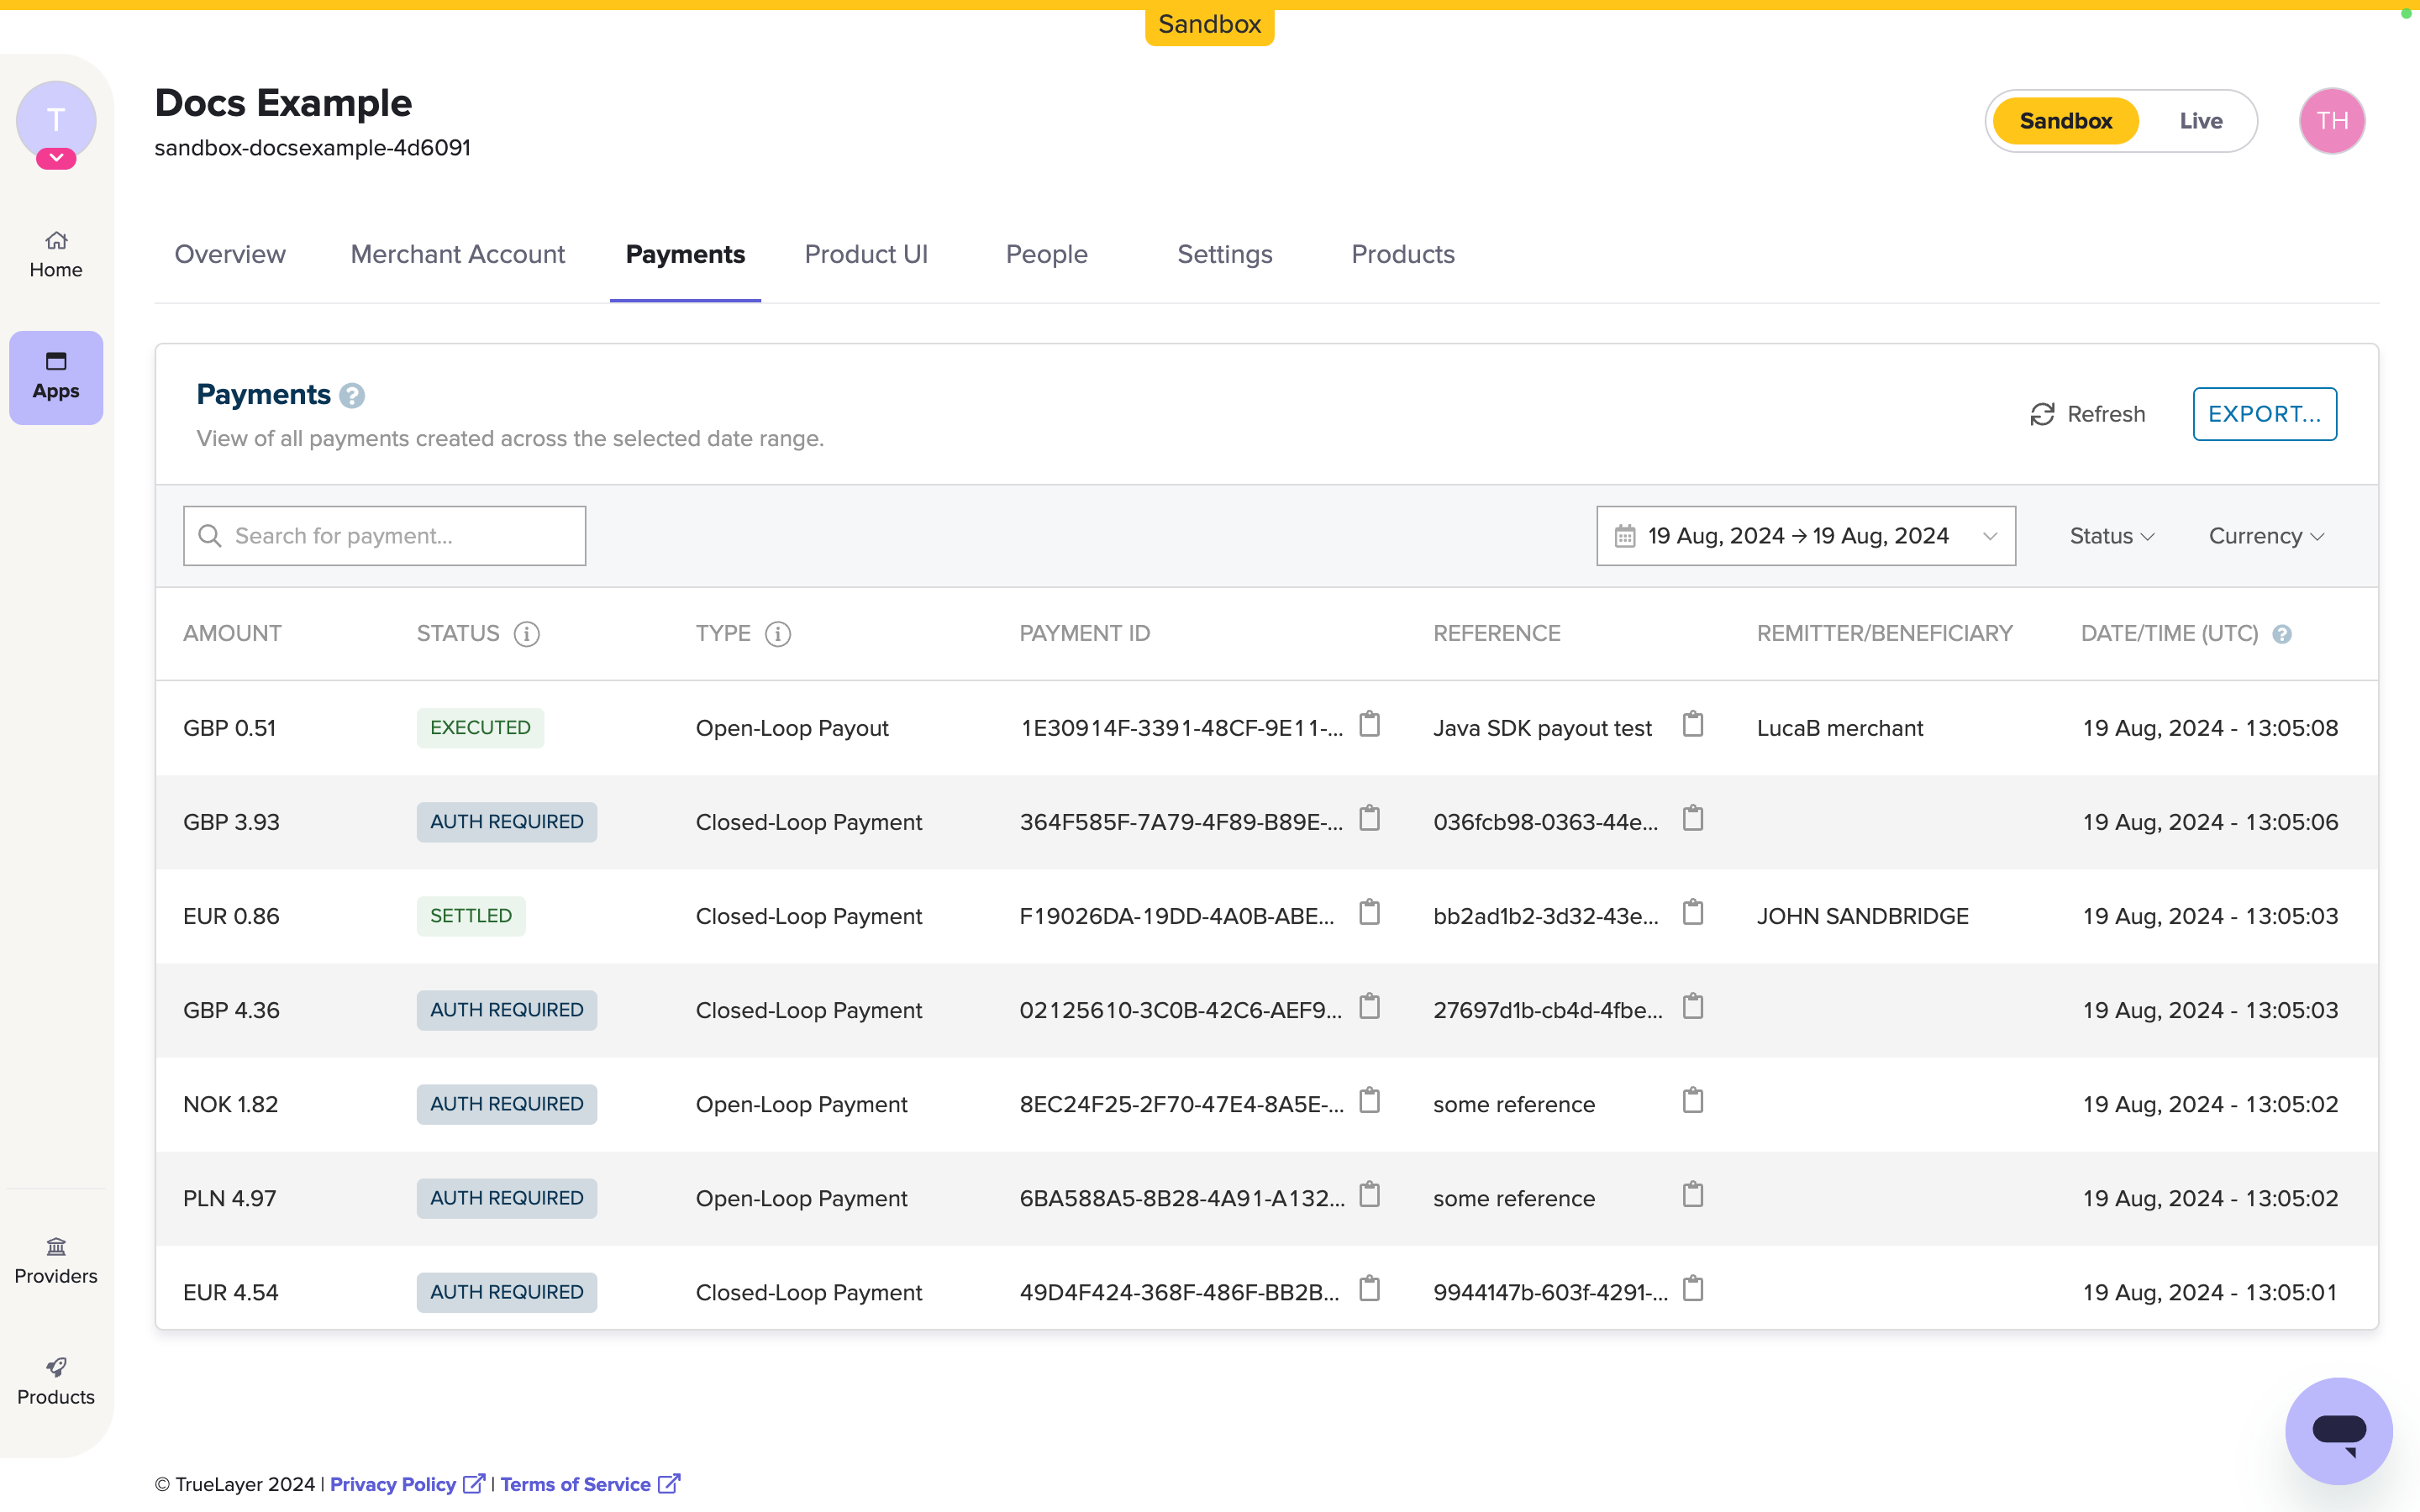
The Payments view, where you can see a table of payments and issue refunds. The tab menu also displays the other options available to you.
Documentation quickstart guides and links
Try out the API endpoints with our Insomnia collection and use our Insomnia plugin for quickly signing requests. Follow the instructions in the page for how to setup Insomnia, import the TrueLayer signing plug-in and import the v3 collection.
Migrating from Payments v1 to v3
Introduction
With the Payments v1 APIs, you used TrueLayer payment dialogs to handle the bank selection screens, or whitelabeled the bank selection screen (and potentially also the Payment consent screen) passing the remitter bank details (i.e. provider_id and sort_code-account_number) into the payment request calls once the user selected their bank account.
With Payments v3 both those scenarios are still possible. You can both completely re-use your existing UX/UI flow, using a Direct API integration, or use one of TrueLayer UI/UX and SDK components.
Payment token creation
Like with Payments v3 APIs, you will need to generate a Bearer access_token. This will be used to get info from your merchant account and to initiate API calls. Use your TrueLayer client_id and client_secret (found in your TrueLayer Console) to request an access_token from our auth server.
The /connect/token endpoint is the same. The scope must now be payments, which is used for both pay-ins (deposits) and payouts (withdrawals and refunds).
As with previous API versions, the generated access_token lasts for 1 hour and once expired, you need to generate a new one.
Example:
| Environment | Endpoint |
|---|---|
| Live | https://auth.truelayer.com/connect/token |
| Sandbox | https://auth.truelayer-sandbox.com/connect/token |
curl -X POST
    -d grant_type=client_credentials
    -d client_id=${client_id}
    -d client_secret=${client_secret}
    -d scope=payments
https://auth.truelayer-sandbox.com/connect/token
{
    "access_token": "eyJhbGciOiJSUzI1NiIsImtpZCI6IjE0NTk4OUIwNTdDOUMzMzg0MDc4MDBBOEJBNkNCOUZFQjMzRTk1MTBSUzI1NiIsInR5cCI6ImF0K2p3dCIsIng1dCI6IkZGbUpzRmZKd3poQWVBQ291bXk1X3JNLWxSQSJ9.eyJuYmYiOjE2NjAyNDU0NzEsImV4cCI6MTY2MDI0OTA3MSwiaXNzIjoiaHR0cHM6Ly9hdXRoLnRydWVsYXllci1zYW5kYm94LmNvbSIsImF1ZCI6InBheW1lbnRzX2FwaSIsImNsaWVudF9pZCI6InNhbmRib3gtZGFyeWx0ZXN0LTc2YjkwOCIsImp0aSI6IkE0MTNERDhFOENENTJGQUQ5MjcwRTU3QjJCN0RFNjhFIiwiaWF0IjoxNjYwMjQ1NDcxLCJzY29wZSI6WyJwYXltZW50cyJdfQ.hV5Nuqi-X9PqNDOyVftnWZzHhuBIetsjM1zeK-64ZSJ9aTqPdwhqVGiM4zTqLEx0ZfT34MbUfY98cFu00X3SbgS4fV7_Mu2jV_5ofrLdlb_KoIFo82ZG5Y4SNd19vFI5sEIkYIL3KtYnvnjUwP4UZvxgl0siTg1K0kRqws8SqfeOwStgaHsBfYcTUi_w3Z5DSZTspR_G_FixOHGjTPFY48GPACO-wyfH5JZn_uMpARRUam-sadukUpe8yjxFrg1zQ8mqXBhuuBbk8PoG4DCkk5tY-lTjFx92P1NuElMP1RzvIJ_-1qDhdtnNJROLm09_D-l4YX1VIaxL29Wv9kudqQ",
    "expires_in": 3600,
    "scope": "payments",
    "token_type": "Bearer"
}
Single Immediate Payments
Create a payment to your bank account
Step 1: Pay-In creation call
The Payments API call needs to be initiated from the backend, including the Bearer 'access_token' token we got in the previous step.
Request signing
Learn more about request signing for Payments v3.
Using v1 APIs, you created a Payment to the beneficiary bank account by making an API call request to the https://pay-api.truelayer.com/single-immediate-payments endpoint.
The two examples below show how to convert V1 payment creation calls to Payments V3.
There are two examples, one where the ‘remitter’ information isn't passed, and one where it is passed.
See below an example of a Payment creation call with v1 and its corresponding v3 version:
Here is an example where Remitter data is also being passed in the request, and the corresponding v3 version:
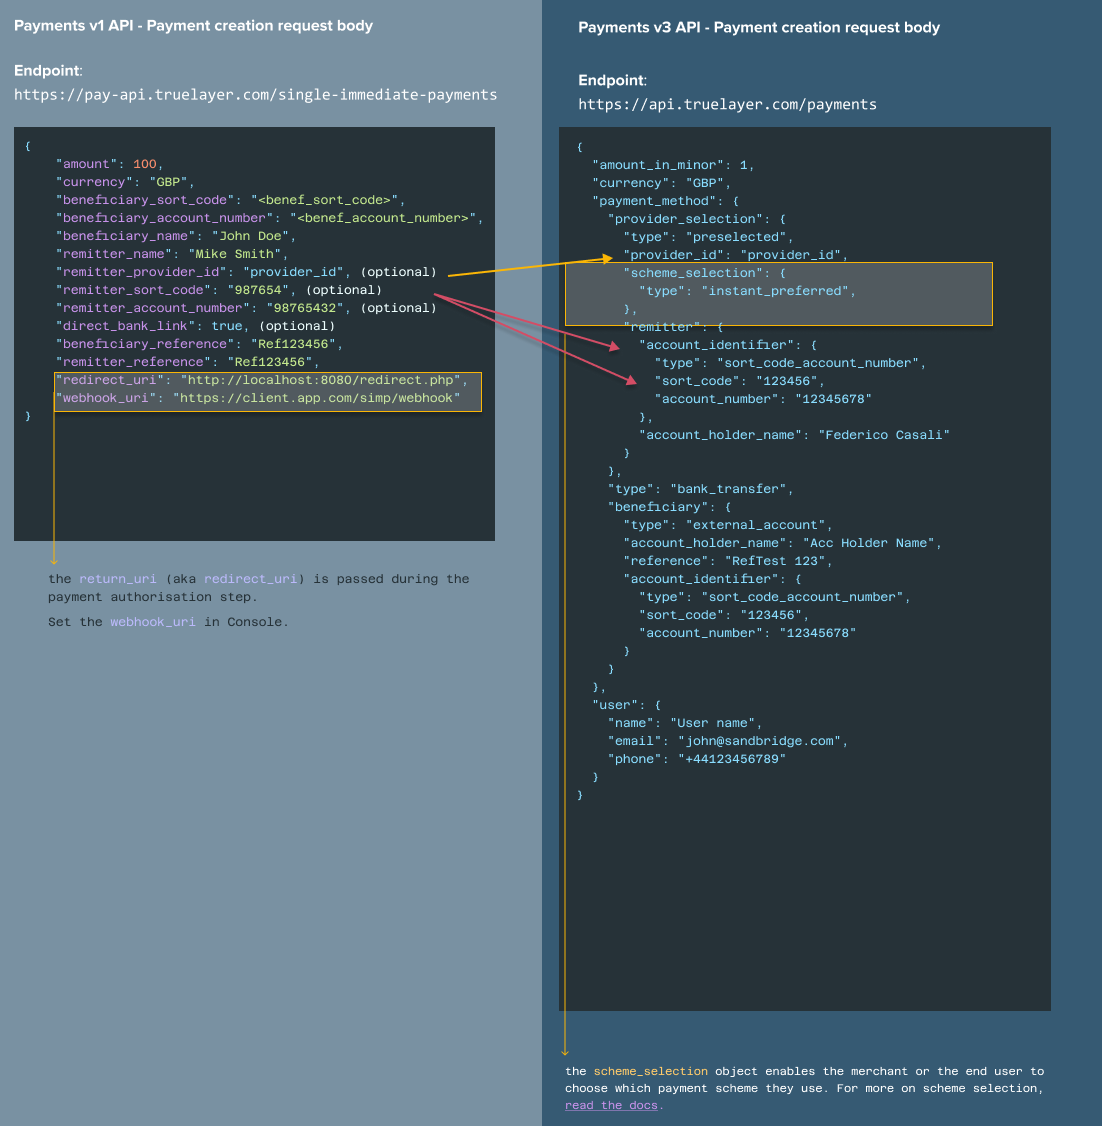
As shown in the image above, the equivalent Payment creation call can be made in v3, to the https://api.truelayer.com/payments endpoint.
| v1 endpoint | v3 endpoint |
|---|---|
https://pay-api.truelayer.com/single-immediate-payments | https://api.truelayer.com/payments |
Then, the following changes in the request body should be applied (see the API reference for more information):
useris now a dictionary object that is including multiple values, and represents the user authorizing the payment.typeneeds to be specified asbank_transfervalue.- In case you need to pass a remitter
provider_id, it can be passed as part of theprovider_selectionobject, where also thetypevalue has been passed aspreselected(see example 2 above).
List of available parameters
| Field | Description |
|---|---|
amount_in_minor | The amount in minor units. Minor units are the smallest units of a currency, depending on the number of decimals. For example: EUR 1 = 100 cents |
currency | Must be set to GBP or EUR. |
payment_method | Configuration options for the payment method. |
payment_method.provider_selection | Set to user_selected, this allow the user to select their bank in the Hosted Payment Page (use this option for first time deposits). |
payment_method.provider_selection.filter | Configuration options to constrain which providers should be available during the provider_selection action. |
payment_method.provider_selection.scheme_selection | Configuration options to specify the type of scheme selection: instant_only only allows providers that support instant payments.Some EU providers may charge the remitter a fee for using instant payments. These providers are not returned in the provider selection action by default. To include them, you can set the allow_remitter_fee flag to true.To enable your user to choose which payment scheme to use, set the scheme_selection object to user_selected. |
payment_method.beneficiary | Must be set to external_account |
payment_method.beneficiary.account_identifier | Identifies the destination account. In the case of EUR payments the identifier type is iban. |
payment_method.beneficiary.account_holder_name | Must be the player’s legal name as registered. |
payment_method.beneficiary.reference | Reference that will appear in the player’s bank statement. |
user | The user authorising the payment. |
user.id | A unique identifer for the user. Must be UUID format. |
user.name | This is the full legal name of your end user. |
user.email | The email address of your end user according to RFC 2822. |
user.phone | The phone number of your end user in formats recommended by ITU. The country calling code must be included and prefixed with a +. |
user.date_of_birth | The date of birth of your end user, in YYYY-MM-DD format. |
user.address | The physical address of your end user. |
user.address.address_line1 | The full street address including house number and street name. Pattern: ^.{1,50}$ |
user.address.address_line2 | (Optional) The full street address including house number and street name. Pattern: ^.{1,50}$ |
user.address.city | Name of the city / locality. Pattern: ^.{1,50}$ |
user.address.state | Name of the county / state. If not available pass the same value as in city.Pattern: ^.{1,50}$ |
user.address.zip | Zip code or postal code. Pattern: ^.{1,20}$ |
user.address.country_code | The country code according to ISO-3166-1 alpha-2. |
metadata | Optional field for adding custom key-value data to a resource. This is saved on payment creation and returned on every payment retrieve. This object can contain a maximum of 10 key-value pairs, each with a key with a maximum length of 40 characters and a non-null value with a maximum length of 500 characters. |
With v1 you implemented payment flow using either the TrueLayer v1 payment dialog web page or building your own bank selection screen. These scenarios are both supported in v3.
In general, though, the recommended path is to benefit from the TrueLayer v3 out-of-the-box payment authorisation flows for handling the bank selection (like the Hosted Payment Page or the dedicated SDKs for iOS and Android), you can omit passing any remitter provider information in the payment creation call. See our docs page for more information.
With v1 APIs, after the payment creation request to https://pay-api.truelayer.com/single-immediate-payments, the API response includes a direct link to the provider specified in the request.
With Payments v3 APIs, instead, the https://api.truelayer.com/payments request creates a payment that still requires authorisation, and returns an object which includes the following:
{
    "id": "e9931912-da0b-4aa7-8209-357741836691",
    "user":
    {
        "id": "f61c0ec7-0f83-414e-8e5f-aace86e0ed35"
    },
    "resource_token": "eyJhbGciOiJIUzI1NiIsInR5cCI6IkpXVCJ9.eyJzY29wZSI6InBheW1lbnQiLCJjbGllbnRfaWQiOiJzYW5kYm94LWRhcnlsdGVzdC03NmI5MDgiLCJqdGkiOiJlOTkzMTkxMi1kYTBiLTRhYTctODIwOS0zNTc3NDE4MzY2OTEiLCJuYmYiOjE2NjMxNzIwMzQsImV4cCI6MTY2MzE3MjkzNCwiaXNzIjoiaHR0cHM6Ly9hcGkudHJ1ZWxheWVyLXNhbmRib3guY29tIiwiYXVkIjoiaHR0cHM6Ly9hcGkudHJ1ZWxheWVyLXNhbmRib3guY29tIn0.yjQHGEASEJmvpl-PTxkngXWwVpzoWSWnuIQb_6bKaCU",
"status": "authorization_required"
}
Where:
idis thepayment_id(ordeposit_id)user.idis theuser.idbeing passed in the request. In case no user.id is passed in the request, TrueLayer will generate one and return it here.resource_tokenis the token that should be used in the payment authorisation step only in the case you want to use TrueLayer UX/UI (HPP, EPP, SDK) for the Payment Authorisation flow.
Resource tokens are valid for 15 minutes
After 15 minutes, the
resource_tokenassociated with the payment expires, causing the payment itself to fail.The status of the payment will move to
expired, instead of remaining ininitiatedindefinitely.
The payment has now been created and its status is authorization_required.
Migrating from a previous version
If you want to keep your custom provider selection flow, and continue to follow a logic where you are passing the remitter provider_id in the request, you can still do that as Payments V3 fully supports this.
You can continue to present white-labelled provider selection and consent pages to your users (and therefore, perform the payment creation API call after the provider has been selected and passed in the request).
The Providers Endpoint and provider_id values
If you are currently using a V1 /providers endpoint to fetch the provider_id, you can still keep this logic concept in your code, but there is a new dedicated Payments API V3 version of the Providers Endpoint.
The provider_id values fetched can be used for the payment_method.provider_selection.provider_id value for payments from a specific provider.
We have released a new V3 version of the Providers Endpoint: the provider_id values are not changing, but there are some differences in how the endpoint works, especially:
- The endpoint is now
/v3/payment-providers/search. - The API call is now a
POST(instead of a GET). - Instead of passing your
client_id, the request needs to be authenticated with a validaccess_token(the request doesn't have to be signed thou). - Please check our guide on how to use the new V3 providers endpoint,
/v3/payment-providers/searchand the Documentation specs relative to the new V3 Providers Endpoint.
You can of course create a pay-in (deposit) without specifying the provider_id the payment is coming from - which is done with the 'default' value of the payment_method.provider_selection.type=user_selected , as explained here. The user then selects their provider in the next step (see 'Select a provider for a payment' and the payment authorisation pages for web, mobile SDK or a white-labelled direct API integration).
As such, if you use V3's out-of-the-box payment authorisation solutions, such as our web authorisation UIs or Mobile authorisation UIs for handling bank selection, you don't need to pass any remitter provider information at the payment creation stage.
This also applies to payment scheme selection; you do not need to provide a specific scheme.id in the payment creation call. Instead, you can enable your user to select the payments scheme they would like to use as part of the authorisation flow.
Enabling "business" and "corporate" providers in the bank selection screen
With Payments API V1, in general, all available providers were returned in the bank selection screen dialog, including business or corporate account.
By default, with Payments API V3, only retail providers are returned.
In order to also return business and/or corporate bank account, there are available options for the filter array object (under the payment_method.provider_selection).
{
"provider_selection": {
      "filter": {
        "customer_segments": [
          "retail",
          "business",
          "corporate"
          ]
        },
      }
}
Being an array, all desired values can be passed (as in the example above). In this example, all of retail, business, and corporate providers are returned in the provider selection object.
The bank selection screen: provider_selection.type = user_selected vs preselected
provider_selection.type = user_selected vs preselectedAs mentioned above, if you want to pass the provider_id in the request, in Payments V3 the provider_selection.type needs to be passed with the preselected value.
However is important here to acknowledge how with Payments V3 the Payment flow would work in case of using the user_selected value for provider_selection.type.
The concept is that in this case you would be first creating the payment, defining currency, amount and passing a filter object, that will determine which banks are going to be returned eventually in the authorization_flow subsequent step.
Basically, the difference is that you can skip providers endpoint calls ahead of creating the payment, and instead incorporate into the payment creation call the filters you would use to fetch the providers list, and then will either receive this list of providers in the /authorization-flow subsequent API call response (if integrating with a Direct API approach) or will receive this list of returned providers from the UI/UX component (like HPP, EPP or SDKs…) used for the Authorization-flow step.
Let’s make an example.
In the following Payment creation call, see the filter object:
curl --request POST \
--url https://api.truelayer-sandbox.com/v3/payments \
--header 'Idempotency-Key: string' \
--header 'Tl-Signature: string' \
--header 'accept: application/json; charset=UTF-8' \
--header 'content-type: application/json; charset=UTF-8' \
--data '

{
    "currency": "GBP",
    "payment_method":
    {
        "type": "bank_transfer",
        "provider_selection":
        {
            "type": "user_selected",
            "filter":
            {
                "countries":
                [
                    "GB"
                ],
                "release_channel": "general_availability",
                "customer_segments":
                [
                    "retail"
                ]
            },
            "scheme_selection":
            {
                "type": "instant_only",
                "allow_remitter_fee": false
            }
        },
        "beneficiary":
        {
            "type": "merchant_account",
            "verification":
            {
                "type": "automated"
            },
            "merchant_account_id": "AB8FA060-3F1B-4AE8-9692-4AA3131020D0",
            "account_holder_name": "Ben Eficiary",
            "reference": "payment-ref"
        }
    },
    "user":
    {
        "id": "f9b48c9d-176b-46dd-b2da-fe1a2b77350c",
        "name": "Remi Terr",
        "email": "remi.terr@aol.com",
        "phone": "+447777777777",
        "date_of_birth": "1990-01-31"
    },
    "amount_in_minor": 1
}
The filter object configured in this way will determine that (as an example) during the payment authorization, only UK banks (countries:[GB]) will be returned, and that will offer only payments instant and not subject to a fee.
Let’s then look now at the next step where the payment is authorised.
Step 2: Payment Authorisation
In most circumstances, to authorise the payment, at this stage is recommended to use the TrueLayer UX/UI components (hosted payment page, embedded payment page, SDKs), as this approach will result in being able to benefit from a series of advantages and better scalability in case of expanding into new geographies as TrueLayer UX/UI components evolve ensuring to support all possible different requirements from all supported providers (eg. additional screens in case of additional branches to be selected).
When expanding in the EU, integration efforts become more complex without using TrueLayer Hosted Payment Pages or SDKs. In some cases (for example, German banks using embedded flows), they are mandatory if you are operating with TrueLayer certificates (you are not regulated).
Coming from a v1 Payment integration is possible that you were using the TrueLayer Payment page dialogs, handling the bank selection screen and/or the payment consent screen. With v3, this is done by adopting a hosted payment page (or embedded payment page, or our native mobile SDK).
See how to handle the authorisation flow using TrueLayer's web components, and directly see our docs for our hosted payment page or embedded payment page. Alternatively, handle the authorisation flow using TrueLayer's mobile SDKs.
For more advice on designing the best experience for your users, read our online UX/UI guidelines.
Direct API integration
In the case that you’d like to keep your current white labelled front-end and proceed with a Direct API integration, and handle payment authorisation using TrueLayer APIs from the backend, Payments v3 fully supports this scenario and you can continue to present your custom bank selection and consent page to your users (and therefore, perform the payment creation API call after the provider has been selected and passed in the request).
- Likewise, the
/v2/single-immediate-payments-providersendpoint or/v3/payment-providers/searchendpoint is used to fetch information about the provider_id and other info. You can still keep this logic in your code and theprovider_idvalues can be used for thepayment_method.provider_selection.provider_idvalue. - One thing to be kept in mind in this case, is that if you are passing the remitter
provider_id, which, as mentioned above, and shown in the examples, in v3 is underpayment_method.provider_selection.provider_id, you will also have to pass a valid paymentscheme_selectionobject (which includes the payment scheme information, as explained here). - Once the Payment is created, you will have to make an additional API call to the
/authorization-flowendpoint in order to start the authorisation flow for the payment (see the API specs for more information).
If you currently have implemented a customised white labelled frontend flow, want to keep and proceed with a Direct API integration, please get in touch directly with us.
Step 3: Consume webhooks and payment statuses
Once the payment authorisation process is completed, the user is redirected back to the return_uri. Now you just have to display indications to the user based on the payment status received via webhooks.
By default, with Payments v3 only executed status webhooks are going to be returned. You can request to in case also receive webhooks for authorized payments; please reach out to us in that case.
In Payments v3, these are the payment statuses you can expect:

Green arrows indicate possible statuses for payments into a merchant account.
Grey arrows indicate possible statuses for payments into an external account.
See our payment statuses page for more information around the Payment statuses and see the get data about a payment page for more information around which data is returned for each payment status.
| Status | Description | Notification Method |
|---|---|---|
authorization_required | The payment has been created successfully and no further action has been taken. | Status only via /GET /payments/{payment_id} |
authorizing | The end user has started the authorization journey by interacting with the Hosted Payments Page or the client's UI and have not completed the journey yet | Status only via /GET /payments/{payment_id} |
authorized | The end user has completed the authorization journey and the payment has successfully completed its authorization flow | Status only via /GET /payments/{payment_id} |
payment_executed | TrueLayer has successfully submitted the payment to the bank and the bank has confirmed it as accepted. This does not mean that the payment will settle in the creditor’s account. | Status via /GET /payments/{payment_id}Webhook sent to your endpoint |
payment_failed | The payment has failed to transition to the next status. Within this notification, TrueLayer provides information about why the payment wasn't successful. The failure reason is shared in the failure_reason field on the payment resource and the failure_stage field shares the payment status where the payment transitioned to payment_failed. This is a terminal status. | Status via /GET /payments/{payment_id}Webhook sent to your endpoint. |
We consider a webhook as having been successfully delivered when we receive a success status code (2xx) from your webhook URI.
If we receive any other status code (for instance, if your API is temporarily unavailable), we will start retrying. Our retry policy is jittered exponential backoff. We will immediately perform some fast retries and then start waiting increasingly longer. We will keep retrying for up to 72 hours. If we continue to receive any other status codes than 2xx ones after retrying for 72 hours, we will discard the webhook. We apply the above retry policy for payments, payment refunds, payouts, and mandates.
Single Immediate Payment webhook examples
We recommend developers to use our signing libraries to verify the
Tl-Signatureof the received webhooks.You must set your Webhook URI in Console to receive webhook notifications.
This block contains examples of the webhooks you receive for executed and failed payments:
	{
    "type": "payment_executed",
    "event_version": 1,
    "event_id": "ed5c3c60-6760-4830-86c3-bced4ce63f21",
    "payment_id": "e9931912-da0b-4aa7-8209-357741836691",
    "payment_method":
    {
        "type": "bank_transfer",
        "provider_id": "mock-payments-gb-redirect",
        "scheme_id": "faster_payments_service"
    },
    "executed_at": "2022-09-14T16:14:24.217Z",
    "metadata":
    {
        "brand": "TL Casino"
    }
}
{
    "type": "payment_failed",
    "event_version": 1,
    "event_id": "8dfba42f-72db-4aa1-b573-e0602ca65506",
    "payment_id": "09baadd0-499f-480f-a451-0ed6cd74593e",
    "payment_method":
    {
        "type": "bank_transfer"
    },
    "failed_at": "2022-09-14T16:22:00.528Z",
    "failure_stage": "authorizing",
    "failure_reason": "canceled",
    "metadata":
    {
        "brand": "TL Casino"
    }
}
This block contains examples of the webhooks you receive for executed and failed payouts:
{
    "type": "payout_executed",
    "event_id": "1b712c55-6bc4-487c-8a5b-2107623fe3bf",
    "event_version": 1,
    "payout_id": "5016c85d-de28-406d-9866-0a3ed85af3b1",
    "executed_at": "2022-09-14T16:39:50.593Z",
    "beneficiary":
    {
        "type": "payment_source",
        "user_id": "4d9af4be-f75b-4ca7-be9b-b842bf7237c1",
        "payment_source_id": "1c928e0e-6dc9-497c-8154-83dce43b2377"
    },
    "metadata":
    {
        "brand": "TL Casino"
    }
}
{
    "type": "payout_failed",
    "event_id": "f8a144dc-a550-4681-844b-4de231ec3764",
    "event_version": 1,
    "payout_id": "f8a144dc-a550-4681-844b-4de231ec3764",
    "failed_at": "2022-09-14T16:41:21.006718283Z",
    "failure_reason": "insufficient_funds",
    "beneficiary":
    {
        "type": "payment_source",
        "user_id": "4d9af4be-f75b-4ca7-be9b-b842bf7237c1",
        "payment_source_id": "1c928e0e-6dc9-497c-8154-83dce43b2377"
    },
    "metadata":
    {
        "brand": "TL Casino"
    }
}
Updated 6 days ago
