React Native SDK
Our React Native SDK combines all the features of our Android and iOS SDKs into one simple library that you can use in your React Native project. It communicates with the Payments API to make your integration project easier, and presents native payment initiation screens to your users, returning a simple result to your app.
The latest version of the React Native SDK is 3.1.3.
Compatibility
- Xcode 14.x and iOS 14.0 and above.
- Android 7.0 (API level 24) and above.
Additional configuration for Android
For Android apps, you must enable desugaring to ensure support for modern Java APIs (like Java 11+) on devices running API 21 and higher. You must also remove excess LICENSE-MIT files.
You can do this by manually editing build.gradle. Here is an example:
android {
    // this part will enable core library desugaing
    compileOptions {
        coreLibraryDesugaringEnabled true
    }

    // this part will remove excess LICENSE-MIT files
    packagingOptions {
        resources {
            excludes += '/META-INF/{AL2.0,LGPL2.1}'
            pickFirsts += ['META-INF/LICENSE-MIT']
        }
    }
}

dependencies {
    // Add to your projects `build.gradle`.
    // We are currently using following version of desuga libraries
    coreLibraryDesugaring "com.android.tools:desugar_jdk_libs:2.1.5"
}
You can also do this by editing app.json in Expo:
{
  "expo": {
    "plugins": [
      [
        "expo-build-properties",
        {
          "android": {
            "packagingOptions": {
              "pickFirst": ["META-INF/LICENSE-MIT"],
              "excludes" : "/META-INF/{AL2.0,LGPL2.1}"
            }
          }
        }
      ],
      // Custom script to integrate desugaring automatically when generating the Android files
      // Example here -> https://github.com/TrueLayer/truelayer-react-native-sdk/blob/main/ExpoDemoApp/plugins/withCustomAppBuildGradle.js
      [
        "./plugins/withCustomAppBuildGradle.js"
      ]
    ]
  }
}
Payment and mandate authorisation journey
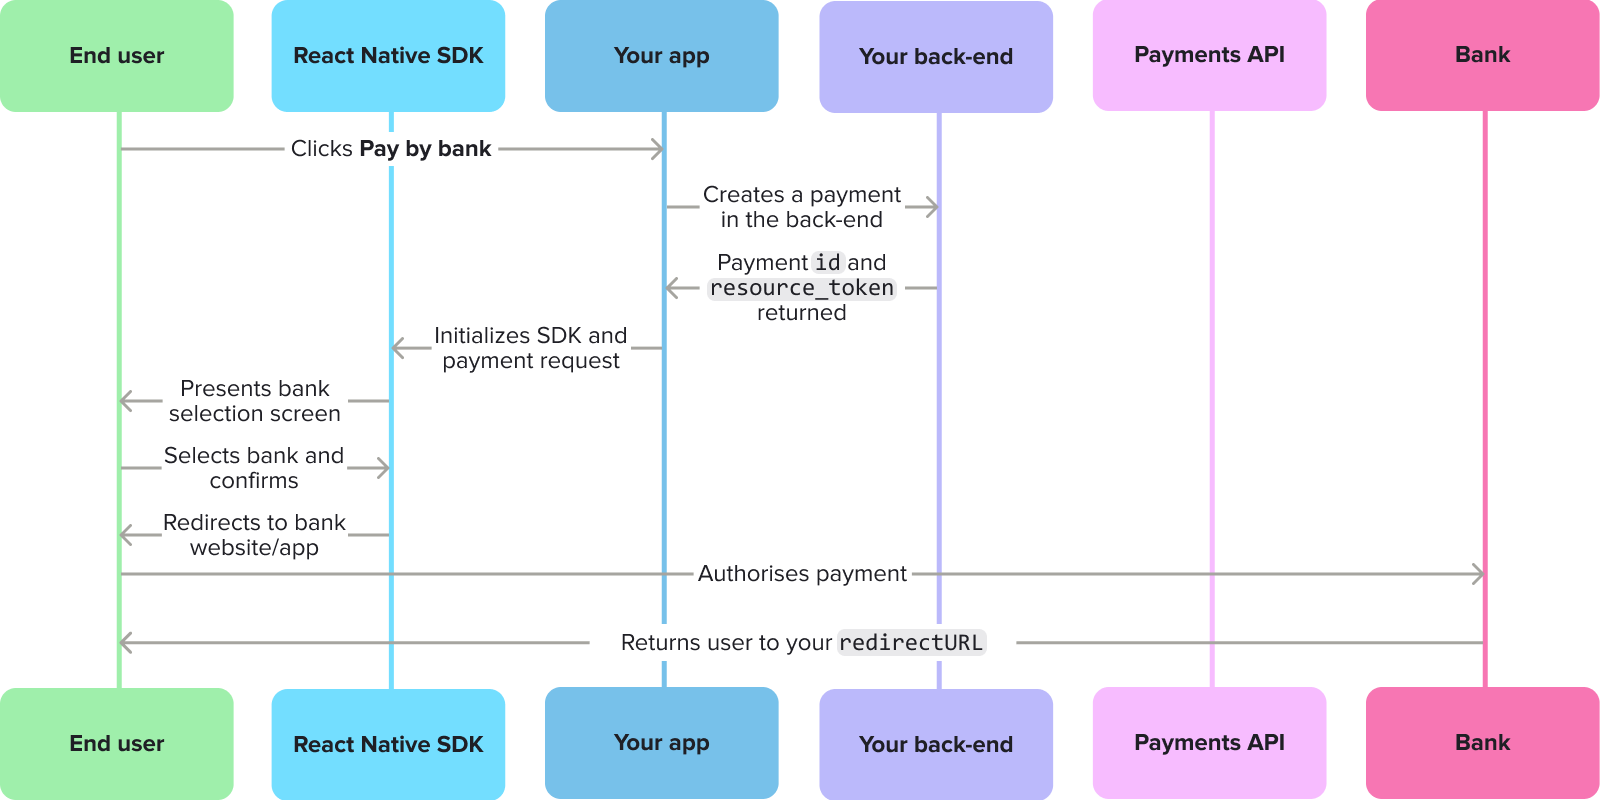
When a customer makes a payment or creates a mandate through your React Native SDK integration:
- The user selects to pay through an instant bank payment, or to set up a recurring payment mandate.
- Your backend creates a payment or mandate with TrueLayer and receives an
idandresource_token.
If you includesignup_plusinrelated_productsat payment creation, the authorisation flow changes to reflect this. - Your app uses the
idandresource_tokento initialise the SDK. - Your user selects and confirms their bank on the provider selection screen through the mobile SDK. If the bank needs additional information from the user, such as IBAN or branch, then the SDK screens ask the user to enter these.
- For banks that use a redirect flow, the mobile SDK redirects your user to their bank's website or app. Your user authorises the payment in their bank's website or app.
- Optionally, for banks that use an embedded flow, the mobile SDK collects the user's credentials and handles the strong customer authentication in order to authorise the payment.
- Once the authorisation is complete, the user is redirected to your return URI. You can then confirm the result to your user.
Payments
Before you start
Register a return URI in Console. Go to Console > Settings > Allowed redirect URIs to do this. Your user is redirected back to your redirect URL, typically your website or application, at the end of the payment journey.
You also need an integration that can create a payment, and get a payment id, to start the React Native SDK. Learn more about how to create a payment, and authenticate, and sign your requests (our payment quickstart guide provides an overview).
Configuration overview
There are four steps to configuring the React Native SDK to authorise payments:
- Install the SDK and platform-specific configuration
- Import the SDK and configure environments
- Process and check payments
- Handle the
ProcessorResult

1. Install and set up the SDK
You can install the React Native SDK with either Yarn or npm.
To install the SDK with Yarn, run this command:
yarn add rn-truelayer-payments-sdkTo install the SDK with npm, run this command:
npm install rn-truelayer-payments-sdk --saveAdditional configuration for iOS
To ensure that the React Native SDK can install new dependencies when needed, you should install Cocoapods.
In your iOS folder, run:
- This command if using the new React Native architecture:
RCT_NEW_ARCH_ENABLED=1 bundle exec pod install - This command if using the old React Native architecture:
bundle exec pod install
Additional configuration for Android
To remove excess LICENSE-MIT files and to be able to run on an Android API level beneath 26, you should enable core library desugaring and update packing options. To do this, update your Android file as follows:
android {
    // this part will enable core library desugaing
    compileOptions {
        coreLibraryDesugaringEnabled true
    }

    // this part will remove excess LICENSE-MIT files
    packagingOptions {
        resources {
            pickFirsts += ['META-INF/LICENSE-MIT']
        }
    }
}

dependencies {
    // Add to your projects `build.gradle`.
    // We are currently using following version of desuga libraries
    coreLibraryDesugaring "com.android.tools:desugar_jdk_libs:2.0.4"
}
Additional configuration for Expo
In your app.json file, you need to add the following configuration for the expo-build-properties
{
  "expo": {
    "plugins": [
      [
        "expo-build-properties",
        {
          "android": {
            "compileSdkVersion": 33,
            "targetSdkVersion": 33,
            "buildToolsVersion": "33.0.0",
            "packagingOptions": {
              "exclude": ["META-INF/LICENSE-MIT"]
            }
          },
          "ios": {
            "deploymentTarget": "14.0"
          }
        }
      ]
    ]
  }
}
The React Native SDK is a wrapper around a native mobile TrueLayer Payments SDK. It is not possible to use it with Expo for web.
It's also not possible to use the SDK within the Expo Go app. To test the SDK, you must build the Android and iOS apps. You can do that by running the following commands:
For Android:
npx expo prebuild
npx expo run:android
For iOS:
npx expo prebuild
npx expo run:ios
2. Import the SDK and configure environments
Once you've installed the SDK, the next step is to import the React Native SDK. Here's an example:
import {
  TrueLayerPaymentsSDKWrapper,
  Environment,
  PaymentUseCase,
  ResultType,
} from "rn-truelayer-payments-sdk";
You can then configure your SDK to work in either the sandbox or production environment by using Environment.Sandbox or Environment.Production respectively:
TrueLayerPaymentsSDKWrapper.configure(Environment.Sandbox).then(
  () => {
    console.log("Configure success");
  },
  (reason) => {
    console.log("Configure failed " + reason);
  }
);
3. Process and check payments
Once you've installed and configured the React Native SDK, you can process a payment. To do this, you must have created a payment and have its id.
In this section, learn how to:
Process a payment
Before you can process a payment, you must first make a successful POST request to the /v3/payments endpoint. Then, provide the parameters when you process the payment:
TrueLayerPaymentsSDKWrapper.processPayment({
  paymentId: "", // Your payment ID,
  resourceToken: "", // Your payment token,
  redirectUri: "", // Your redirect URI,
},
// Optional payment preferences
{
	shouldPresentResultScreen: true, // Whether to display the payment result screen.
  preferredCounryCode: GB // The IOS 3166-2 country code, which determines the banks displayed.
}).then((result) => {
  switch (result.type) {
    case ResultType.Success:
      console.log(`processPayment success at step: ${result.step}`);
      break;
    case ResultType.Failure:
      console.log(`processPayment failure reason: ${result.reason}`);
      break;
  }
});
The mandatory parameters in PaymentContext are:
paymentId: The paymentidreceived after you created the payment.resourceToken: Theresource_tokenreceived after you created the payment.redirectUri: Where the user should be redirected to after the authorization flow is completed outside of your app (bank website, HPP). This is usually your app's redirect URI, which you should add in Console,
The optional parameters in PaymentPreferences are:
shouldPresentResultScreen: A Boolean parameter that determines whether the payment result screen displays.preferredCountryCode: You can use this with a two-character country code to specify which country to display payment providers for.
If the code is invalid, or the country has no providers, the value defaults to the user's browser locale.
Handle redirects in the authorisation flow
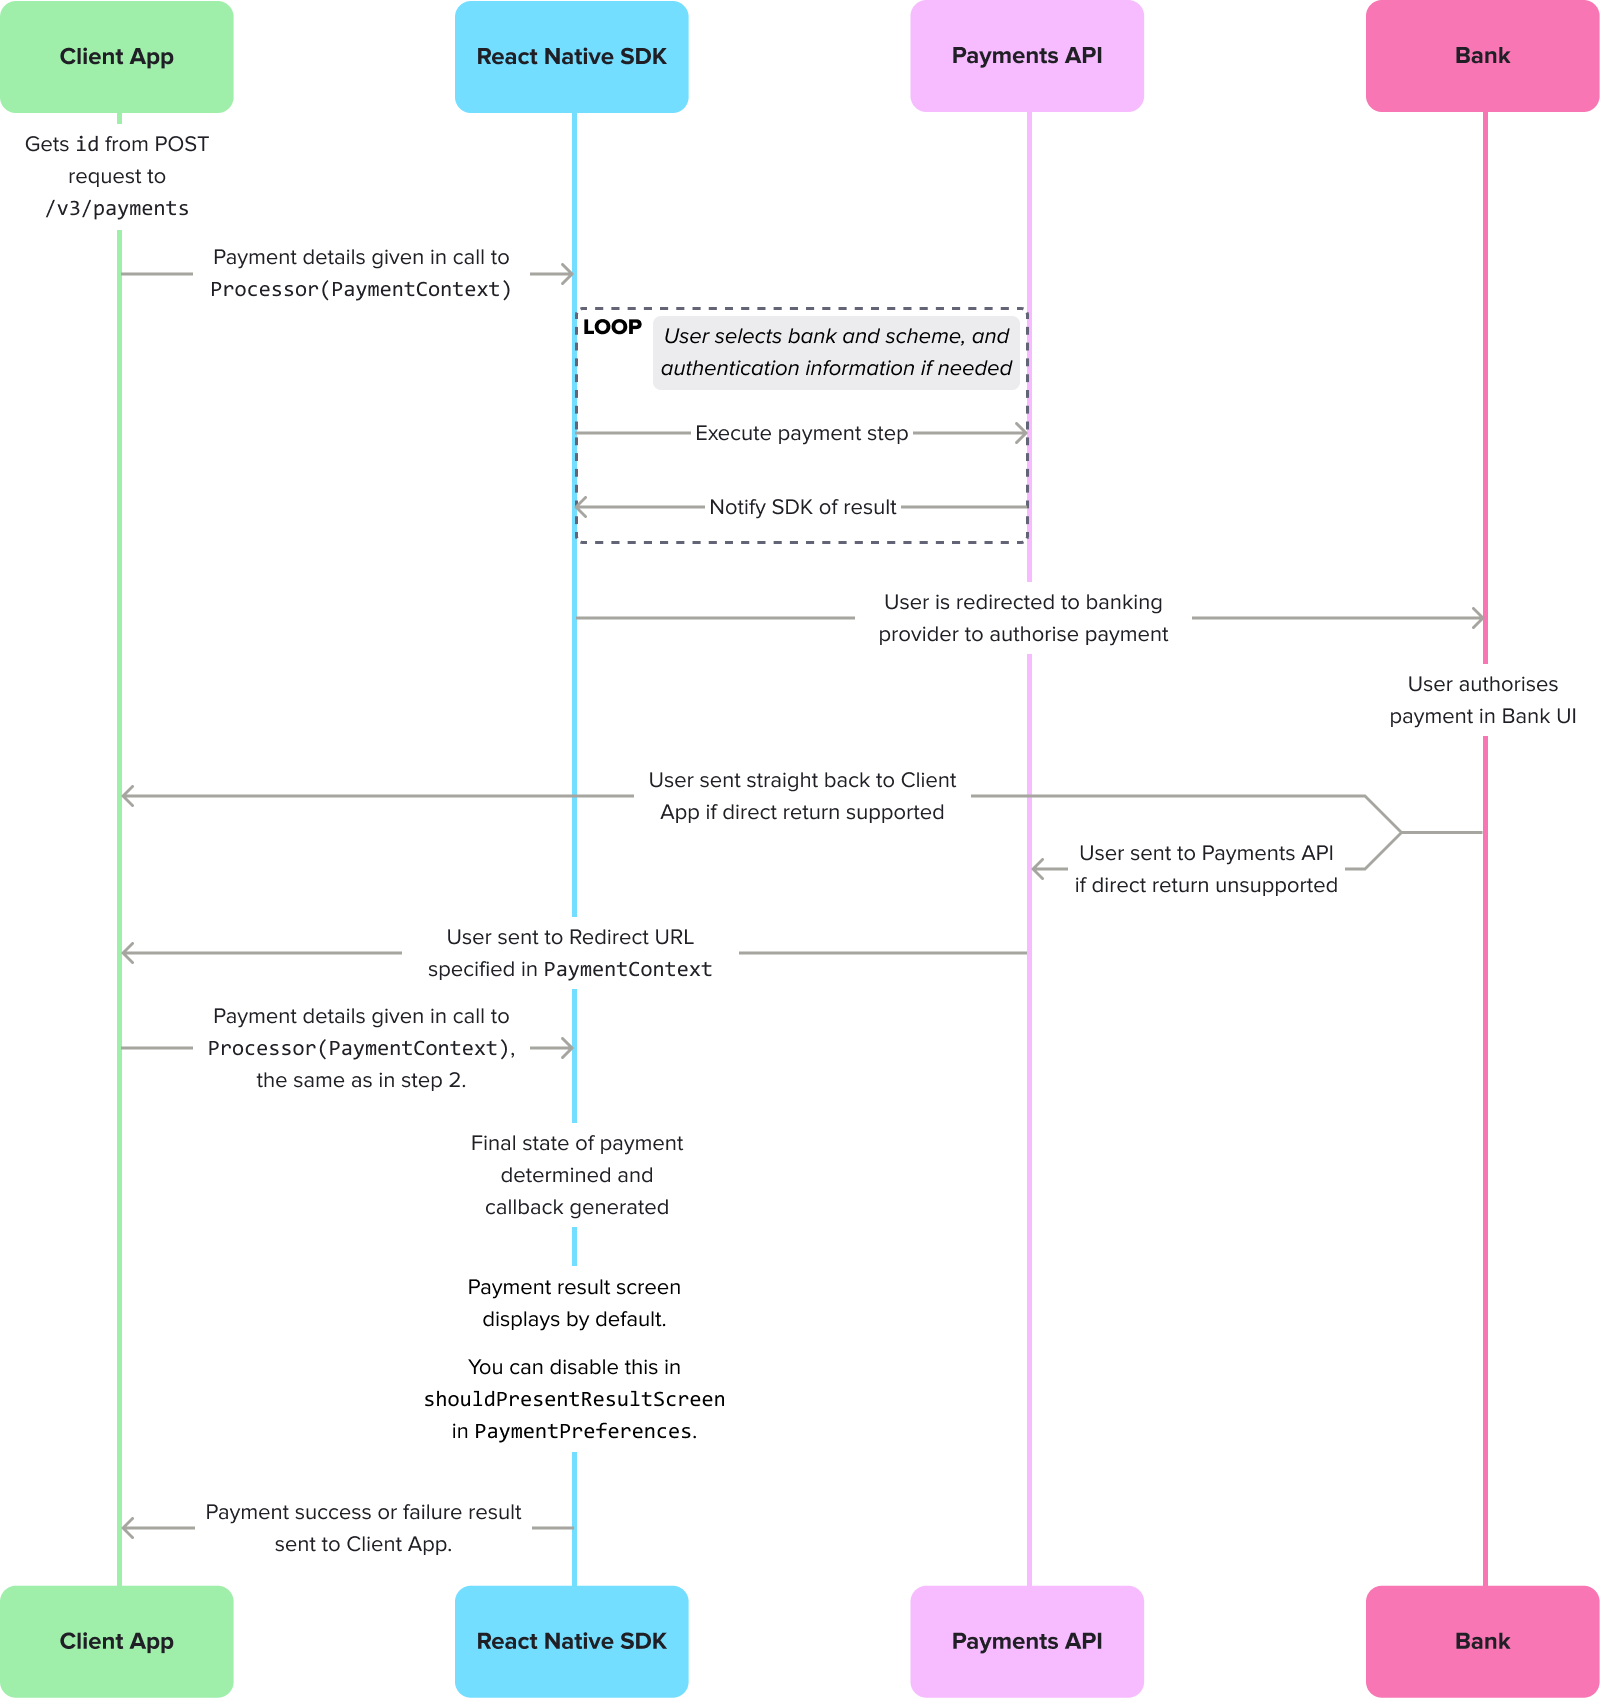
The flow for payment authorisation through the React Native SDK, highlighting how the SDK is reinvoked after the user is returned to the Client App.
At the end of a redirect flow the bank app relaunches your app with the redirect URI you specified in Console.
In your activity that launches when a deep link is triggered, you can fetch the redirect parameters from the url which will include the payment_id.
Whenever you are redirected to your app, you should reinvoke the SDK, until you receive a success or error callback.
By default the SDK offers a payment result screen, which displays the result of the payment and advises the user on what to do in case of a failed payment. If you disable the result screen, you can use the success or error callback to render a screen for your user when they return to your app.
AIS and PIS flow
To make the user experience simpler, you can give your user the option of creating an additional Data connection when they consent to a payment. This flow appears for some German banks when your user would need to input an IBAN at the authorisation stage.
When your user logs into their bank, a screen displays with a list of IBANs associated with their credentials. They can then select the IBAN that they want to pay with, without having to input it manually.
Check payment status
The React Native SDK offers the following method to check the status of a payment. You should consider this the best source of truth for the payment's status.
TrueLayerPaymentsSDKWrapper.paymentStatus({
  paymentId: "", // Your payment ID,
  resourceToken: "", // Your payment token
}).then((result) => {
  switch (result.type) {
    case ResultType.Success:
      console.log(`paymentStatus success with status: ${result.status}`);
      break;
    case ResultType.Failure:
      console.log(
        `paymentStatus failed with the following reason: ${result.failure}`
      );
      break;
  }
});
This is a list of the different payment statuses the SDK can return. Learn more about payment statuses.
PaymentStatus | Description |
|---|---|
AuthorizationRequired | The payment requires authorisation. |
Authorizing | The user is authorizing the payment. |
Authorized | The user has authorised the payment with their bank. |
Executed | The payment has been executed. |
Settled | The funds have reached the destination. |
Failed | The payment failed. This can be due to various reasons. |
4. Handle the ProcessorResult
ProcessorResultThe processPayment method in the React Native SDK returns a ProcessorResult type.
Success cases
ProcessorResult.PaymentStep contains different success results that are part of the payment flow.
PaymentStep | Description |
|---|---|
Executed | The bank confirmed the payment. |
Authorized | The user authorised the payment with the bank. |
Redirect | The user has been redirected to the bank to authorise the payment. |
Settled | The funds have reached the destination. |
Wait | The SDK flow is complete, but a decoupled authorisation action is still pending with the user and/or the bank. |
Failure cases
ProcessorResult.FailureReason contains the reason why a payment failed. These reasons are shared across payments and mandates.
Expand to see all payment failure callbacks
FailureReason | Description |
|---|---|
ProcessorContextNotAvailable | The context provided to the SDK is invalid. |
NoInternet | There was an issue while connecting to the internet. Either the user is offline, or the request timed out. |
CommunicationIssue | There was an issue communicating with the server. |
ConnectionSecurityIssue | The token used to make the payment or mandate is not authorized to undergo such an operation. |
PaymentFailed | The payment or mandate is in a failed state. Click here for more information: payments or mandates. |
WaitAbandoned | The user abandoned the payment on the wait screen. |
Unknown | The SDK encountered an unexpected behaviour. |
UserAborted | The user cancelled the payment or mandate. |
ProviderOffline | The pre-selected provider was offline. |
InvalidRedirectURI | The redirect URI passed to the SDK is invalid. |
Blocked | The payment has been blocked due to a regulatory requirement. This may happen if the PSU fails a sanctions check. |
InvalidAccountDetails | The payment failed because either the creditor's or debtor's account details were invalid. |
InvalidAccountHolderName | The payment failed because the account holder's name details were invalid. |
InvalidCredentials | The banking credentials provided by the PSU to log into their bank were incorrect. |
InvalidRemitterAccount | The account details of the remitter bank account provided during the payment flow were incorrect. |
InvalidRequest | The payment failed due to invalid data in the request. |
InvalidSortCode | The payment failed due to an invalid sort code being provided. |
InsufficientFunds | The PSU did not have the required balance in their account to complete this payment. |
PaymentLimitExceeded | The PSU's payment limit amount with their bank was breached. |
ProviderError | The provider has unexpectedly failed when creating the payment. |
ProviderExpired | The payment failed because the token or exchange code used to communicate with the bank expired. |
ProviderRejected | The provider rejected the payment. |
UserCanceledAtProvider | The payment failed because either the creditor's or debtor's account details were invalid. |
Display the payment result screen
The payment result screen is enabled by default. To display it to your user after the payment is authorised (or fails) you must relaunch the SDK using the same PaymentContext you used when you first processed the payment.
Possible payment results and callbacks
When your user sees the payment result screen, you receive a ResultShown callback. This applies for both successful and failed payments, and contains the following properties, which explain the result the user saw:
List of payment result callbacks
ResultShown property | Description |
|---|---|
None | No result screen was shown because it's either been opted out by the client or the user has been redirected. |
Initiated | The payment did not reach a final state and the user was shown the "Payment in progress" screen. |
Success | The payment was completed successfully. |
InsufficientFunds | The payment failed due to insufficient funds. |
PaymentLimitExceeded | The payment failed due to exceeding the payment limit. |
UserCanceledAtProvider | The payment failed due to the user cancelling at the provider. |
AuthorizationFailed | The payment failed due to authorization failure. |
Expired | The payment failed due to expiring. |
InvalidAccountDetails | The payment failed due to the invalid account details. |
InvalidGenericWithoutRetry | The payment failed and retry is not possible. |
Failed | The payment failed to be set up. |
Mandates
Before you start
Register a return URI in Console. Go to Console > Settings > Allowed redirect URIs to do this. Your user is redirected back to your redirect URL, typically your website or application, at the end of the mandate journey.
You also need an integration that can create a mandate, and get a mandate id, to start the React Native SDK. Learn more about how to create a mandate, and authenticate, and sign your requests.
Configuration overview
There are four steps to configuring the React Native SDK to authorise mandates:
- Install the SDK and platform-specific configuration
- Import the SDK and configure environments
- Process and check mandates
- Handle the
ProcessorResult

1. Install and set up the SDK
You can install the React Native SDK with either Yarn or npm.
To install the SDK with Yarn, run this command:
yarn add rn-truelayer-payments-sdkTo install the SDK with npm, run this command:
npm install rn-truelayer-payments-sdk --saveAdditional configuration for iOS
To ensure that the React Native SDK can install new dependencies when needed, you should install Cocoapods.
In your iOS folder, run:
- This command if using the new React Native architecture:
RCT_NEW_ARCH_ENABLED=1 bundle exec pod install - This command if using the old React Native architecture:
bundle exec pod install
Additional configuration for Android
To remove excess LICENSE-MIT files and to be able to run on an Android API level beneath 26, you should enable core library desugaring and update packing options. To do this, update your Android file as follows:
android {
    // this part will enable core library desugaing
    compileOptions {
        coreLibraryDesugaringEnabled true
    }

    // this part will remove excess LICENSE-MIT files
    packagingOptions {
        resources {
            pickFirsts += ['META-INF/LICENSE-MIT']
        }
    }
}

dependencies {
    // Add to your projects `build.gradle`.
    // We are currently using following version of desuga libraries
    coreLibraryDesugaring "com.android.tools:desugar_jdk_libs:2.0.4"
}
Additional configuration for Expo
In your app.json file, you need to add the following configuration for the expo-build-properties
{
  "expo": {
    "plugins": [
      [
        "expo-build-properties",
        {
          "android": {
            "compileSdkVersion": 33,
            "targetSdkVersion": 33,
            "buildToolsVersion": "33.0.0",
            "packagingOptions": {
              "exclude": ["META-INF/LICENSE-MIT"]
            }
          },
          "ios": {
            "deploymentTarget": "14.0"
          }
        }
      ]
    ]
  }
}
The React Native SDK is a wrapper around a native mobile TrueLayer Payments SDK. It is not possible to use it with Expo for web.
It's also not possible to use the SDK within the Expo Go app. To test the SDK, you must build the Android and iOS apps. You can do that by running the following commands:
For Android:
npx expo prebuild
npx expo run:android
For iOS:
npx expo prebuild
npx expo run:ios
2. Import the SDK and configure environments
Once you've installed the SDK, the next step is to import the React Native SDK. Here's an example:
import {
  TrueLayerPaymentsSDKWrapper,
  Environment,
  PaymentUseCase,
  ResultType,
} from "rn-truelayer-payments-sdk";
You can then configure your SDK to work in either the sandbox or production environment by using Environment.Sandbox or Environment.Production respectively:
TrueLayerPaymentsSDKWrapper.configure(Environment.Sandbox).then(
  () => {
    console.log("Configure success");
  },
  (reason) => {
    console.log("Configure failed " + reason);
  }
);
3. Process and check mandates
Once you've installed and configured the React Native SDK, you can process a VRP mandate. In order to do this, you must have created a mandate and have its id.
In this section, learn how to:
Process a mandate
Before you can process a mandate, you must first make a successful POST request to the /v3/mandates endpoint. After that, you can process the mandate:
TrueLayerPaymentsSDKWrapper.processMandate({
  mandateId: "", // Your mandate ID,
  resourceToken: "", // Your mandate token,
  redirectUri: "", // Your redirect URI,
},
// Optional mandate preferences
{
	shouldPresentResultScreen: true, // Whether to display the mandate result screen.
  preferredCounryCode: GB // The IOS 3166-2 country code, which determines the banks displayed.
}).then((result) => {
  switch (result.type) {
    case ResultType.Success:
      console.log(`processMandate success at step: ${result.step}`);
      break;
    case ResultType.Failure:
      console.log(`processMandate failure reason: ${result.reason}`);
      break;
  }
});
The mandatory parameters in MandateContext are:
mandateId: The mandateidreceived after you created the mandate.resourceToken: Theresource_tokenreceived after you created the mandate.redirectUri: Where the user should be redirected to after the authorization flow is completed outside of your app (bank website, HPP). This is usually your app's redirect URI, which you should add in Console,
The optional parameters in MandatePreferences are:
shouldPresentResultScreen: A Boolean parameter that determines whether the mandate result screen displays.preferredCountryCode: You can use this with a two-character country code to specify which country to display banking providers for.
If the code is invalid, or the country has no providers, the value defaults to the user's browser locale.
Handle redirects in the authorisation flow
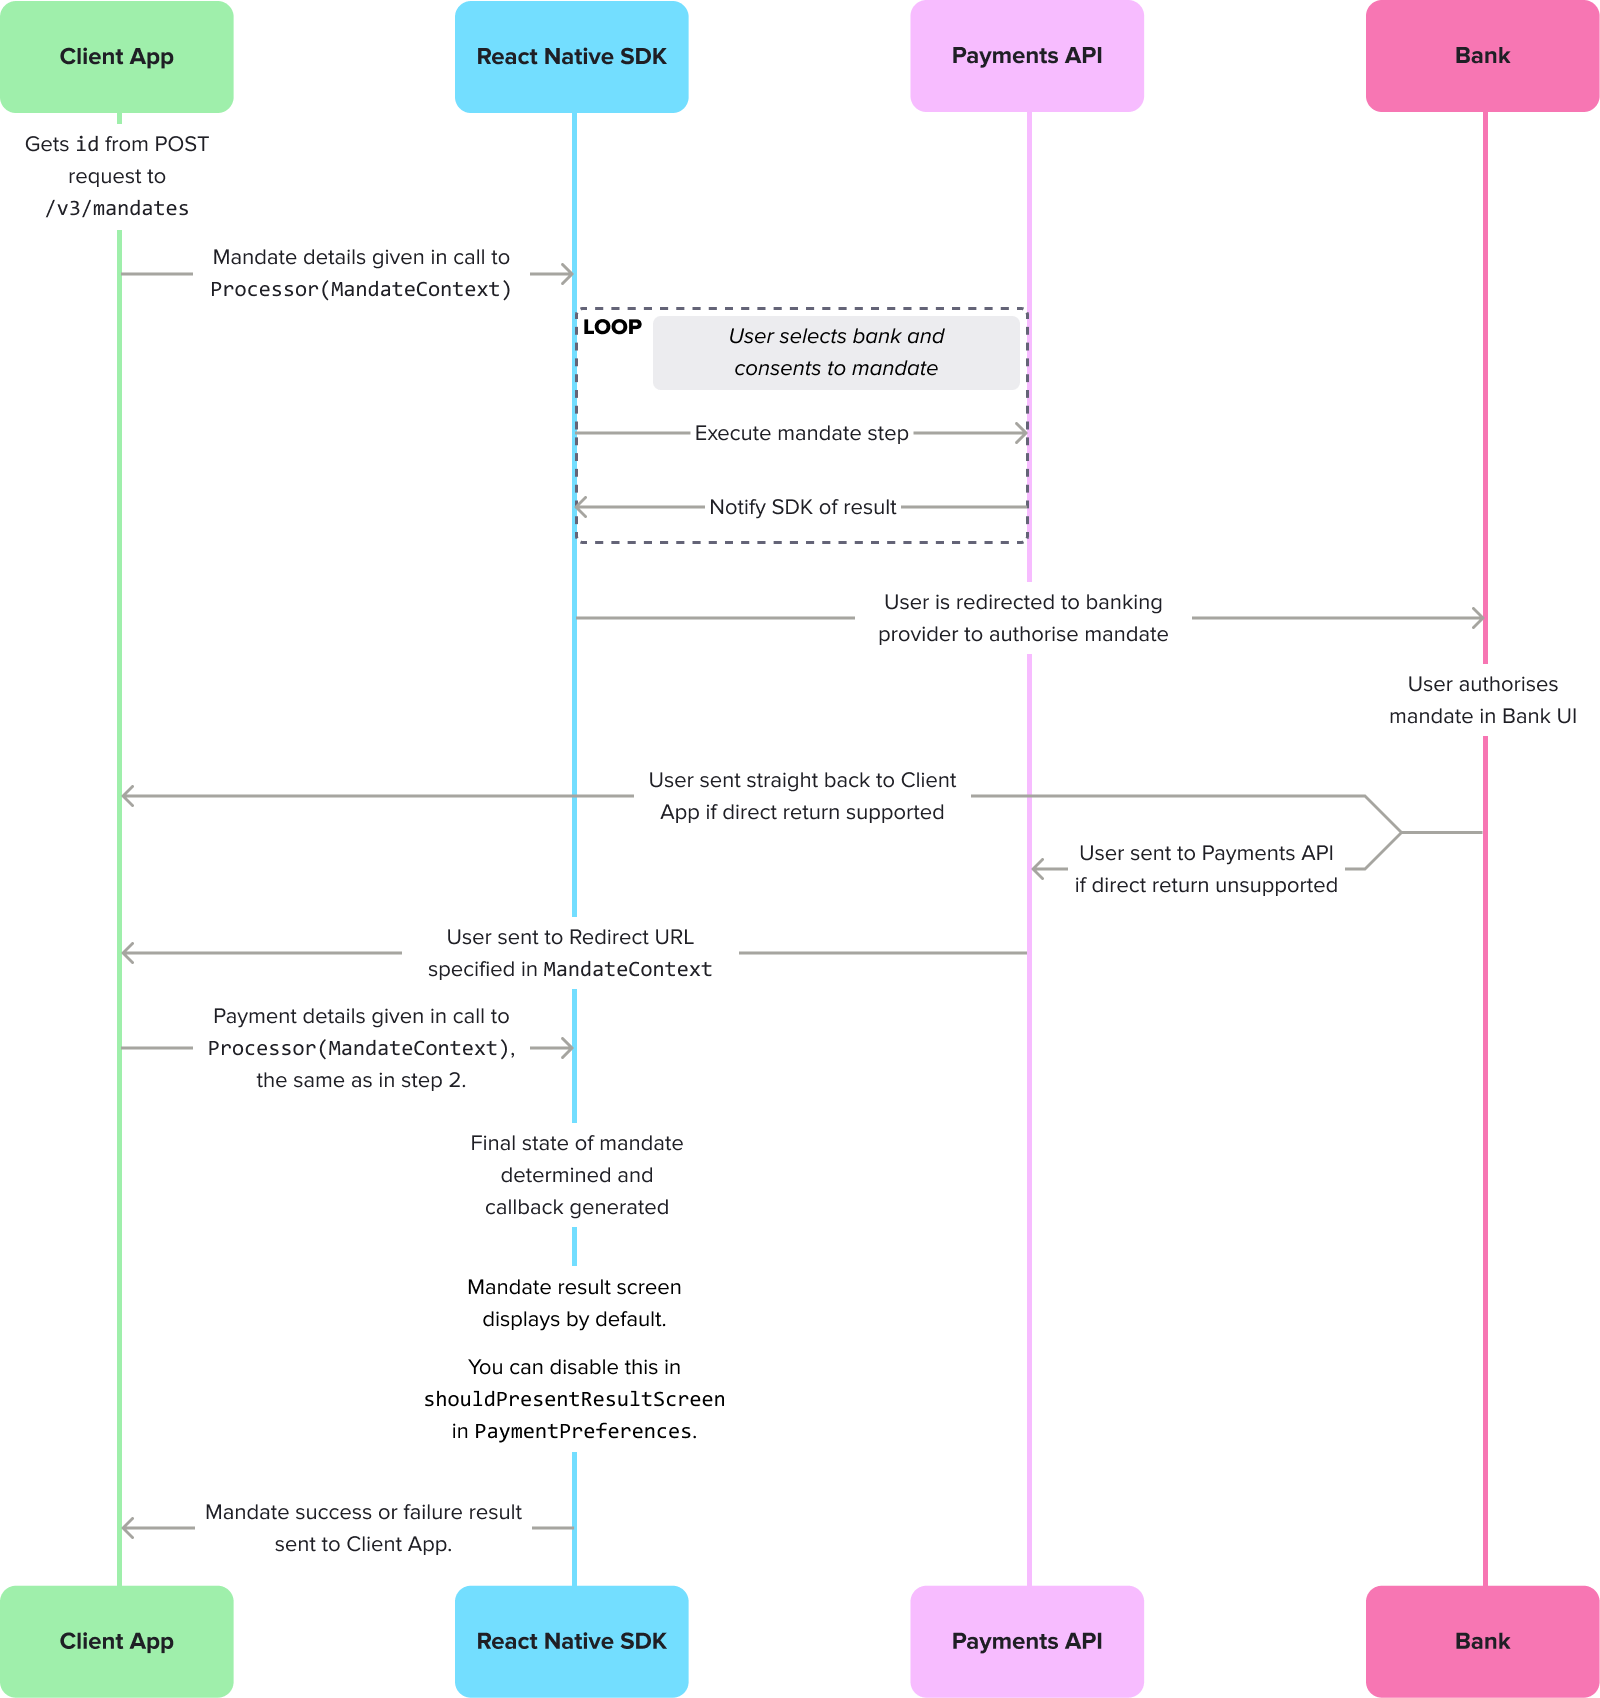
The flow for mandate authorisation through the React Native SDK, highlighting how the SDK is reinvoked after the user is returned to the Client App.
At the end of a redirect flow the bank app relaunches your app with the redirect URI you specified in Console.
In your activity that launches when a deep link is triggered, you can fetch the redirect parameters from the url which will include the mandate_id.
Whenever you are redirected to your app, you should reinvoke the SDK, until you receive a success or error callback.
By default the SDK offers a mandate result screen, which displays the result of the mandate and advises the user on what to do in case of a failed mandate. If you disable the mandate result screen, you can use the success or error callback to render a screen for your user when they return to your app.
Check mandate status
The React Native SDK offers the following method to check the status of a mandate. You should consider this the best source of truth for the mandate's status.
TrueLayerPaymentsSDKWrapper.mandateStatus({
  mandateId: "", // Your mandate identifier,
  resourceToken: "", // Your mandate resource token,
}).then((result) => {
  switch (result.type) {
    case ResultType.Success:
      console.log(`mandateStatus success: ${result.status}`);
      break;
    case ResultType.Failure:
      console.log(
        `mandateStatus failed with the following reason: ${result.failure}`
      );
      break;
  }
});
This is a list of the different mandate statuses the SDK can return. Learn more about mandate statuses.
PaymentStatus | Description |
|---|---|
AuthorizationRequired | The mandate requires authorisation. |
Authorizing | The user is authorizing the mandate. |
Authorized | The user has authorised the mandate with their bank. |
Revoked | The user revoked the mandate and it's no longer valid. |
Failed | The mandate failed. This can be due to various reasons. |
4. Handle the ProcessorResult
ProcessorResultThe processMandate method in the React Native SDK returns a ProcessorResult type.
Success cases
ProcessorResult.PaymentStep contains different success results that are part of the mandate flow (it isn't called MandateStep).
PaymentStep | Description |
|---|---|
Executed | The bank confirmed the mandate. |
Authorized | The user authorised the mandate with the bank. |
Redirect | The user has been redirected to the bank to authorise the mandate. |
Settled | The funds have reached the destination. |
Wait | The SDK flow is complete, but a decoupled authorisation action is still pending with the user and/or the bank. |
Failure cases
ProcessorResult.FailureReason contains the reason why a mandate failed. These reasons are shared across payments and mandates.
Expand to see all mandate failure callbacks
FailureReason | Description |
|---|---|
ProcessorContextNotAvailable | The context provided to the SDK is invalid. |
NoInternet | There was an issue while connecting to the internet. Either the user is offline, or the request timed out. |
CommunicationIssue | There was an issue communicating with the server. |
ConnectionSecurityIssue | The token used to make the payment or mandate is not authorized to undergo such an operation. |
PaymentFailed | The payment or mandate is in a failed state. Click here for more information: payments or mandates. |
WaitAbandoned | The user abandoned the payment on the wait screen. |
Unknown | The SDK encountered an unexpected behaviour. |
UserAborted | The user cancelled the payment or mandate. |
ProviderOffline | The pre-selected provider was offline. |
InvalidRedirectURI | The redirect URI passed to the SDK is invalid. |
Blocked | The payment has been blocked due to a regulatory requirement. This may happen if the PSU fails a sanctions check. |
InvalidAccountDetails | The payment failed because either the creditor's or debtor's account details were invalid. |
InvalidAccountHolderName | The payment failed because the account holder's name details were invalid. |
InvalidCredentials | The banking credentials provided by the PSU to log into their bank were incorrect. |
InvalidRemitterAccount | The account details of the remitter bank account provided during the payment flow were incorrect. |
InvalidRequest | The payment failed due to invalid data in the request. |
InvalidSortCode | The payment failed due to an invalid sort code being provided. |
InsufficientFunds | The PSU did not have the required balance in their account to complete this payment. |
PaymentLimitExceeded | The PSU's payment limit amount with their bank was breached. |
ProviderError | The provider has unexpectedly failed when creating the payment. |
ProviderExpired | The payment failed because the token or exchange code used to communicate with the bank expired. |
ProviderRejected | The provider rejected the payment. |
UserCanceledAtProvider | The payment failed because either the creditor's or debtor's account details were invalid. |
Display the mandate result screen
The mandate result screen is enabled by default. To display it to your user after the mandate is authorised (or fails) you must relaunch the SDK using the same MandateContext you used when you first processed the mandate.
Possible mandate results and callbacks
When your user sees the mandate result screen, you receive a ResultShown callback. This applies for both successful and failed mandates, and contains the following properties, which explain the result the user saw:
List of mandate result callbacks
ResultShown property | Description |
|---|---|
None | No result screen was shown because it's either been opted out by the client or the user has been redirected. |
Initiated | The payment did not reach a final state and the user was shown the "Payment in progress" screen. |
Success | The payment was completed successfully. |
UserCanceledAtProvider | The payment failed due to the user cancelling at the provider. |
AuthorizationFailed | The payment failed due to authorization failure. |
Expired | The payment failed due to expiring. |
InvalidAccountDetails | The payment failed due to the invalid account details. |
InvalidGenericWithoutRetry | The payment failed and retry is not possible. |
Failed | The payment failed to be set up. |
PrismaPrisma is the TrueLayer design system. Go to the Prisma site for everything you need to create seamless payment flows for the best user experience.
You'll find research-backed UX patterns, assets eg bank logos for authorisation screens, and comprehensive brand and checkout guidelines, all designed to reduce friction and boost conversion rates.
Example flows for every TrueLayer UI are available on request, with options tailored to your specific vertical.